Alibaba Cloud Full Stack (12): End-to-End — One Terraform Apply for Everything
The grand finale: codify everything from Parts 1-11 into Terraform modules. VPC, ECS, RDS, OSS, RAM, SLS, Function Compute — all provisioned with one terraform apply. Plus CI/CD with GitHub Actions and cost optimization.
Eleven articles. Dozens of CLI commands. Hundreds of manual steps. Now we throw all of that away and rebuild the entire stack with a single terraform apply. This is why infrastructure-as-code exists.
Over the past eleven parts of this series, we have clicked through consoles, typed aliyun CLI commands, and manually configured everything from VPCs to Function Compute triggers. It worked. We learned every resource intimately because we built each one by hand. But if I asked you right now to recreate that entire stack in a new region — the VPC with its three tiers and two availability zones, the ECS instance with its cloud-init script, the RDS MySQL HA setup, the OSS bucket with lifecycle rules, the RAM policies, the SLS log pipeline, the Function Compute event processing — you would need at least a full day of careful work. And you would inevitably miss something. A security group rule. A backup policy. A CORS configuration.
Infrastructure-as-code eliminates that problem entirely. You describe what you want in declarative configuration files, and the tool figures out how to get there. The entire stack we built across eleven articles becomes a single repository of .tf files that anyone on your team can read, review, modify, and apply.
This is the grand finale. We will take everything from Parts 1 through 11 and encode it into Terraform modules. By the end of this article, you will have a complete, production-grade Terraform project that provisions your entire Alibaba Cloud infrastructure with one command.
If you’re reading the twelfth article in this series, you probably don’t need to be convinced. But let me lay out the case precisely, as these are the arguments you’ll use to convince your team to invest the time.
Stage 1: Manual (console clicks). You click through the web console. It works for one person managing a few resources. It falls apart when you need to recreate something, explain what you did, or hand the environment to a teammate.
Stage 2: Scripts (CLI commands). You write shell scripts that call aliyun ecs CreateInstance and similar commands. Better than clicking, but the scripts are imperative — they describe the steps, not the desired end state. If you run the script twice, it either fails (resource already exists) or creates duplicates. You end up writing increasingly complex logic to handle idempotency, and you have reinvented a bad version of Terraform.
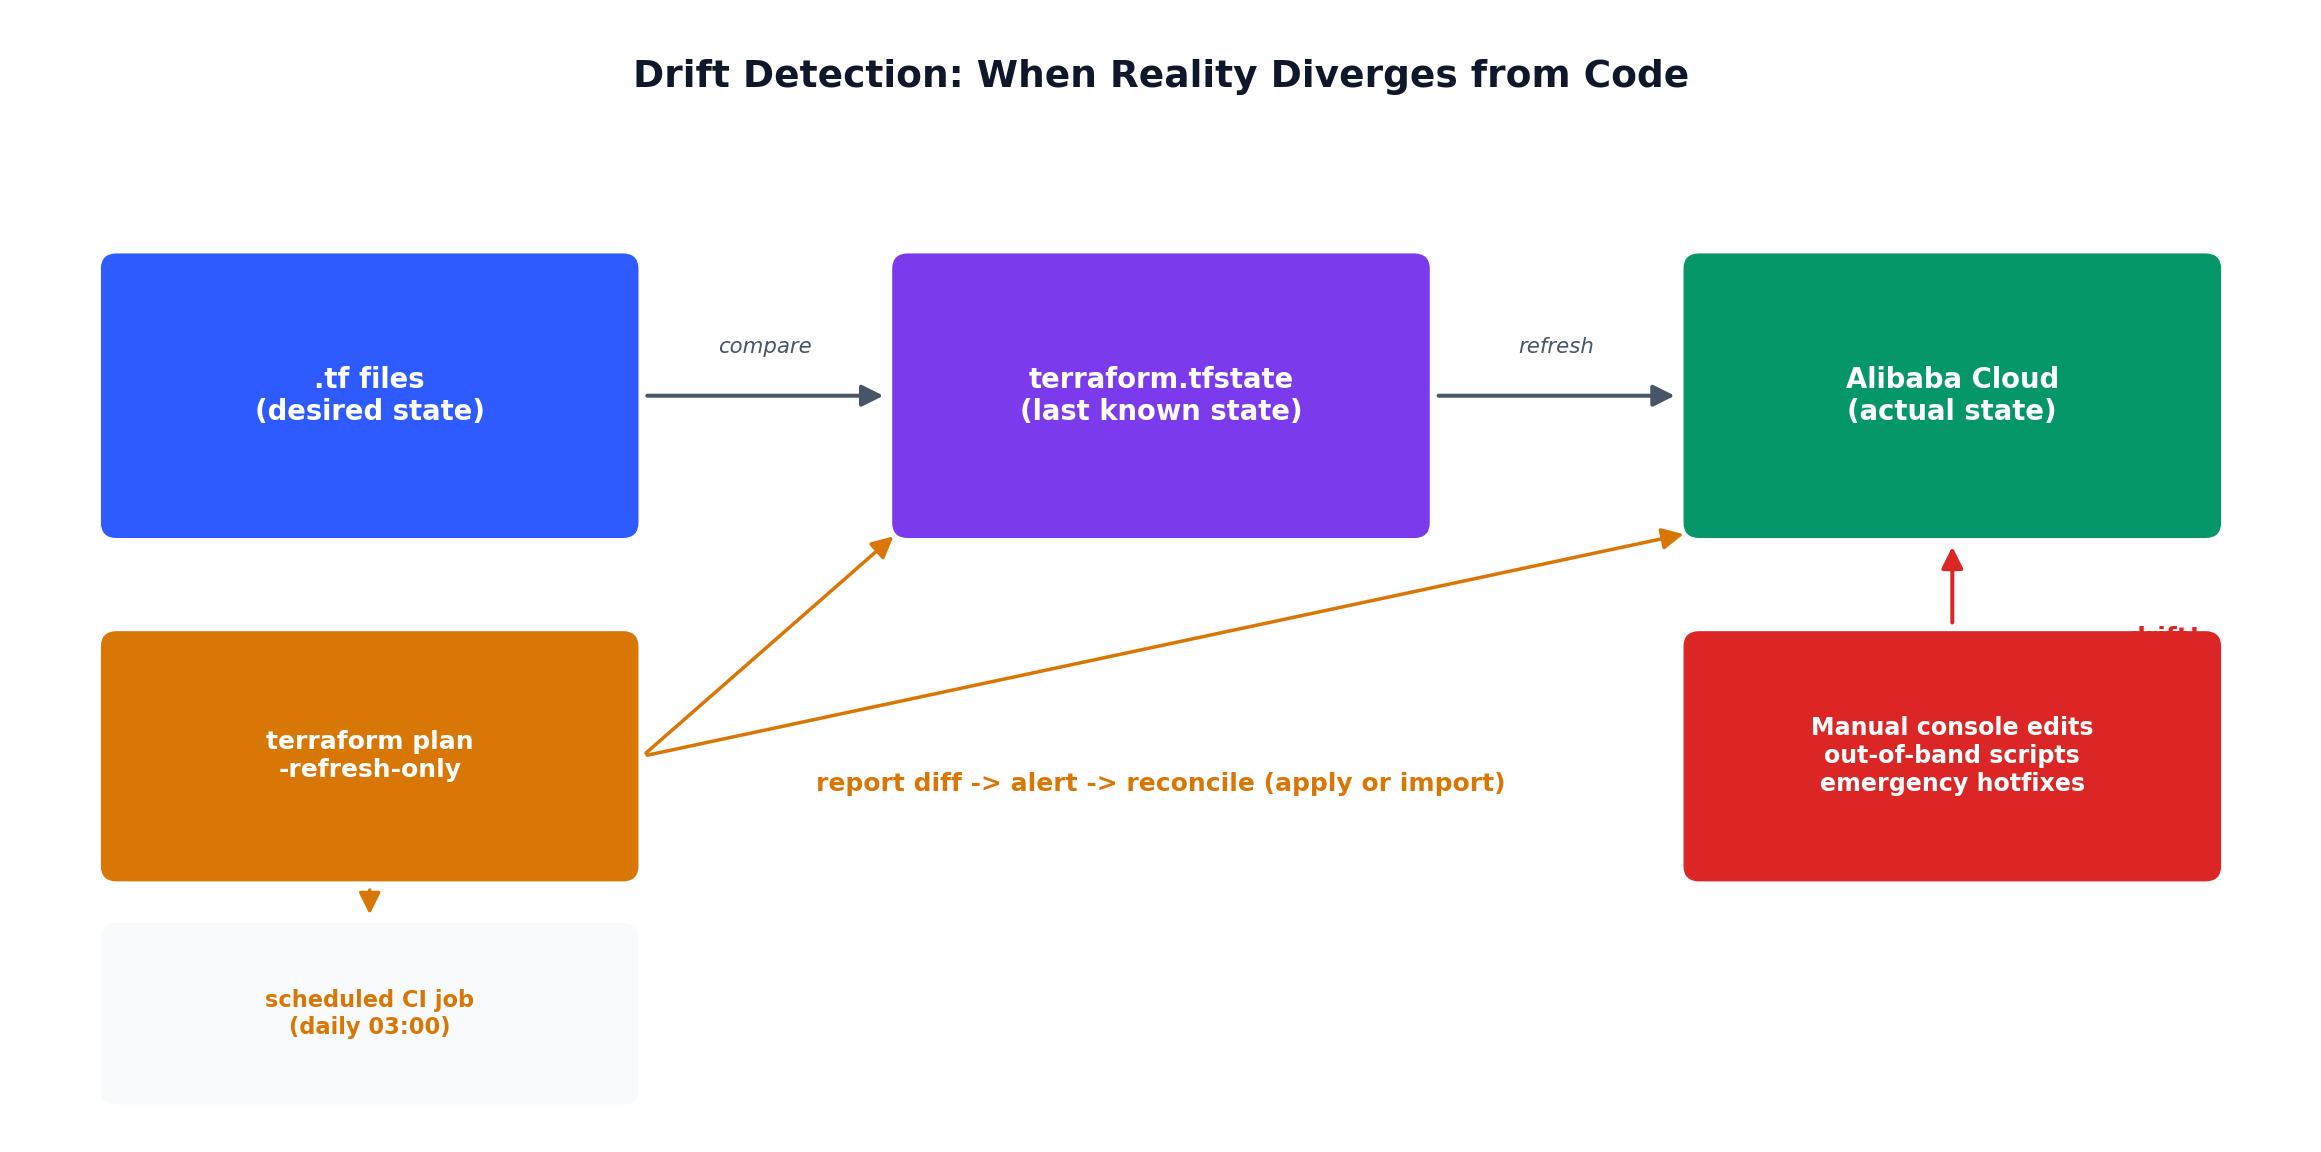
Stage 3: Infrastructure as Code (declarative). You describe the desired state: “I want a VPC with CIDR 10.0.0.0/16 and three VSwitches.” The tool compares the desired state to the actual state and figures out the minimum set of API calls to reconcile them. Run it once, run it a hundred times — the result is the same.
Alibaba Cloud has its own IaC service: Resource Orchestration Service (ROS). It uses JSON or YAML templates and is tightly integrated with the Alibaba Cloud console. It’s free. So why do I recommend Terraform instead?
Criteria
Terraform
ROS
Multi-cloud
Yes — AWS, Azure, GCP, 3000+ providers
Alibaba Cloud only
State management
Local or remote (S3, OSS, Consul, etc.)
Managed by ROS service
Community
Massive — modules, examples, Stack Overflow
Small, mostly Chinese-language
Language
HCL (purpose-built, readable)
JSON/YAML (verbose, error-prone)
Module ecosystem
Terraform Registry with thousands of modules
Limited
Learning investment
Transferable to any cloud
Alibaba-specific
Drift detection
terraform plan shows exact diff
Limited drift detection
Import existing resources
terraform import
Supported but less mature
ROS is fine if your entire world is Alibaba Cloud and you want zero additional tooling. But if you work across clouds, value community support, or want skills that transfer to your next job, Terraform is the clear choice. The Alibaba Cloud Terraform provider (alicloud) is actively maintained and covers effectively every service we have used in this series.
For a much deeper treatment of Terraform itself, see our Terraform series
— eight articles covering every aspect from first principles to advanced patterns. This article assumes you know the basics and focuses on applying Terraform to the specific Alibaba Cloud stack we have built.
For LLM and ML deployment covered in Part 10
and Part 11
, Terraform support is more limited — DashScope and PAI model deployment are typically done through their own SDKs. We will note where Terraform coverage ends.
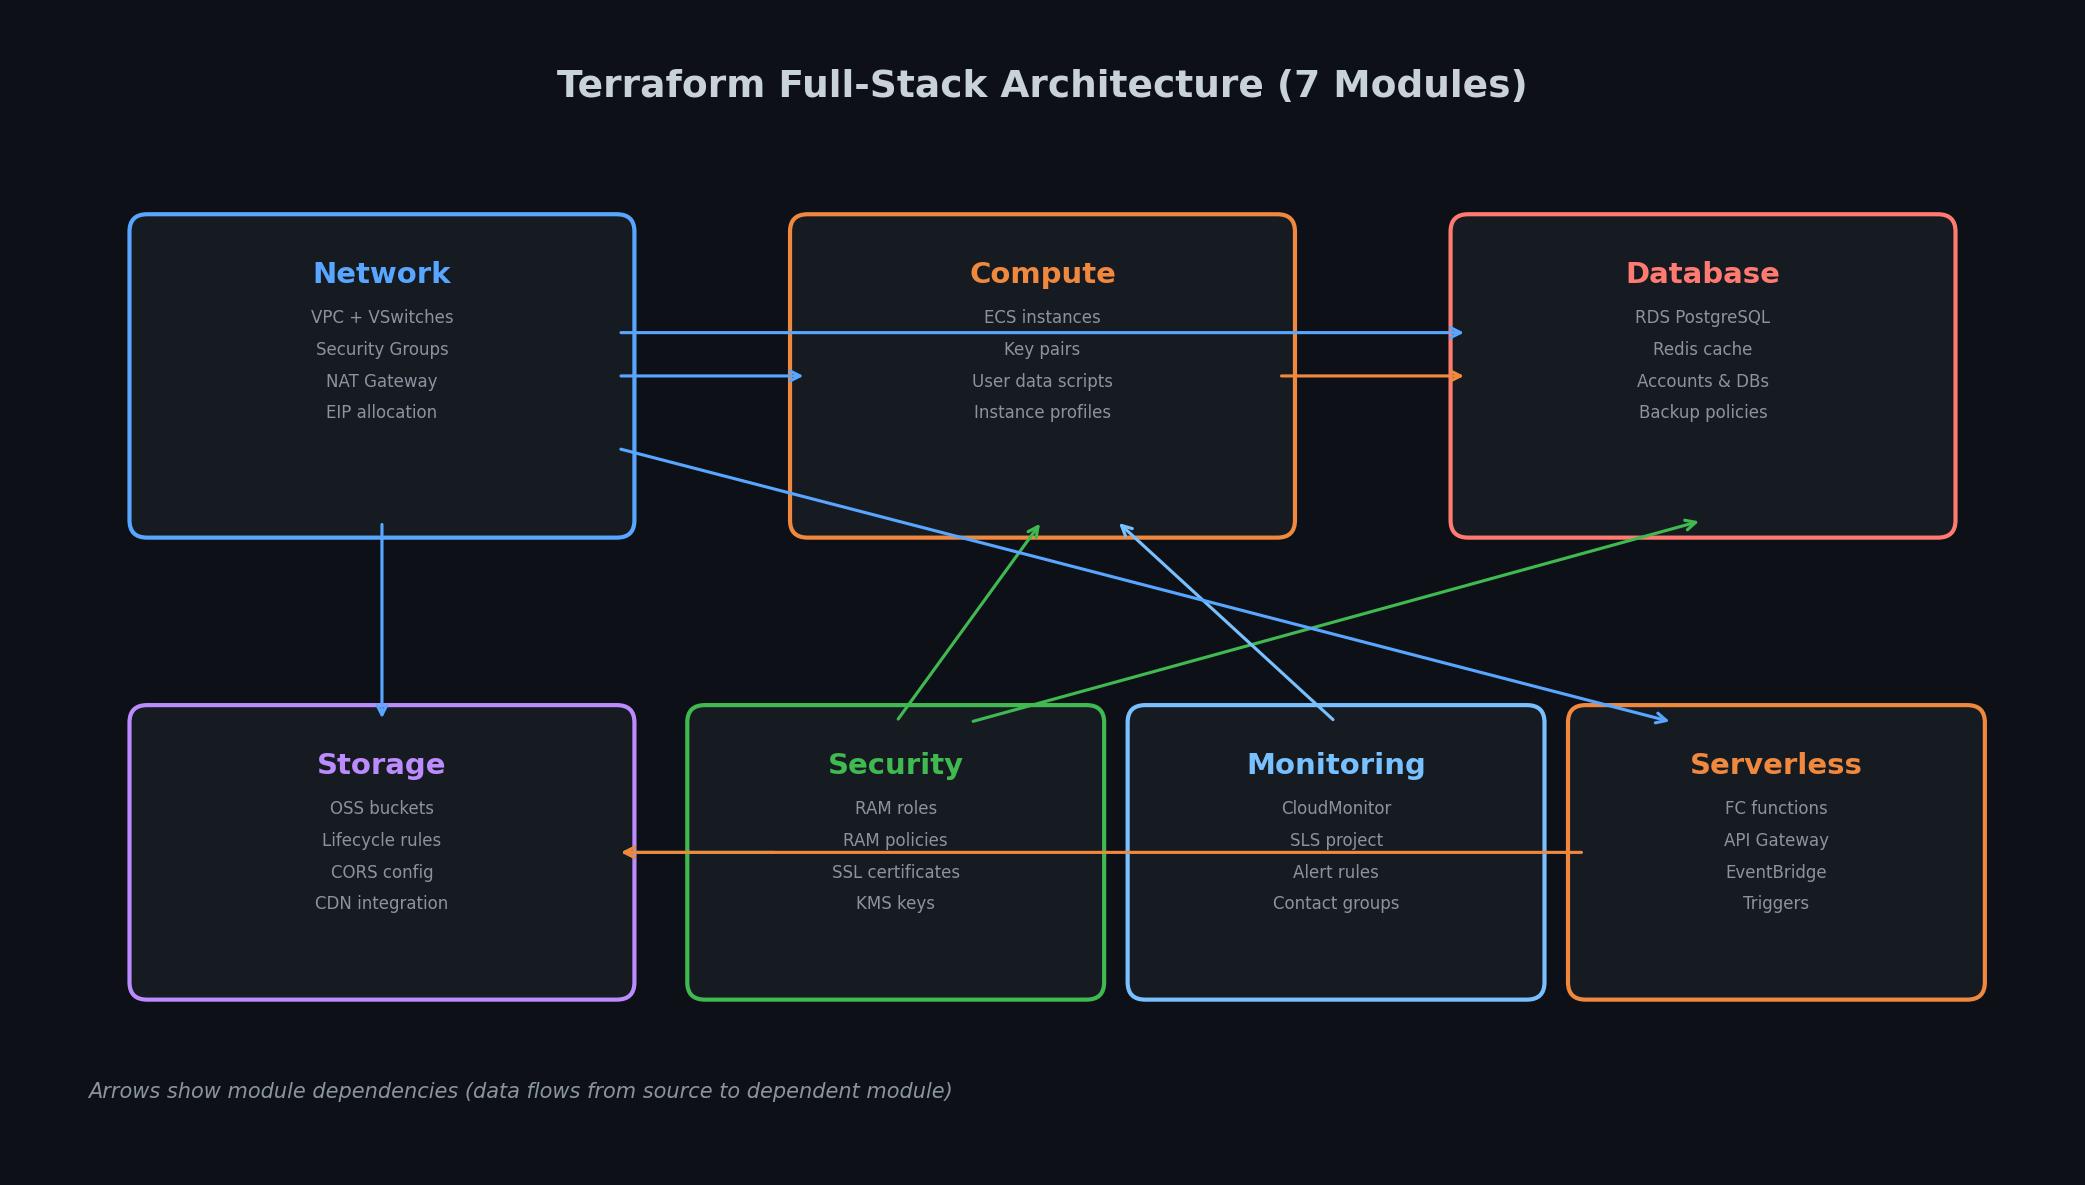
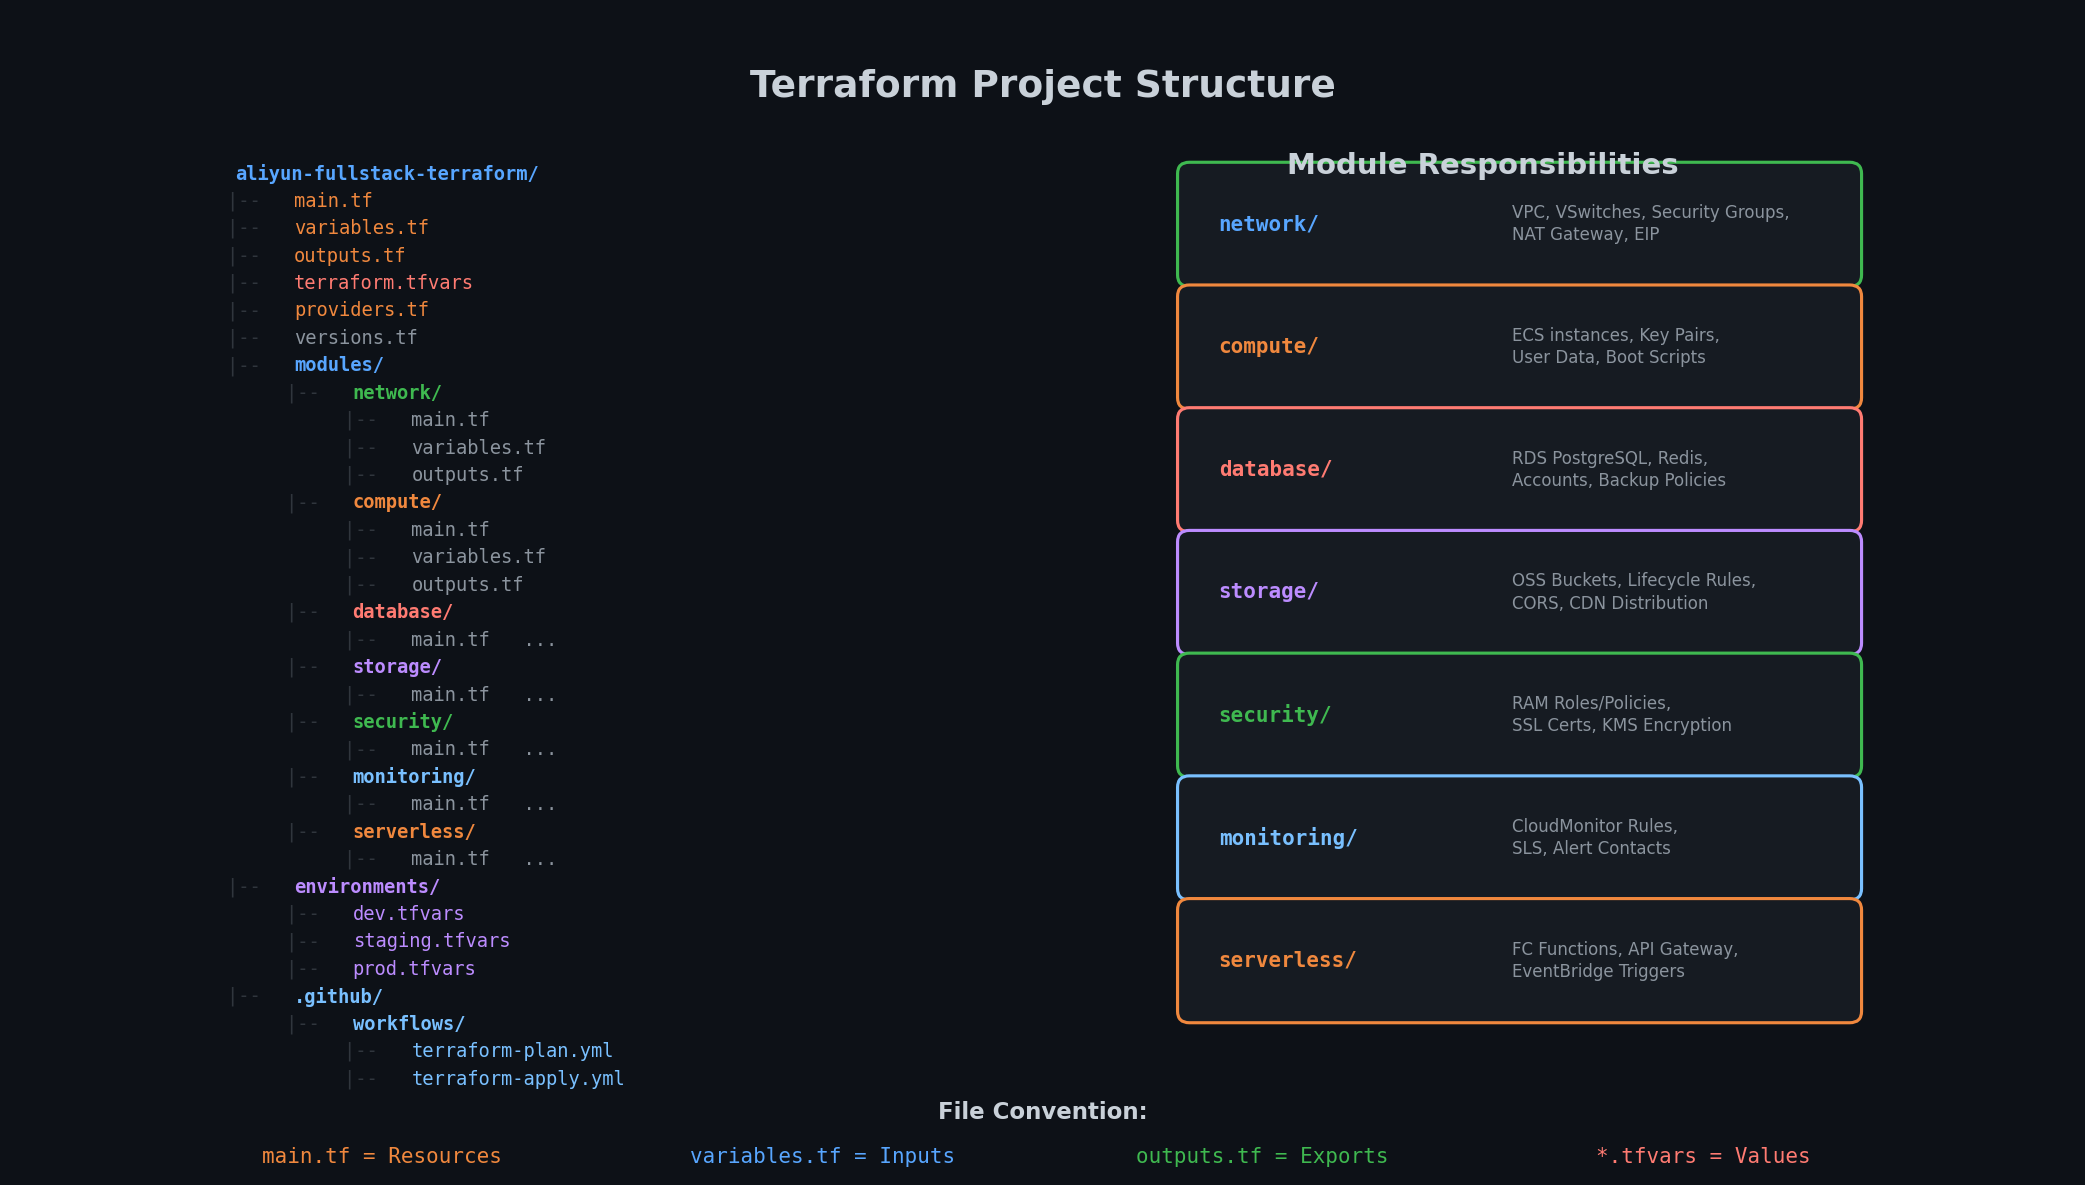
A well-organized Terraform project is the difference between a codebase your team maintains for years and one that becomes a “don’t touch it, it works” liability within months. Here is the structure:
One root module, many child modules. Each child module is self-contained and reusable. You can use modules/network in a different project without dragging along the database module.
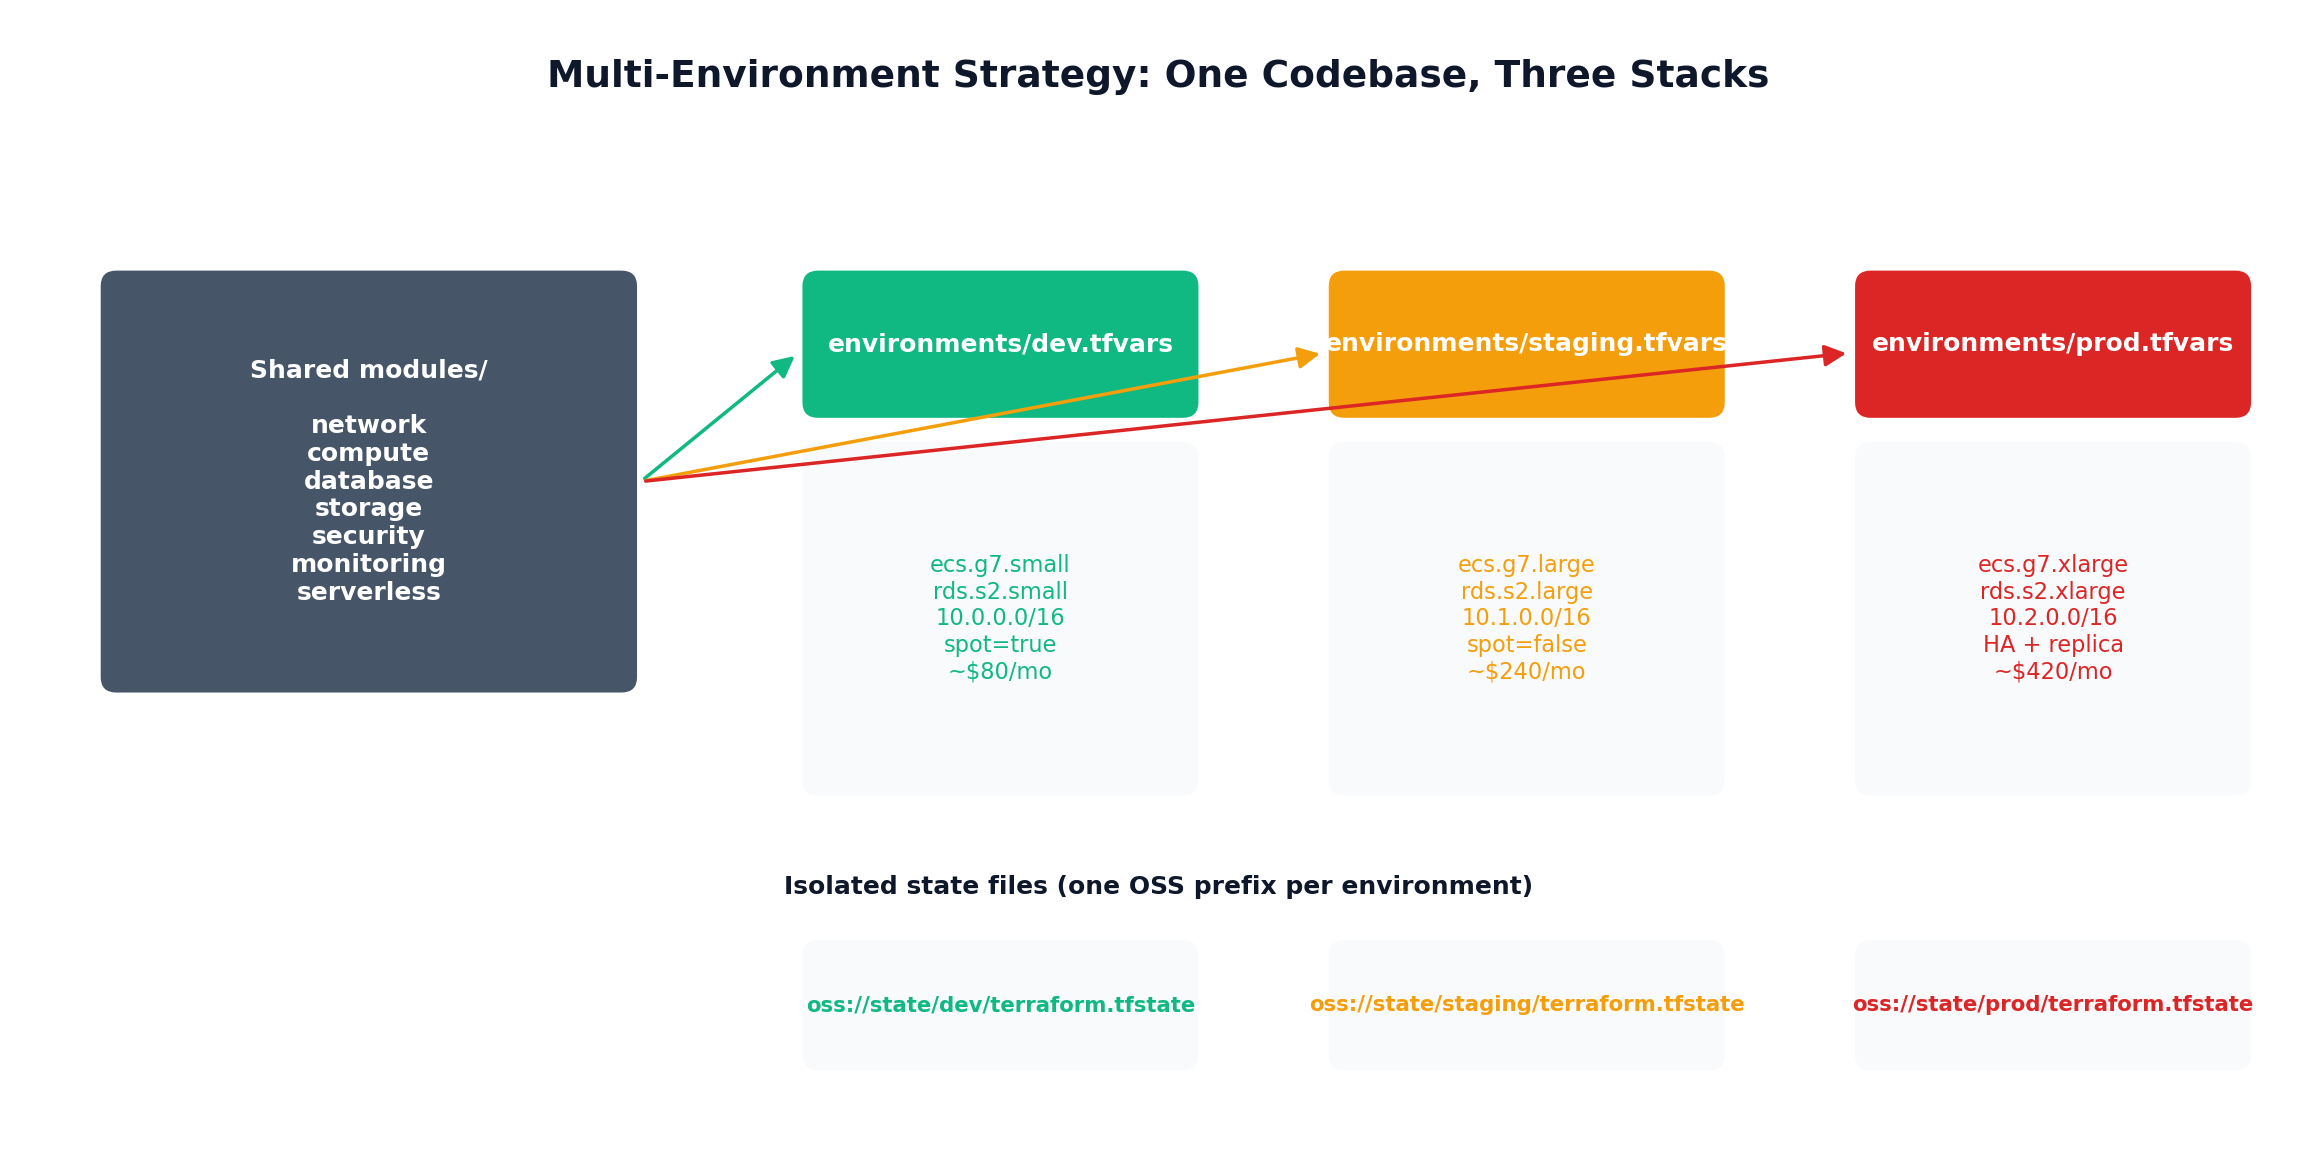
Environment separation via .tfvars files. Not separate directories, not workspaces (which share state backends and cause accidents). Just different variable files: terraform apply -var-file=environments/prod.tfvars.
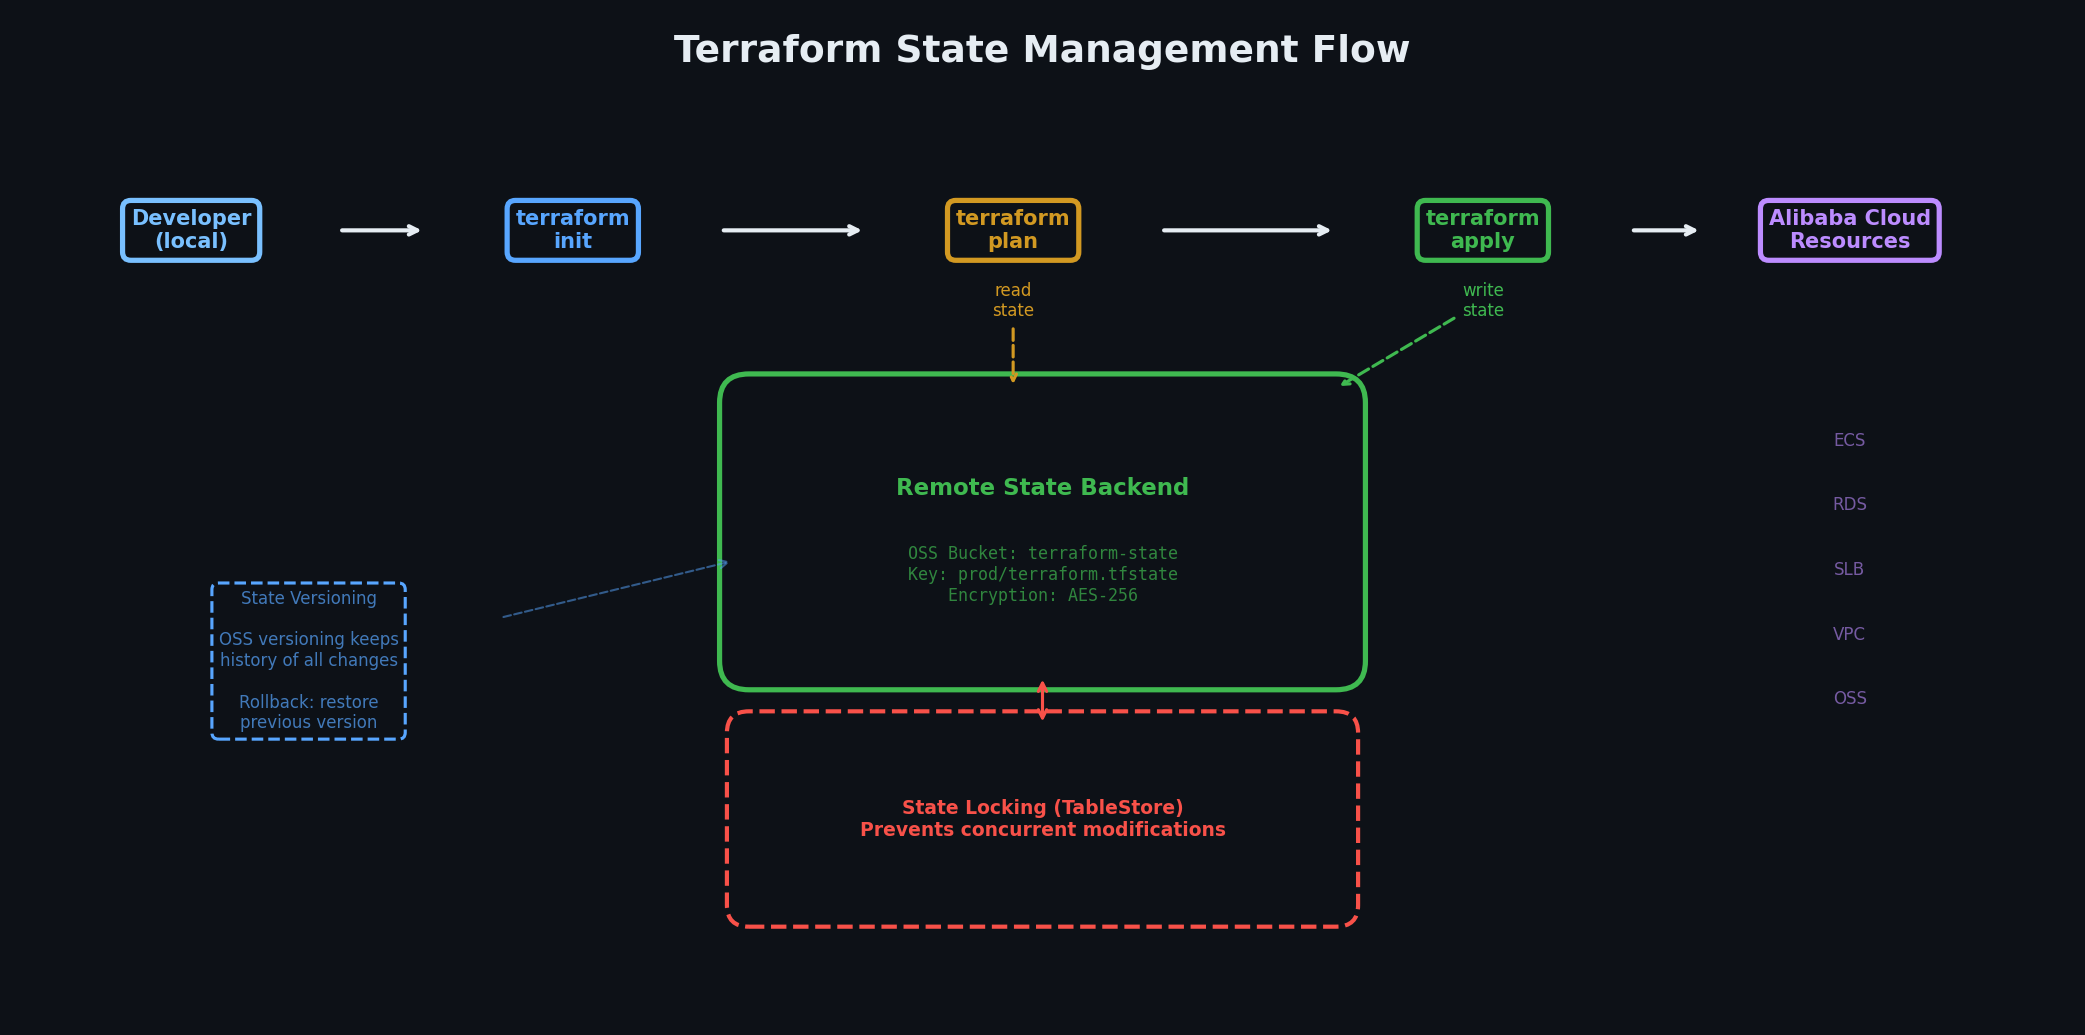
State per environment. Each environment gets its own state file in a separate OSS path. We configure this in the backend.
Secrets stay out of version control.terraform.tfvars is gitignored. terraform.tfvars.example shows the structure without values.
Pin the provider version. The alicloud provider is updated frequently and breaking changes happen. The ~> constraint allows patch updates (1.230.x) but not minor version bumps.
Never hardcode credentials in the provider block. In practice, you would use environment variables (ALICLOUD_ACCESS_KEY, ALICLOUD_SECRET_KEY) or an Alibaba Cloud credentials file. We use variables here for explicitness.
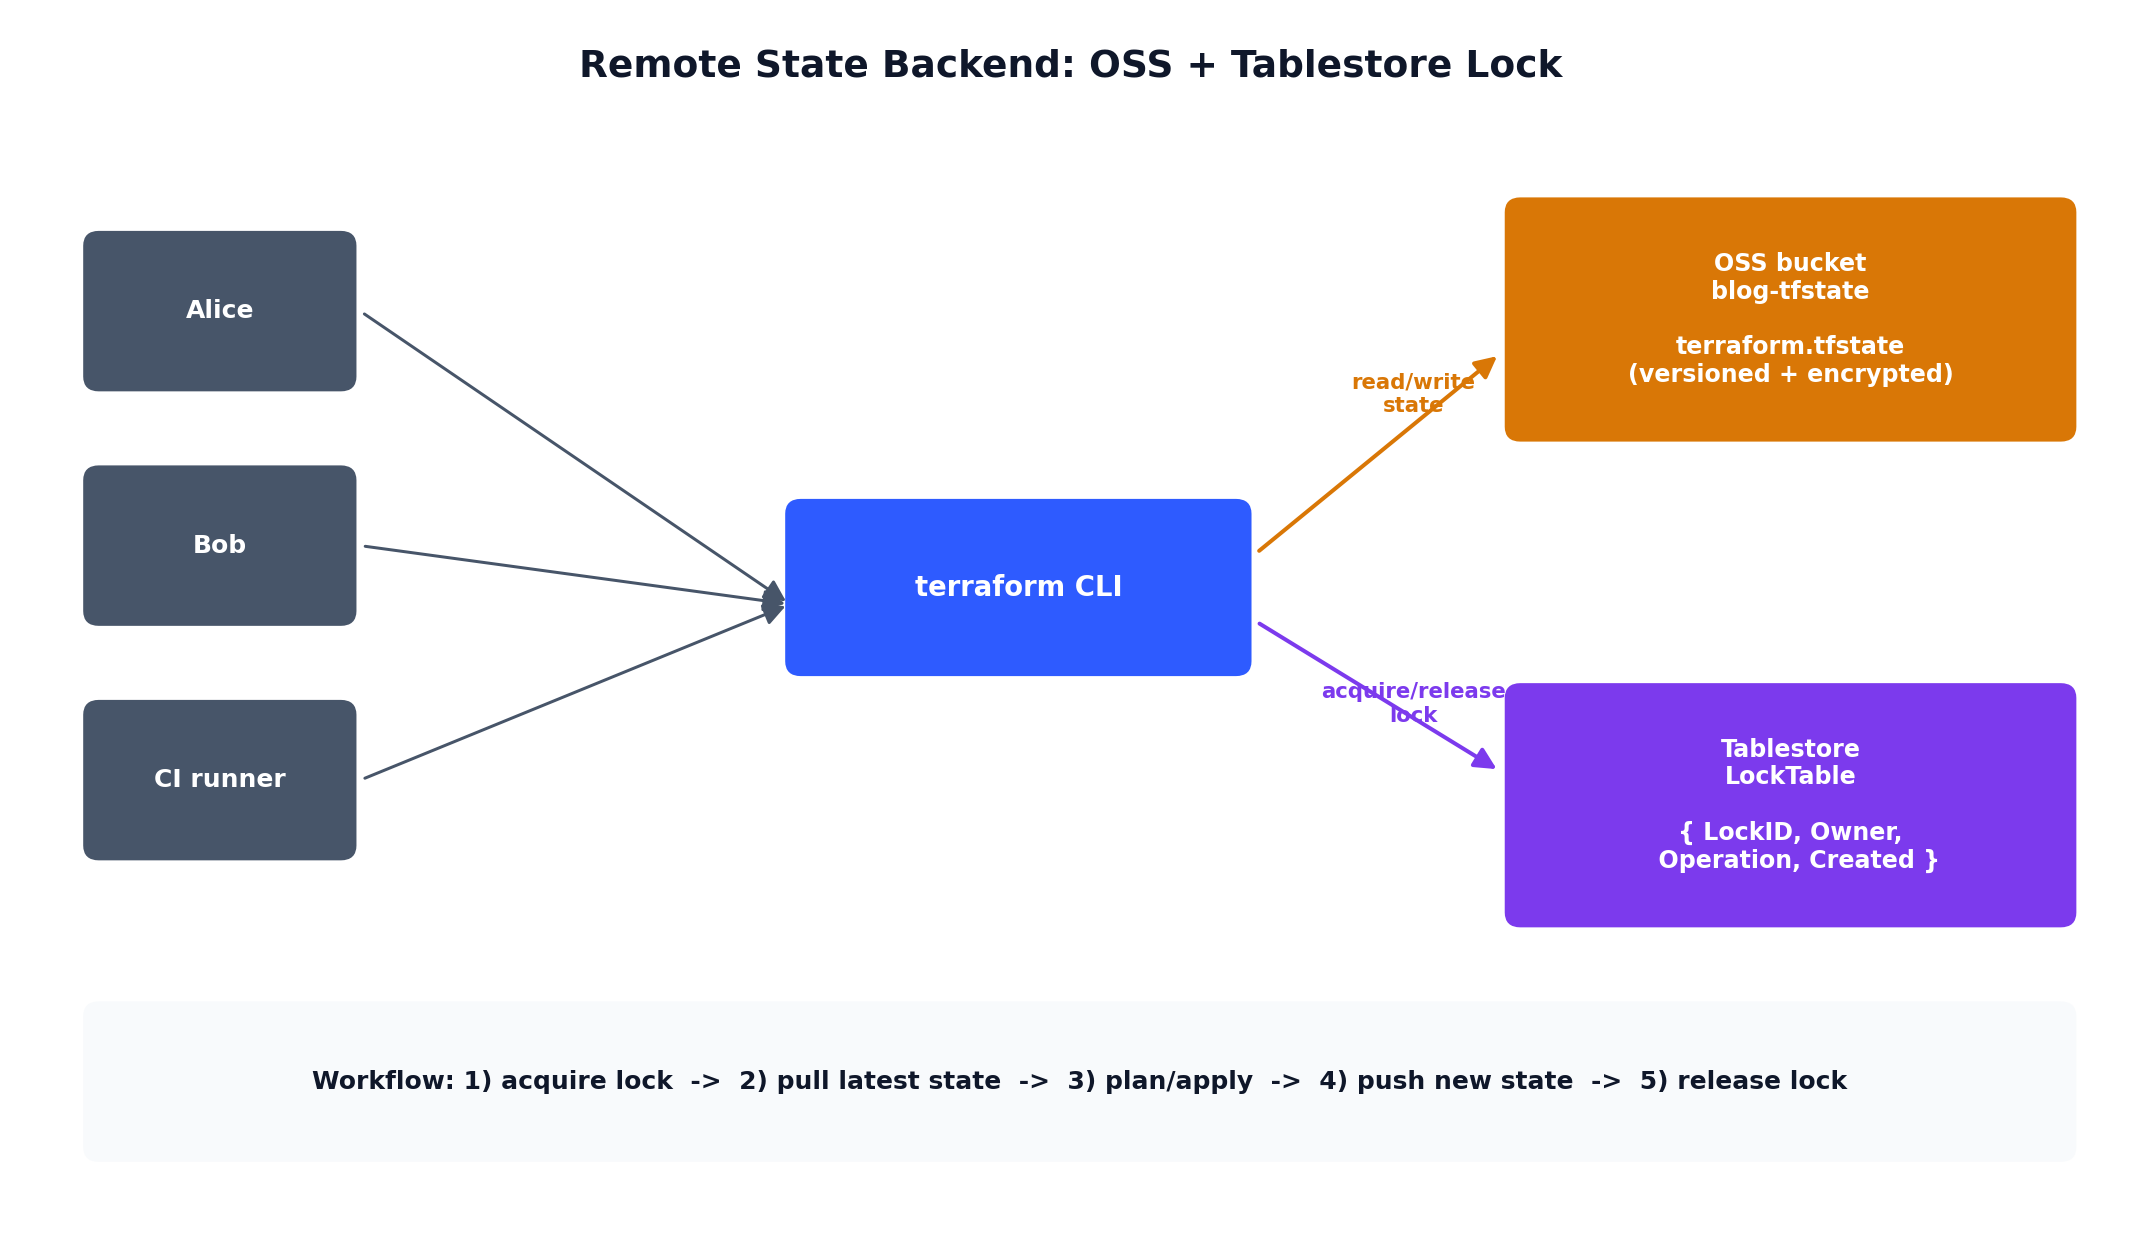
Remote state in OSS with locking via TableStore. This is critical for team environments — without locking, two people running terraform apply simultaneously will corrupt the state file. TableStore provides a distributed lock that prevents concurrent state modifications.
To create the state bucket and lock table (a one-time bootstrap step):
1
2
3
4
5
6
7
8
9
10
11
# Create the state bucketaliyun oss mb oss://my-terraform-state --region cn-hangzhou
# Enable versioning (so you can recover from state corruption)aliyun oss bucket-versioning --method put oss://my-terraform-state --versioning-configuration '{"Status":"Enabled"}'# Create the TableStore instance and lock tablealiyun ots create-instance --instance-name terraform-lock --region cn-hangzhou
aliyun ots create-table \
--instance-name terraform-lock \
--table-meta '{"TableName":"terraform_lock","PrimaryKey":[{"Name":"LockID","Type":"STRING"}]}'
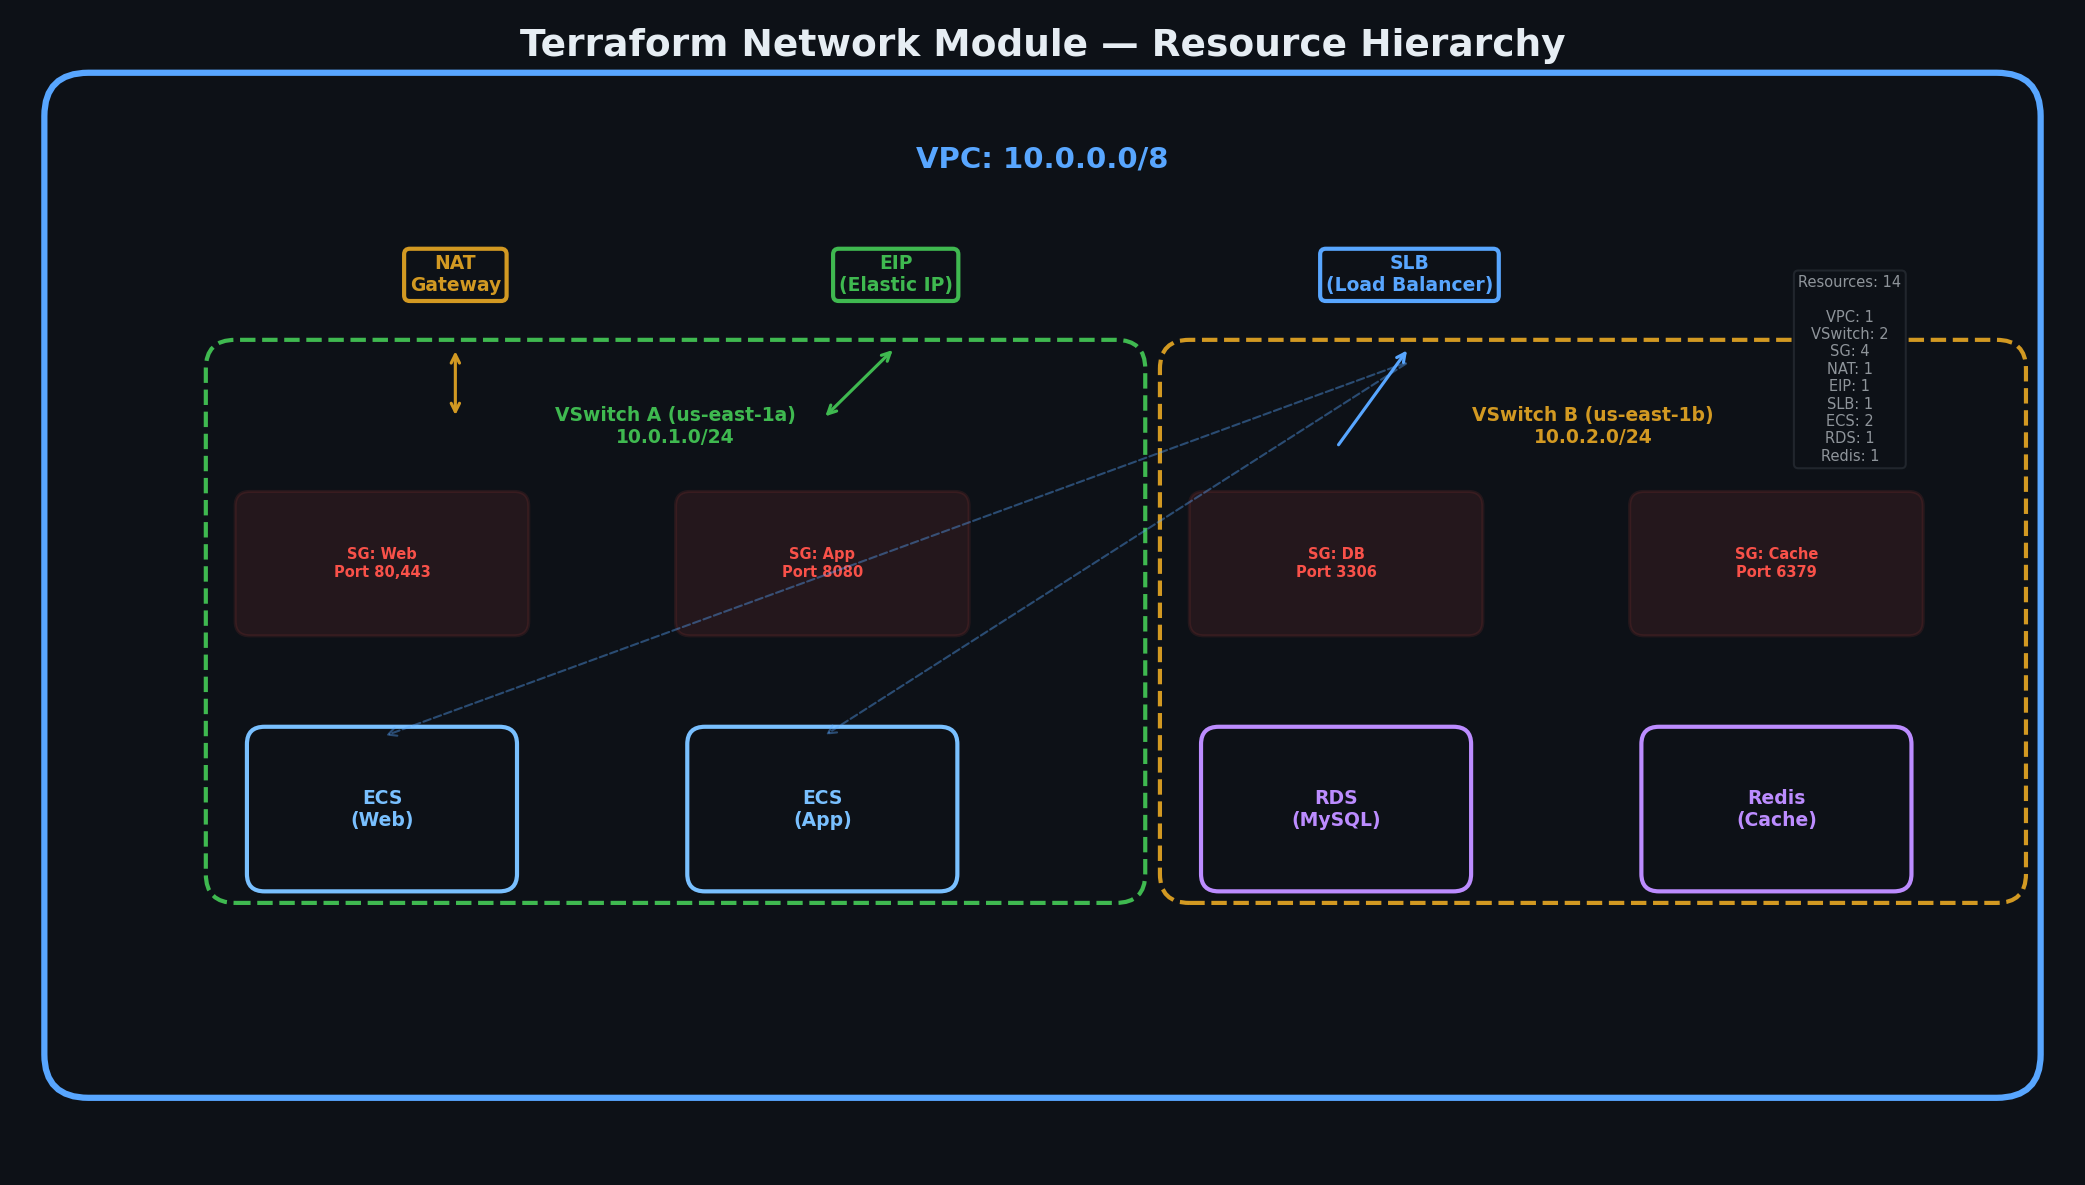
The network module provisions the VPC architecture from Part 3
— a 3-tier, 2-AZ layout with security groups, a NAT Gateway for outbound traffic, and an EIP for public access.
Notice the security group rules. SSH is only allowed from within the VPC (10.0.0.0/16), not from the public internet. The app port (8080) is only accessible from the public subnet. MySQL is only accessible from the app subnets. This is the three-tier isolation we designed in Part 3
, now codified and repeatable.
SLS (Simple Log Service) project and logstore for centralized logging, plus CloudMonitor alert rules. This codifies the observability layer from Part 7
.
Function Compute service with an OSS trigger — exactly what we built in Part 8
. When a file is uploaded to the media bucket, a function automatically generates a thumbnail.
importjsonimportoss2importosfromioimportBytesIOdefhandler(event,context):"""
Triggered by OSS upload. Resizes images and stores thumbnails.
"""evt=json.loads(event)bucket_name=evt["events"][0]["oss"]["bucket"]["name"]object_key=evt["events"][0]["oss"]["object"]["key"]creds=context.credentialsauth=oss2.StsAuth(creds.access_key_id,creds.access_key_secret,creds.security_token)endpoint=f"https://oss-{context.region}-internal.aliyuncs.com"bucket=oss2.Bucket(auth,endpoint,bucket_name)# Download the original imageresult=bucket.get_object(object_key)img_data=result.read()# Generate thumbnail keydest_prefix=os.environ.get("DEST_PREFIX","thumbnails/")filename=object_key.split("/")[-1]dest_key=f"{dest_prefix}{filename}"# For production, use Pillow for actual resizing.# This example passes through the original as a placeholder.bucket.put_object(dest_key,img_data)return{"statusCode":200,"body":f"Processed {object_key} -> {dest_key}"}
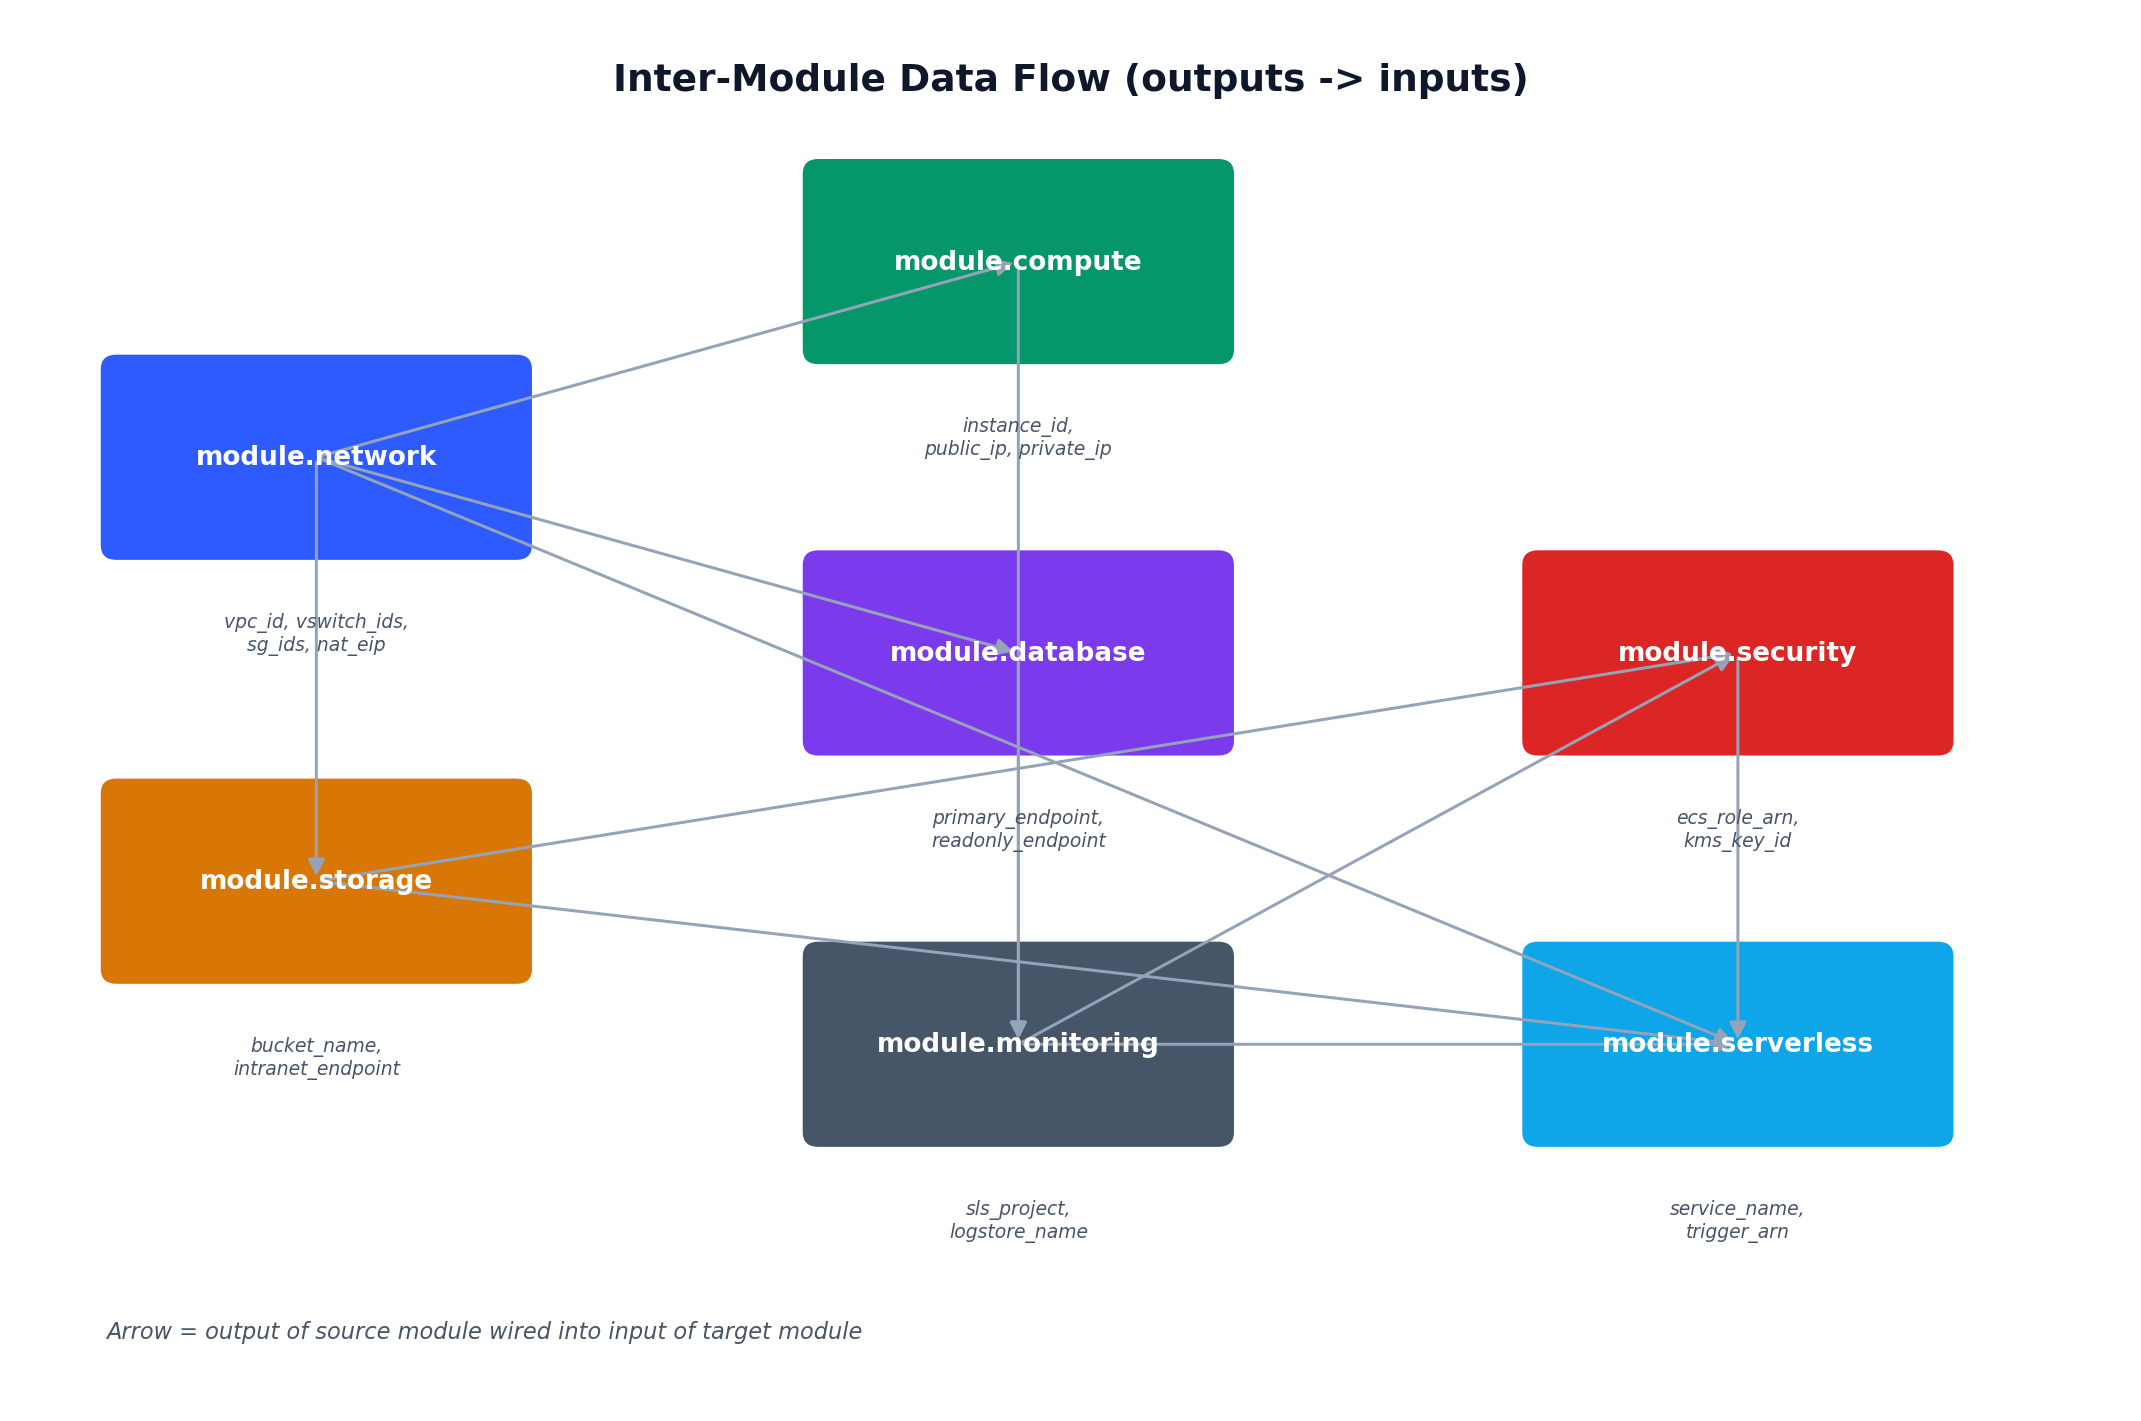
The root main.tf composes all seven modules, wiring outputs from one module as inputs to another. This is the file where you see how everything connects.
# Copy this to terraform.tfvars and fill in your values
# DO NOT commit terraform.tfvars to version control
region="cn-hangzhou"access_key="your-access-key-id"secret_key="your-access-key-secret"project_name="fullstack"environment="prod"vpc_cidr="10.0.0.0/16"ecs_instance_type="ecs.g7.large"ecs_password="YourSecurePassword123!"rds_instance_type="rds.mysql.s2.large"db_password="YourDBPassword456!"
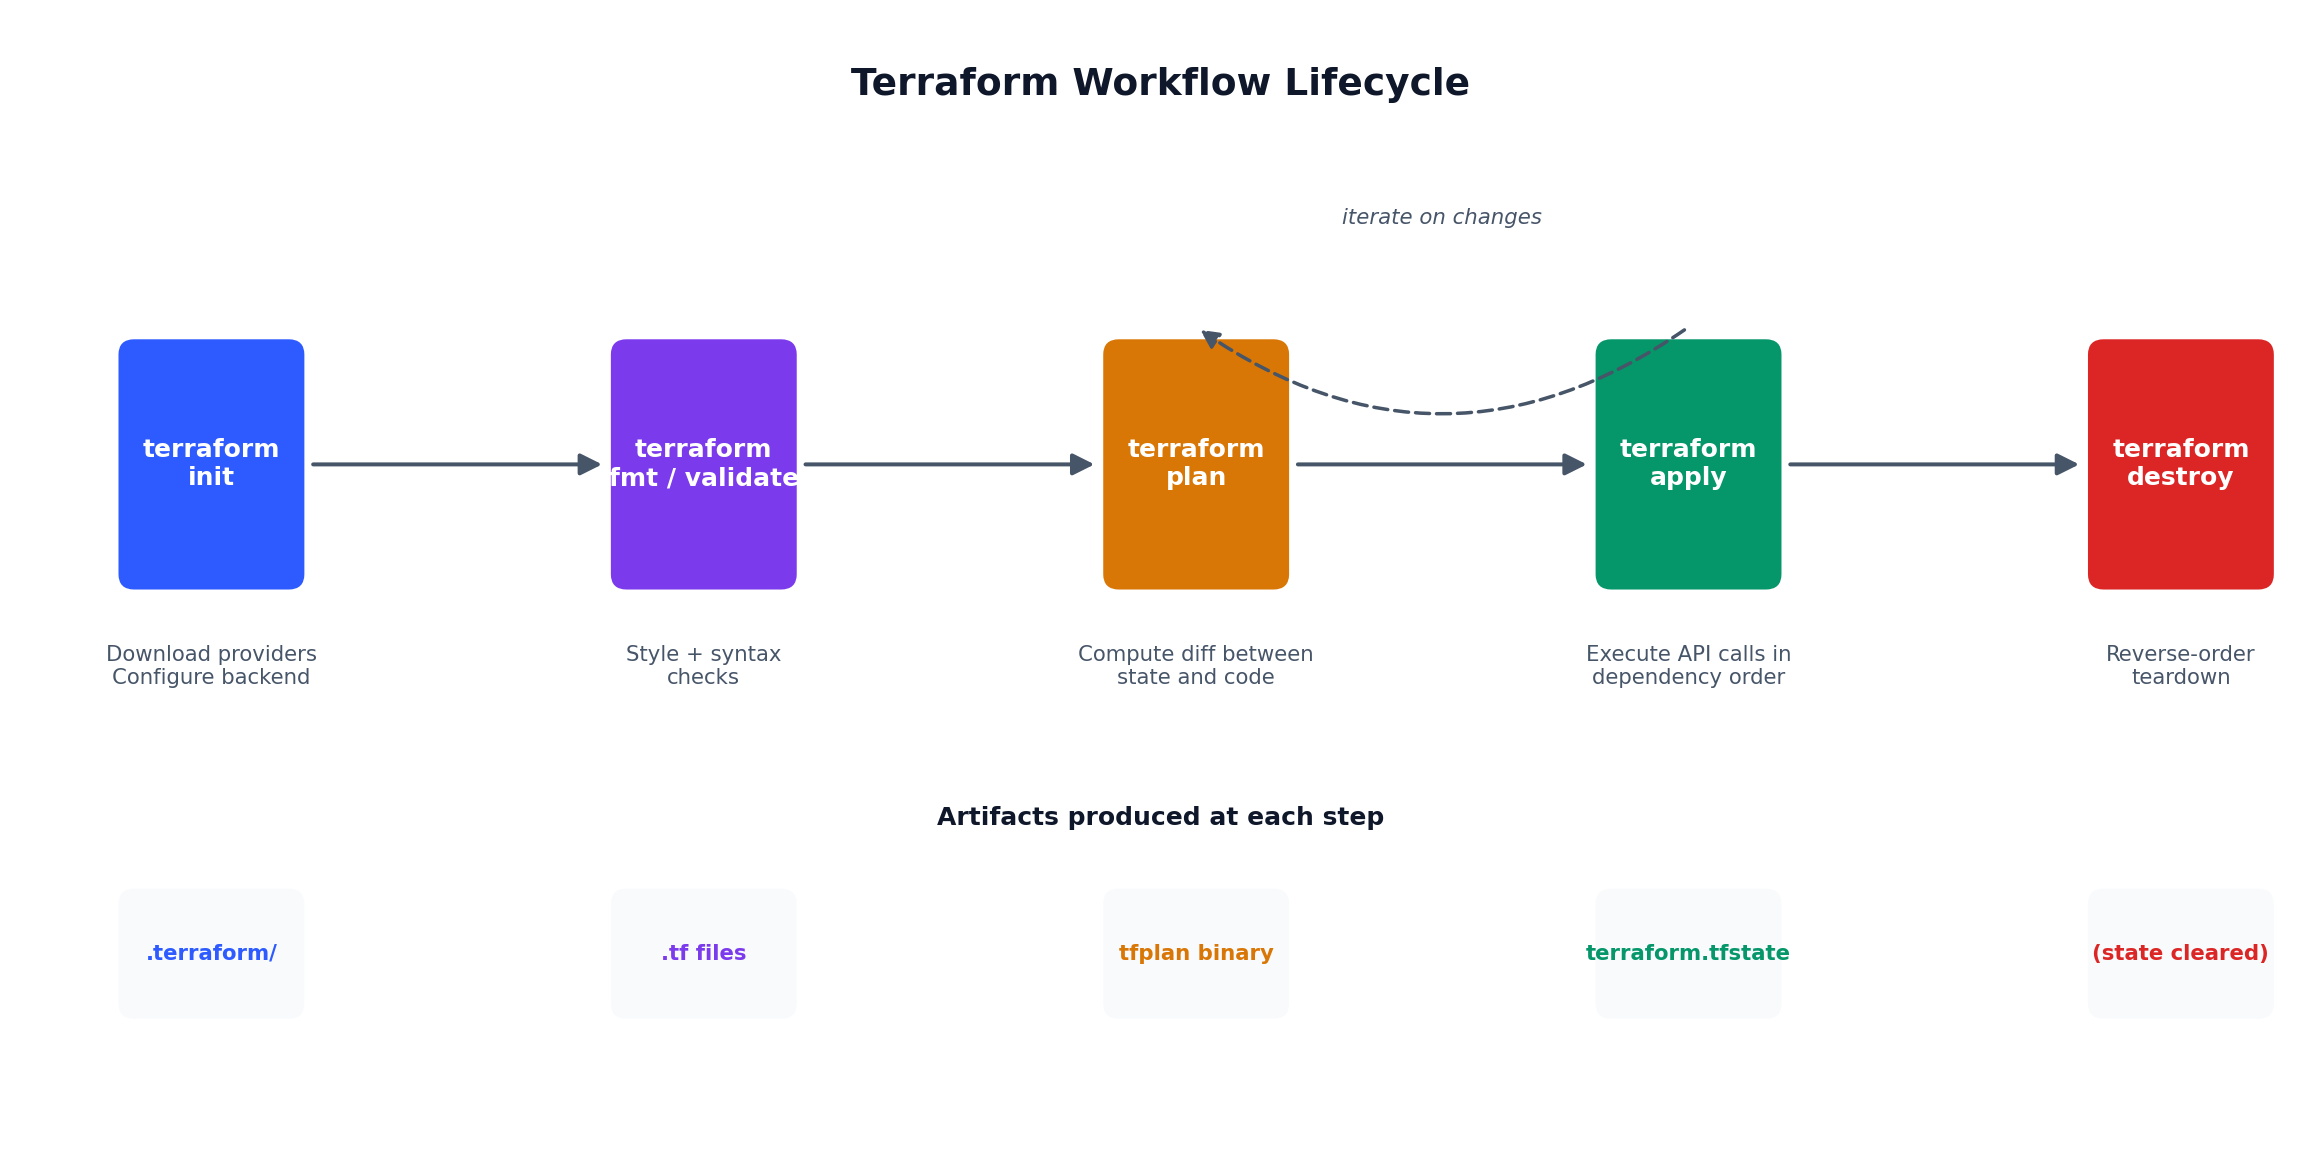
# Initialize Terraform (download providers, configure backend)terraform init
# Preview what will be createdterraform plan -var-file=environments/prod.tfvars
# Apply (create everything)terraform apply -var-file=environments/prod.tfvars
# See what was createdterraform output
# Get the SSH keyterraform output -raw ssh_private_key > key.pem
chmod 600 key.pem
# Connect to your server$(terraform output -raw ssh_command)
The terraform plan output will show you every resource that will be created before you commit. This is the single most important feature of Terraform — you always know what is about to happen. In my experience, roughly one in three plans catches something I did not intend, saving me from creating resources in the wrong AZ, opening the wrong port, or provisioning the wrong instance type.
A typical plan output for our full stack looks like this:
1
2
3
4
5
6
7
Plan: 42 to add, 0 to change, 0 to destroy.

Changes to Outputs:
  + app_public_ip       = (known after apply)
  + oss_bucket          = (known after apply)
  + rds_endpoint        = (known after apply)
  + ssh_command          = (known after apply)
Forty-two resources from a single command. That is the power of infrastructure-as-code.
Manual terraform apply from your laptop is fine for personal projects. For teams, you need automation: run terraform plan on every pull request so reviewers can see the infrastructure diff, and run terraform apply automatically when the PR merges to main.
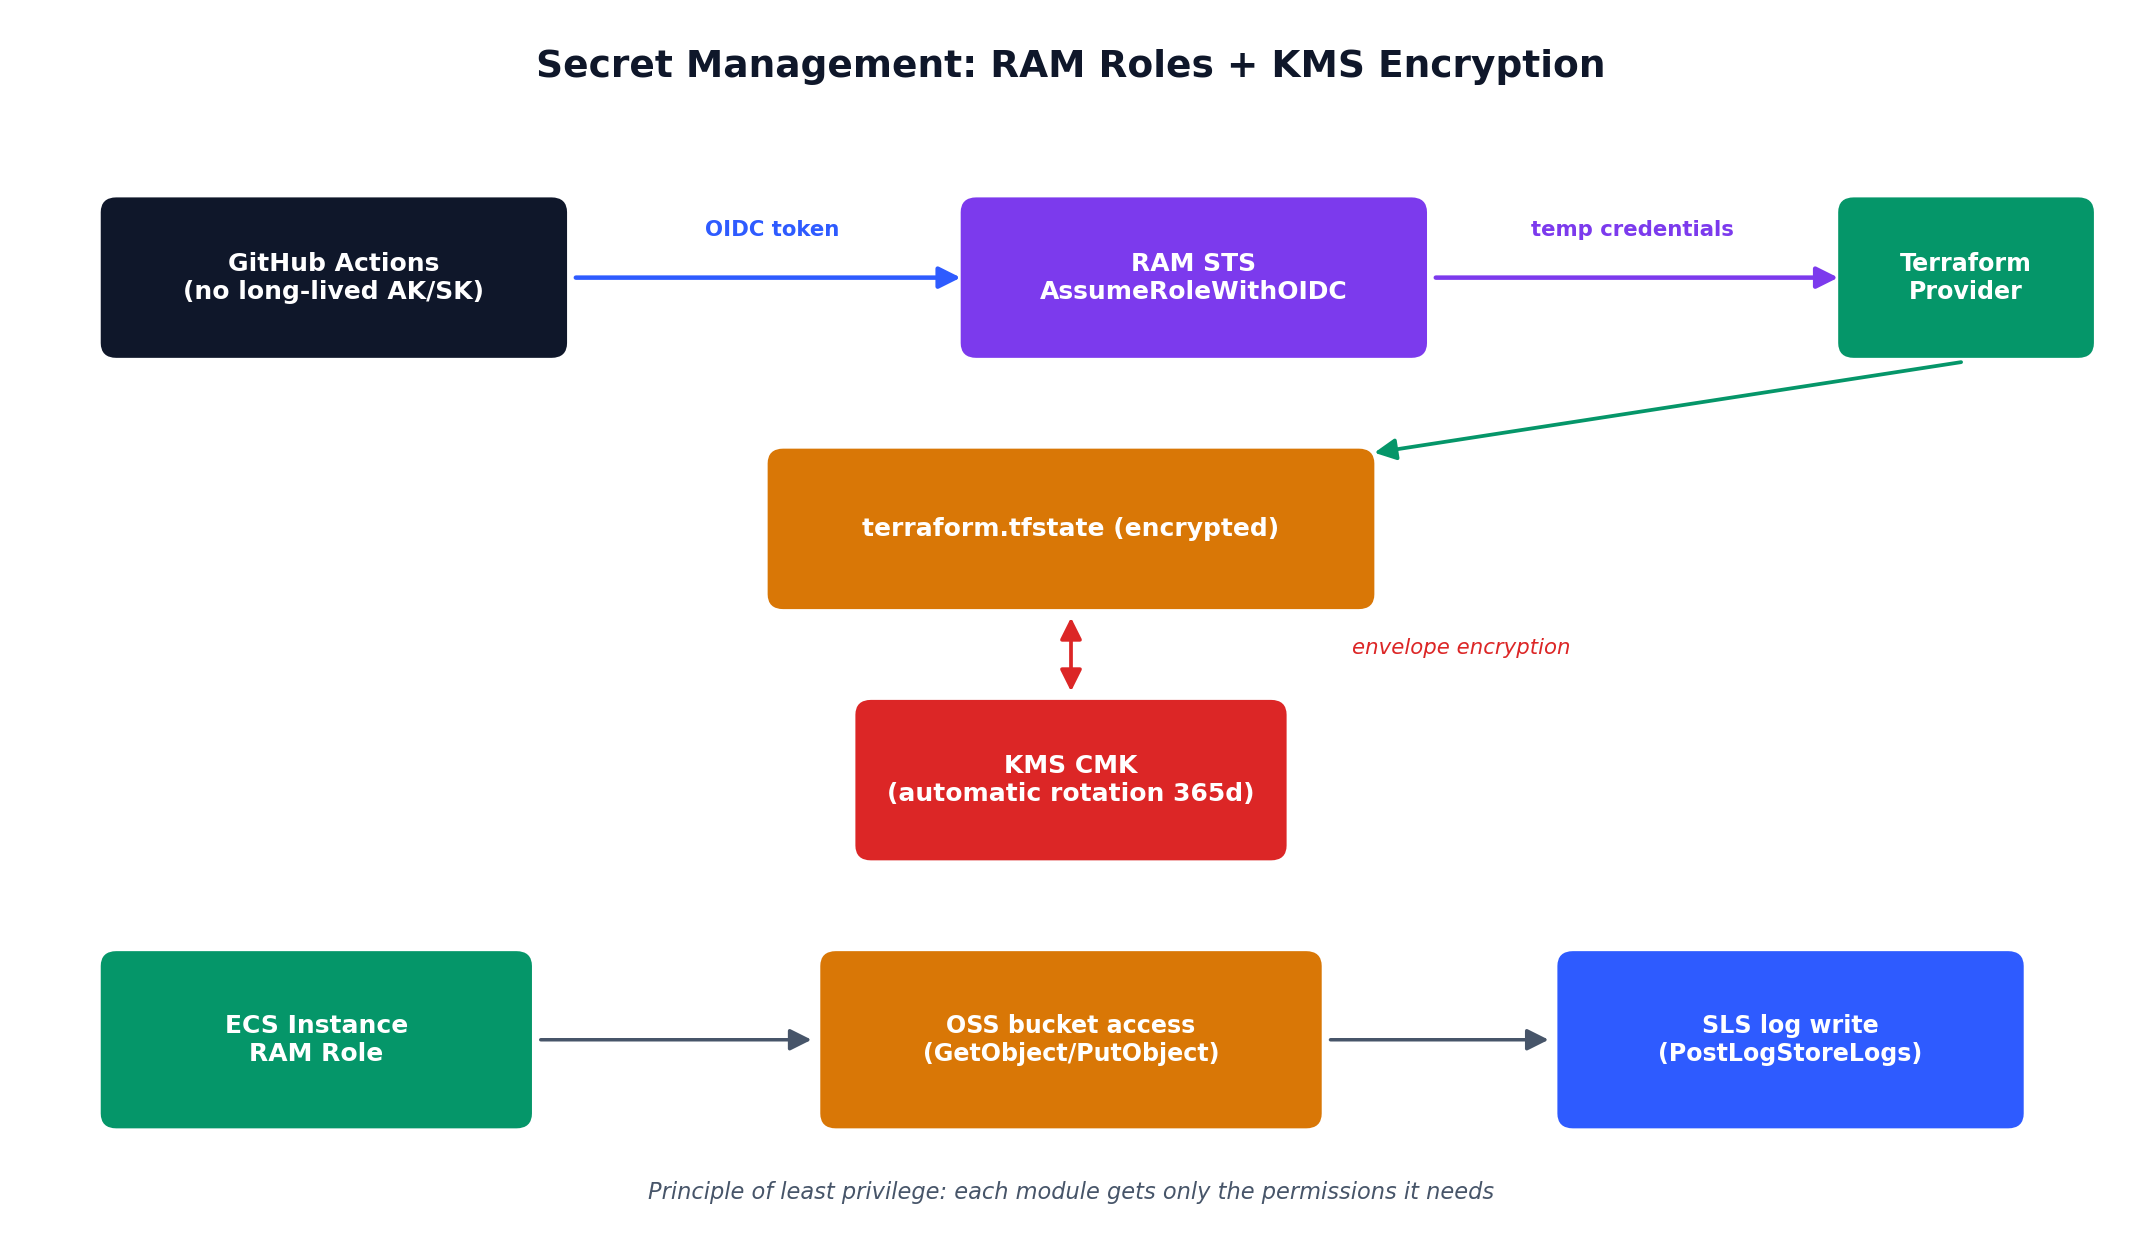
Never use your root account credentials in CI/CD. Create a dedicated RAM user with only the permissions needed for Terraform (or better, use OIDC federation to assume a RAM role without long-lived credentials — but that is an advanced topic for another day).
The workflow does five things:
Format check — Ensures all .tf files are properly formatted. Fail fast on style issues.
Validate — Checks syntax and internal consistency without accessing any APIs.
Plan — Shows what would change. Posts the plan as a PR comment so reviewers can see the infrastructure diff.
Apply — Only runs on merge to main. Applies the changes automatically.
Output — Shows the resulting endpoints and IPs in the workflow log.
This gives you the same code review workflow for infrastructure that you have for application code. Someone proposes a change, the plan shows what will happen, the team reviews, and the merge triggers the apply.
Infrastructure-as-code makes cost optimization possible at the planning stage — before you spend anything. The open-source tool infracost reads your Terraform files and estimates monthly costs.
These are the same strategies from every cloud, but Terraform makes them easy to implement because you change a parameter in code rather than clicking through a console:
1. Preemptible (Spot) instances for non-critical workloads.
Preemptible instances on Alibaba Cloud cost up to 90% less but can be reclaimed with 5 minutes notice. Use them for batch processing, dev/test environments, and stateless workers.
2. Subscription (reserved) instances for predictable workloads.
For the production database that runs 24/7, switching from pay-as-you-go to a 1-year subscription saves roughly 40%:
1
2
3
4
5
6
7
resource"alicloud_db_instance" "primary" { # ... other config ...
instance_charge_type="Prepaid" period=12 # 1 year
auto_renew=true auto_renew_period=12}
3. Right-sizing based on actual usage.
After running for a month, check CloudMonitor metrics:
1
2
3
4
5
6
# Check average CPU utilization over the past 7 daysaliyun cms DescribeMetricLast \
--Namespace acs_ecs_dashboard \
--MetricName CPUUtilization \
--Dimensions '[{"instanceId":"i-xxxx"}]'\
--Period 86400
If your ecs.g7.large (2 vCPU, 8 GiB) averages 15% CPU and 30% memory, downgrade to ecs.g7.small (1 vCPU, 4 GiB) and cut costs in half. With Terraform, this is a one-line change:
1
2
# In environments/prod.tfvars
ecs_instance_type="ecs.g7.small" # was: ecs.g7.large
4. Cost comparison table: before and after optimization.
Resource
Before (Pay-as-you-go)
After (Optimized)
Savings
ECS (app server)
$86.14/mo
$43.07/mo (right-sized)
50%
RDS Primary
$142.35/mo
$85.41/mo (1yr subscription)
40%
RDS Replica
$142.35/mo
$85.41/mo (1yr subscription)
40%
NAT Gateway
$13.14/mo
$13.14/mo
0%
EIPs (x2)
$6.72/mo
$6.72/mo
0%
OSS
$1.20/mo
$1.20/mo
0%
SLS + FC
$0.00/mo
$0.00/mo (free tier)
0%
Total
$412.90/mo
$234.95/mo
43%
That is nearly $2,200 saved per year just from right-sizing and switching to subscriptions. And because the changes are in version-controlled .tfvars files, you have a clear audit trail of when and why you made each optimization decision.
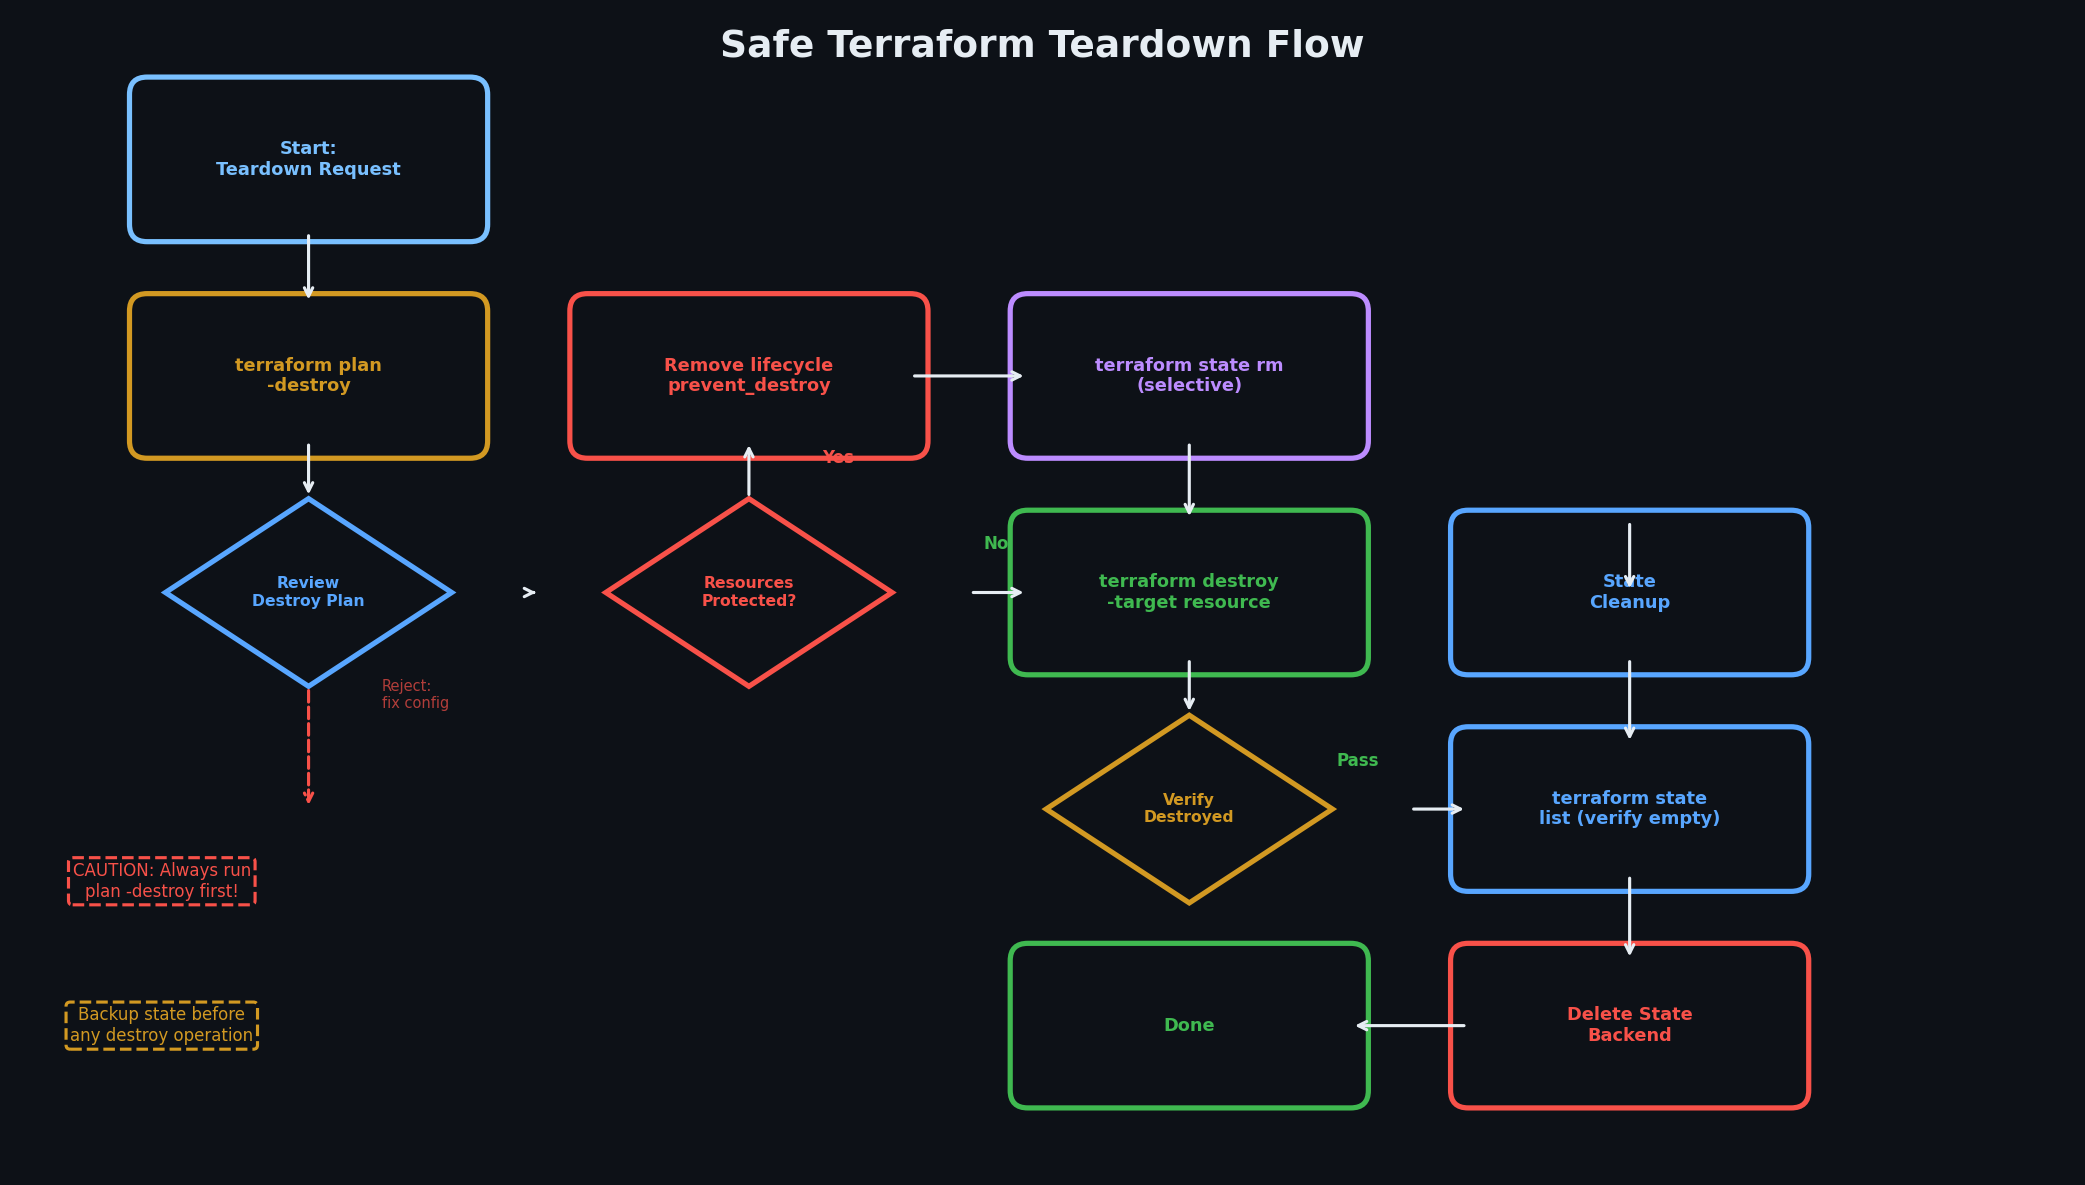
When you are done with an environment — perhaps tearing down a staging stack after testing — Terraform makes it a single command:
1
2
3
4
5
# Preview what will be destroyedterraform plan -destroy -var-file=environments/staging.tfvars
# Destroy everythingterraform destroy -var-file=environments/staging.tfvars
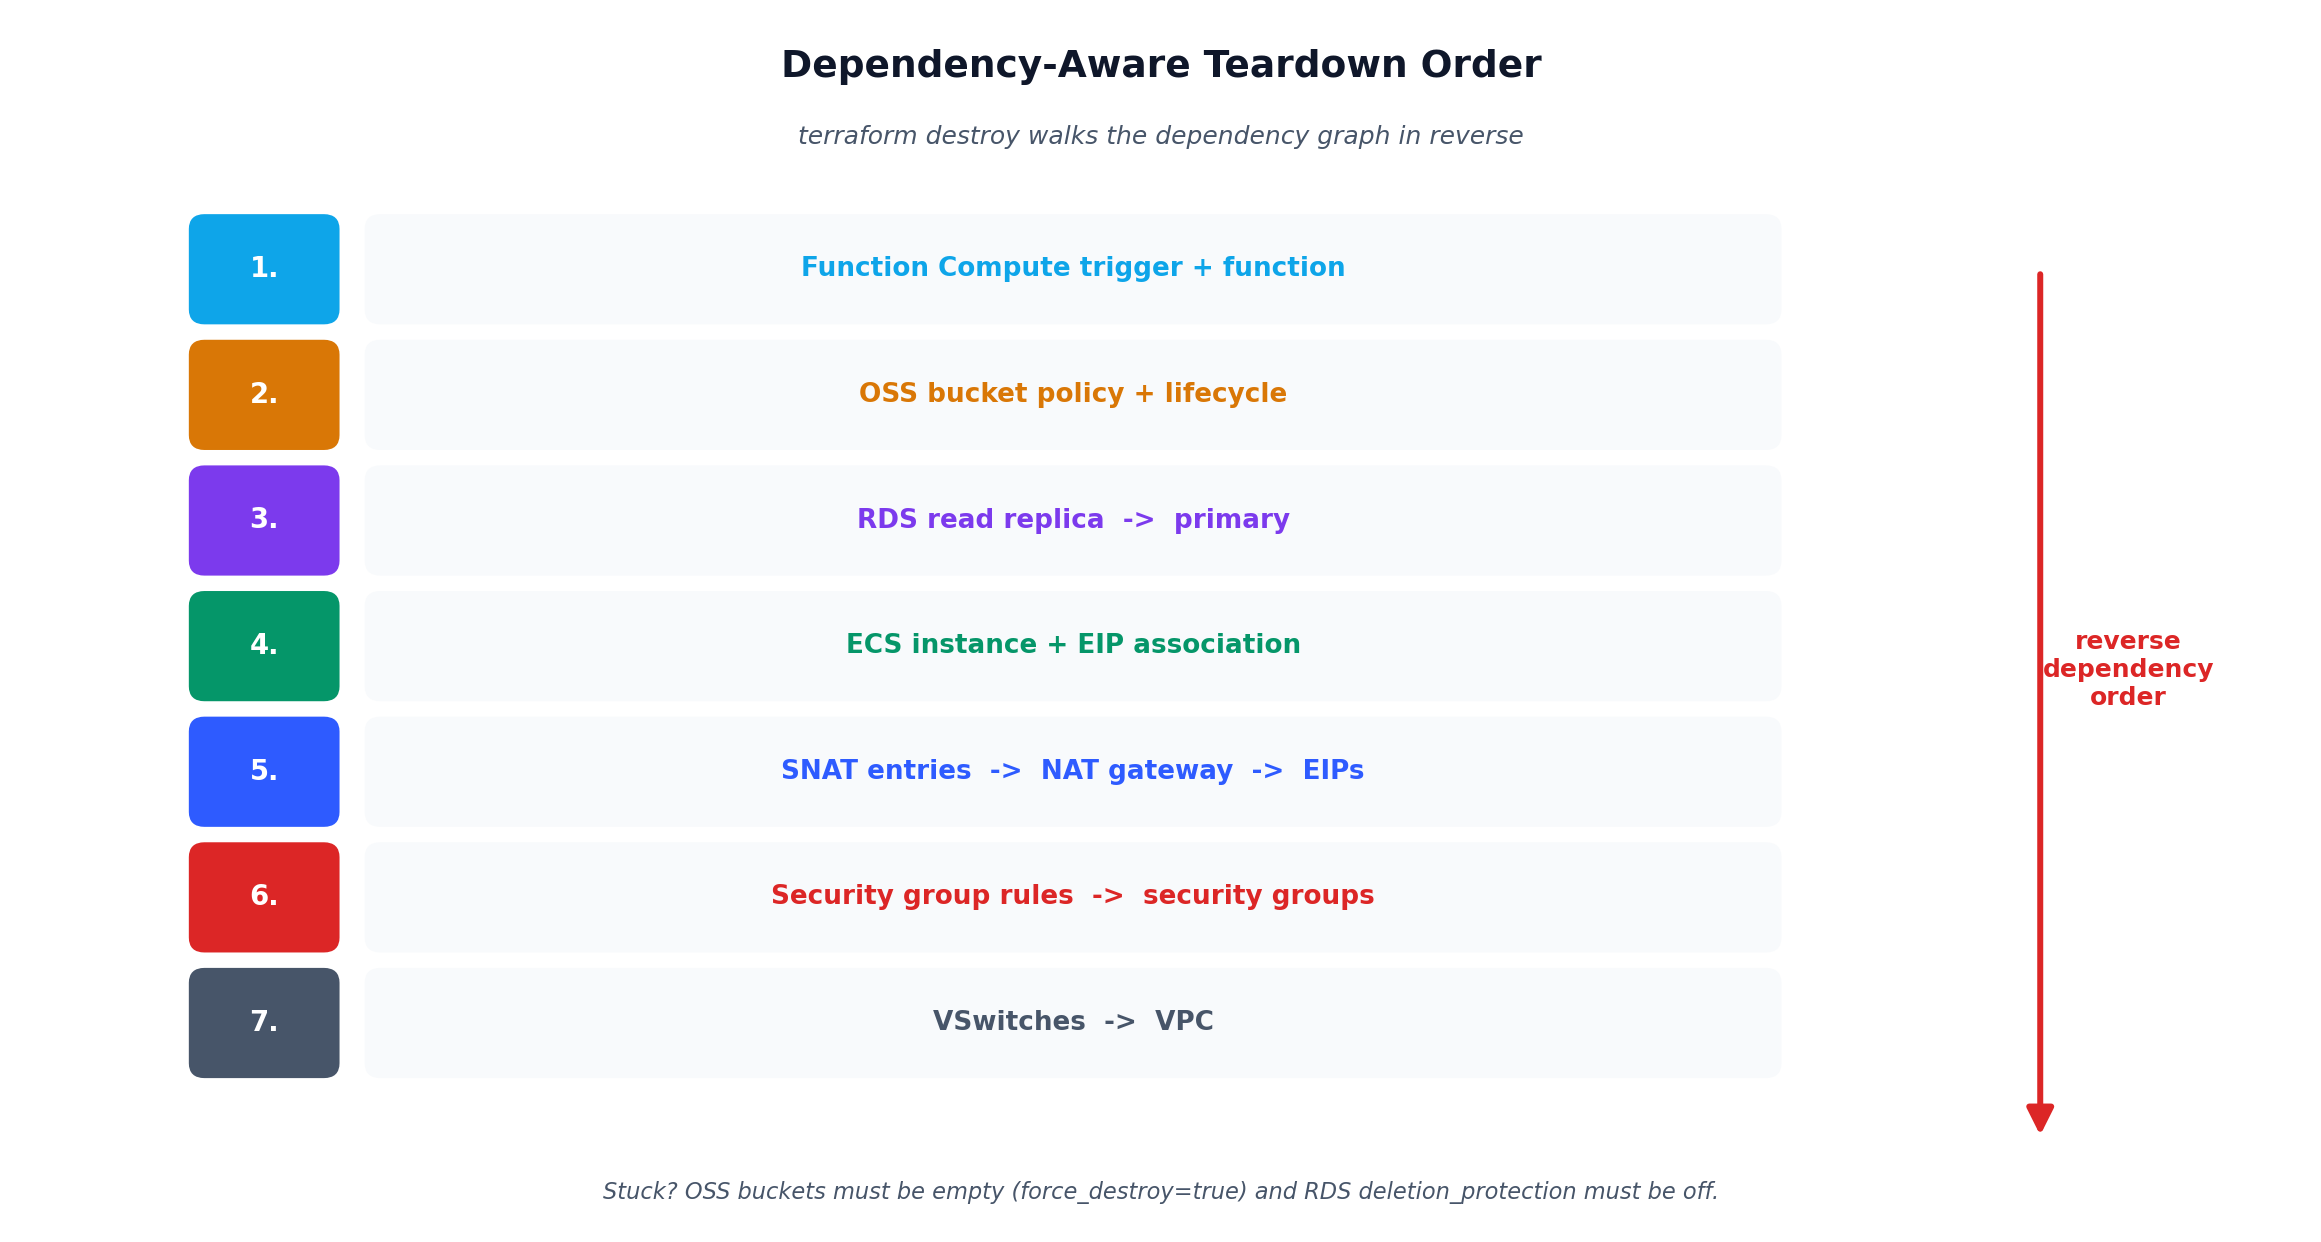
This is the inverse of terraform apply. It reads the state, determines all managed resources, and deletes them in the correct dependency order. RDS read replicas are deleted before primary instances. SNAT entries are removed before NAT gateways. VSwitches are emptied before the VPC is deleted.
Two warnings about terraform destroy:
It is irreversible. RDS data, OSS objects, SLS logs — gone. Terraform will prompt for confirmation, but once you type yes, there is no undo button.
Some resources resist deletion. OSS buckets must be empty before deletion. RDS instances with deletion_protection = true will block the destroy. These are safety features. If you are tearing down for real, you may need to empty buckets manually or set force_destroy = true on the bucket resource.
1
2
3
4
5
# Only set this if you truly want terraform destroy to delete non-empty buckets
resource"alicloud_oss_bucket" "media" { # ... other config ...
force_destroy= var.environment !="prod" # Never force-destroy production
}
After running Terraform against Alibaba Cloud for over a year, here are the issues I hit most often:
1. Provider version drift. The alicloud provider ships updates weekly. Pin your version and upgrade deliberately. An unplanned provider upgrade once changed the default value of a security group rule attribute and opened a port I thought was closed.
2. State file corruption. Always use remote state with locking. If two people apply simultaneously without locking, the state file can become inconsistent. Recovery involves terraform state pull, manual editing, and terraform state push — unpleasant work you never want to do.
3. Resource name uniqueness. Some Alibaba Cloud resources require globally unique names (like OSS bucket names). Always include a random suffix or your account/project prefix.
4. Quota limits. Every Alibaba Cloud account has default quotas (e.g., 20 ECS instances per region, 5 VPCs per region). If terraform apply fails partway through because you hit a quota, you end up with a partially-created infrastructure. Check your quotas before applying.
5. Import existing resources. If you already have manually-created resources and want to bring them under Terraform management, use terraform import:
1
2
3
4
5
# Import an existing VPCterraform import module.network.alicloud_vpc.main vpc-bp1xxxxxxxxxxxxx
# Import an existing ECS instanceterraform import module.compute.alicloud_instance.app i-bp1xxxxxxxxxxxxx
After importing, run terraform plan to see if your configuration matches the actual resource. Expect to iterate a few times until the plan shows no changes.
This article — and this series — boils down to a few principles:
1. Infrastructure belongs in code. Every resource we built by hand in Parts 1 through 11 is now a declarative .tf file. The code is the documentation, the runbook, and the disaster recovery plan all in one.
2. Modules are the unit of reuse. Each module (network, compute, database, storage, security, monitoring, serverless) is self-contained and independently testable. You can use the network module in your next project without touching the database module.
3. Environments are just variables. Dev, staging, and production use the same code with different .tfvars files. No more “production has that one security group rule we added manually six months ago and nobody remembers why.”
4. CI/CD closes the loop. Infrastructure changes follow the same pull request workflow as application code: propose, review, merge, apply. No more “who changed the security group?” mysteries.
5. Cost optimization is a code change. Right-sizing, reserved instances, spot instances — these are parameter changes in .tfvars files, reviewable and auditable like any other code change.
The code from this article is a starting point, not a finished product. Fork it, adapt it to your architecture, add the resources you need, remove the ones you do not. The point is never the specific configuration — it is the practice of treating infrastructure as seriously as you treat your application code.
One terraform apply. Everything you need. That is the way it should be.
This is Part 12 (the final article) of the Alibaba Cloud Full Stack series. For an even deeper dive into Terraform itself — modules, workspaces, testing, CI/CD patterns, and multi-cloud architectures — see the Terraform for Agents series
.