
Linux (1): Basics — Core Concepts and Essential Commands
Your entry guide to Linux: the multi-user permission model, the FHS directory tree, distribution lineages, and the command-line muscle memory you need before any deeper topic makes sense.
The difficulty with Linux rarely lies in the commands themselves. The hard part is having a clear map of the system: why it dominates servers, what multi-user and per-file permissions offer, what changes when switching between Debian and Red Hat lineages, and what to do in the first ten minutes after an SSH prompt opens. This post is the entry guide for the entire Linux series. It first builds the mental model — philosophy, distributions, the FHS tree — and then walks you through the commands you will use ten times an hour: cd ls pwd, cp mv rm mkdir, cat less head tail, find grep, plus pipelines, redirection, SSH, and a quick taste of permissions and processes. Each topic is intentionally kept short; deeper details are in the dedicated articles (File Permissions, Disk Management, User Management, Service Management, Process Management, Package Management, Advanced File Operations).
Why Linux, and Why It Looks the Way It Does#
Three design decisions explain most Linux quirks a newcomer notices: it was built for multiple users at once, it treats files as the universal interface, and it prioritizes automation over clicking.
- Open and customizable. Every component, from the kernel to the init system, can be swapped, recompiled, or stripped down. Both a 5 MB Alpine container and a 12 GB Oracle Linux install call themselves Linux.
- Stable enough to forget about. Production servers routinely run for years without a reboot. The
uptimecommand on a long-lived machine printingup 412 daysis a normal sight, not a brag. - A package manager is the primary install path. You almost never download a
.exe.apt,dnf,pacman,zypperresolve dependencies, verify signatures, and let you upgrade the entire system with one command. - Everything is a file. Disks live in
/dev, processes appear in/proc, kernel knobs are toggled by writing to/sys. The samecatand>operators read CPU info or set LED brightness. - CLI first, GUI optional. Graphical desktops like GNOME and KDE exist, but on servers, you connect via SSH and manage the system with text, which also makes scripting and remote management easy.
Distribution Families at a Glance#
Most distributions descend from a few ancestors. The package manager is usually the quickest way to tell them apart.
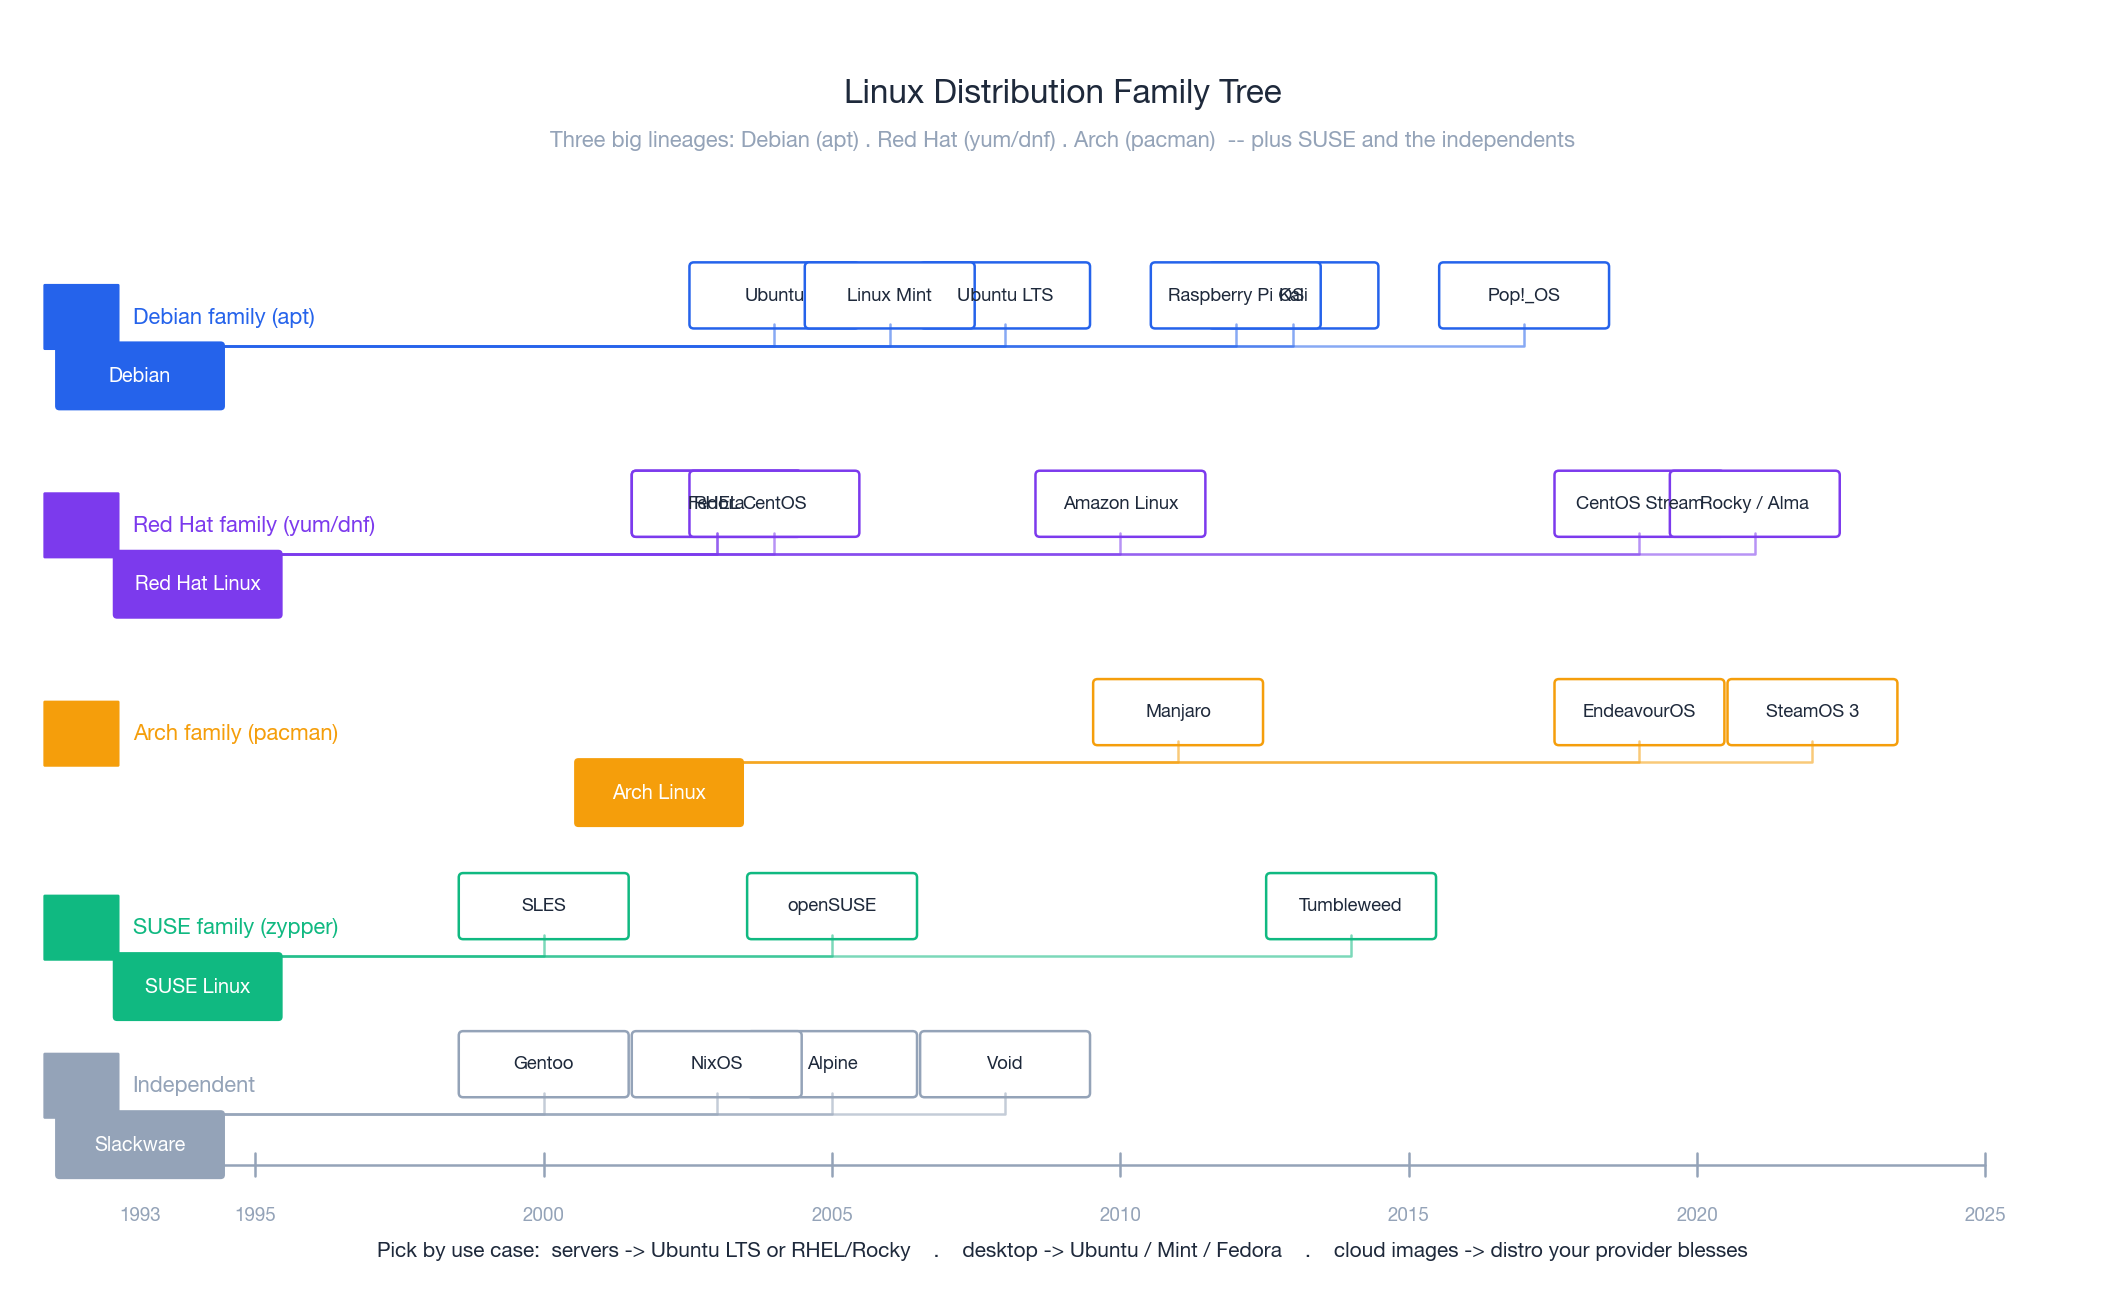
- Debian / Ubuntu —
apt. The friendliest learning curve, vast documentation, and the default for most cloud images. Pick Ubuntu LTS if you have no other constraints. - Red Hat / RHEL / CentOS / Rocky / Alma / Fedora —
yum(CentOS 7) ordnf(8+). The enterprise default. After CentOS Linux was discontinued in 2021, Rocky Linux and AlmaLinux became the binary-compatible replacements. - SUSE / openSUSE —
zypper. Common in European enterprises and SAP environments. - Arch / Manjaro —
pacman. Rolling release, latest packages, and expects you to read the wiki. - Independents — Gentoo (compile everything), Alpine (musl + 5 MB, container darling), NixOS (declarative config), Void (no systemd).
For cloud, also check what your provider supports: AWS ships Amazon Linux, and Alibaba Cloud ships Alibaba Cloud Linux. Both are RHEL derivatives tuned for the platform.
The Three Ideas That Explain Everything Else#
Multi-user, Multi-task#
Dozens of users may log in simultaneously over SSH or local TTYs, each running many processes in parallel. The kernel must isolate their CPU time, memory, files, and network sockets. This is why the permission model is strict: without it, any user could read another user’s secrets or kill their processes.
File-Centric Permissions#
Every file (and a directory is just a special file) has three permission groups — owner, group, others — and three bits each: read (r), write (w), execute (x). Read a permission string from left to right:
| |
A common pattern you should recognise immediately: rw------- (mode 600) is the only permission an SSH private key is allowed to have — the SSH client refuses to use it otherwise.
Depth on
chmod/chown, numeric vs symbolic notation, SUID/SGID/sticky bit, ACLs, andumasklives in the Linux File Permissions article. The basics here are enough to read whatls -lshows you.
Everything Is a File#
Regular files, directories, devices, processes, kernel state, pipes, sockets — all expose the same read() / write() interface. The payoff is that one set of tools works everywhere:
| |
If you can cat it and > to it, you can usually script it.
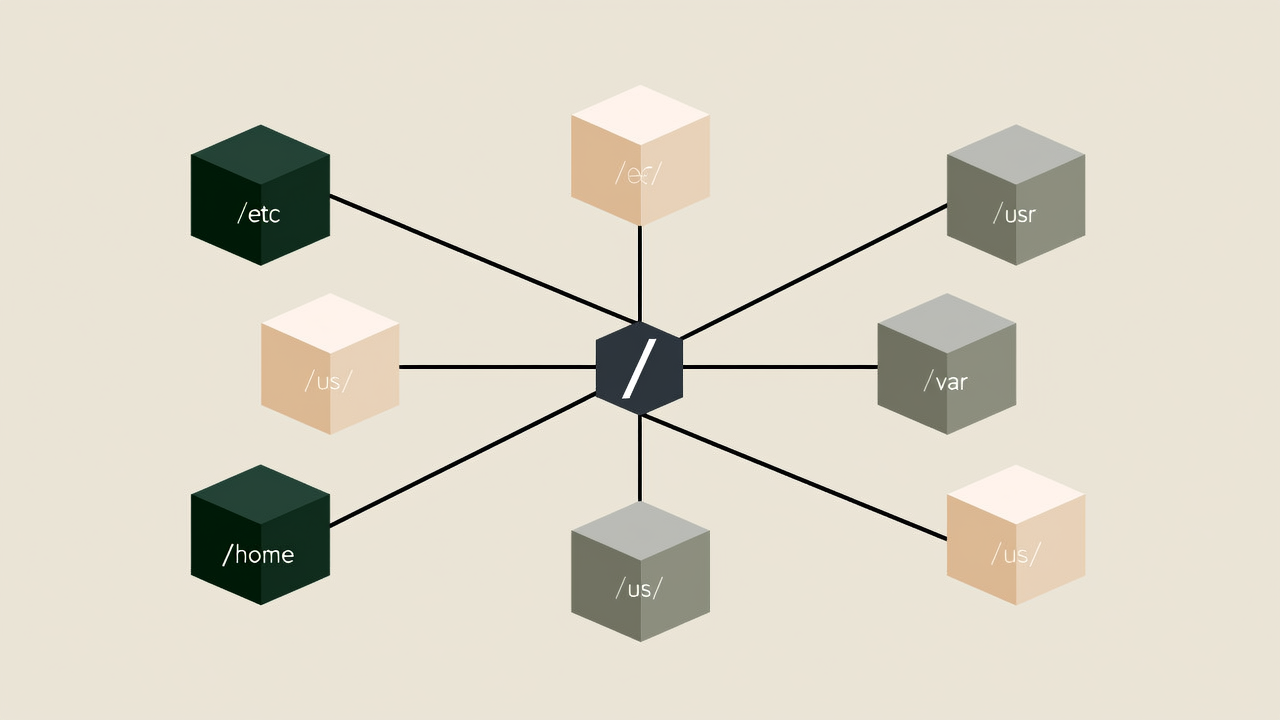
The Filesystem Map (FHS)#
Unlike Windows, there are no drive letters. Every disk, USB stick, and network share is mounted somewhere under a single root /. The layout is standardised by the Filesystem Hierarchy Standard.
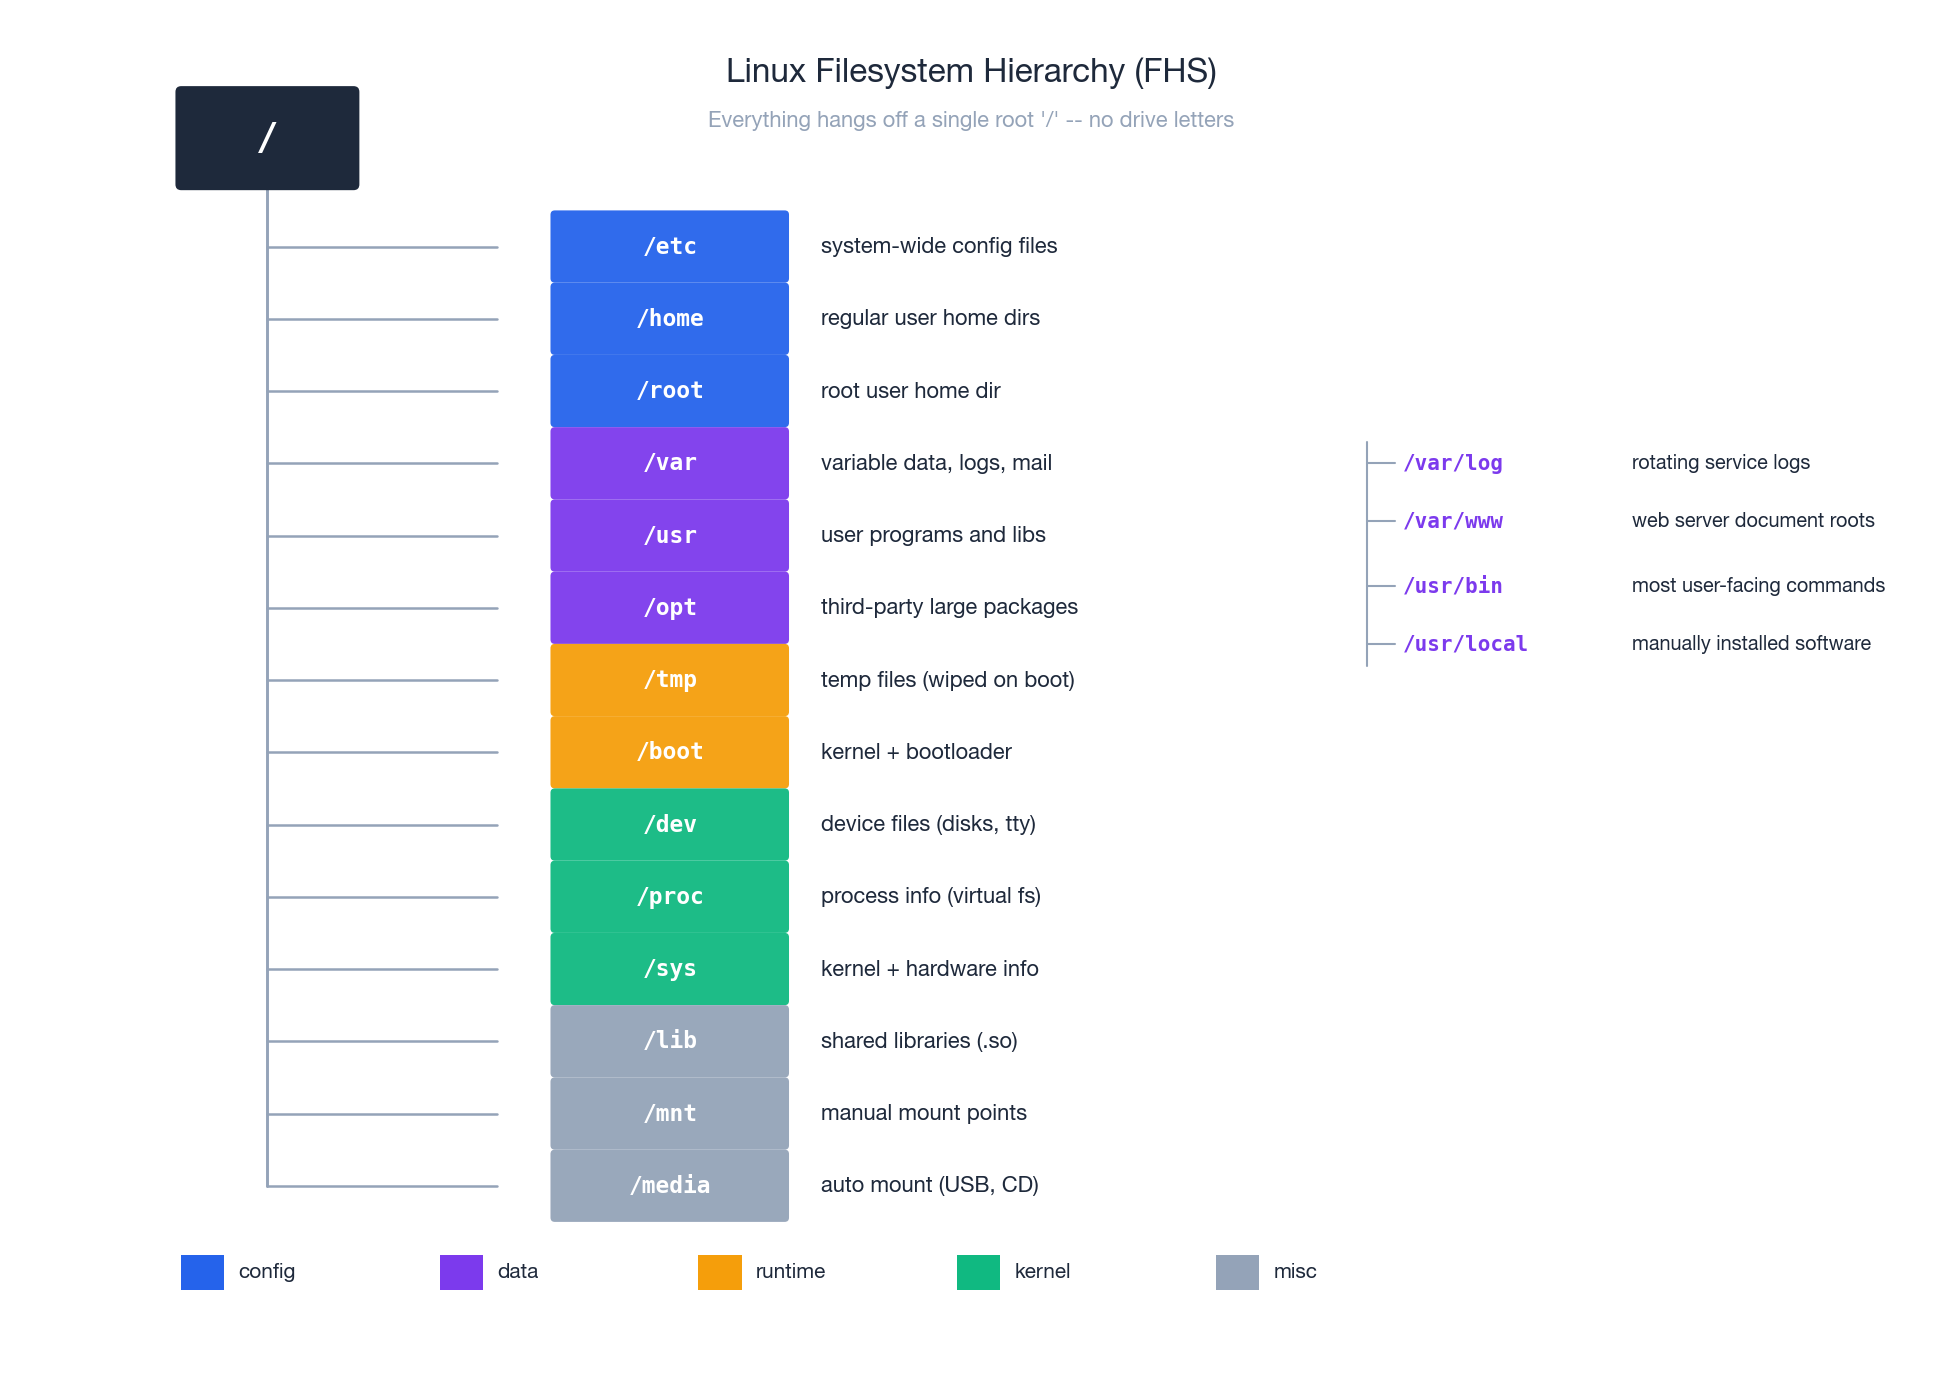
The two directories you will visit most are /etc (configuration) and /var/log (logs). Memorise this rule of thumb:
- Service won’t start? ->
/var/log/<service>/orjournalctl -u <service>. - Wrong configuration? ->
/etc/<service>/. - Disk full? ->
du -sh /* 2>/dev/null | sort -hto find the biggest top-level directory. - Need a binary? ->
which <cmd>; it usually lives in/usr/binor/usr/local/bin.
A few subtleties worth knowing on day one:
/rootis the home ofroot, not/home/root. Regular users live under/home./procand/sysare virtual — they exist only in RAM, exposing kernel state.du -sh /procis meaningless./tmpis wiped on most distros at boot (and often mounted astmpfsin RAM). Don’t store anything you care about there.
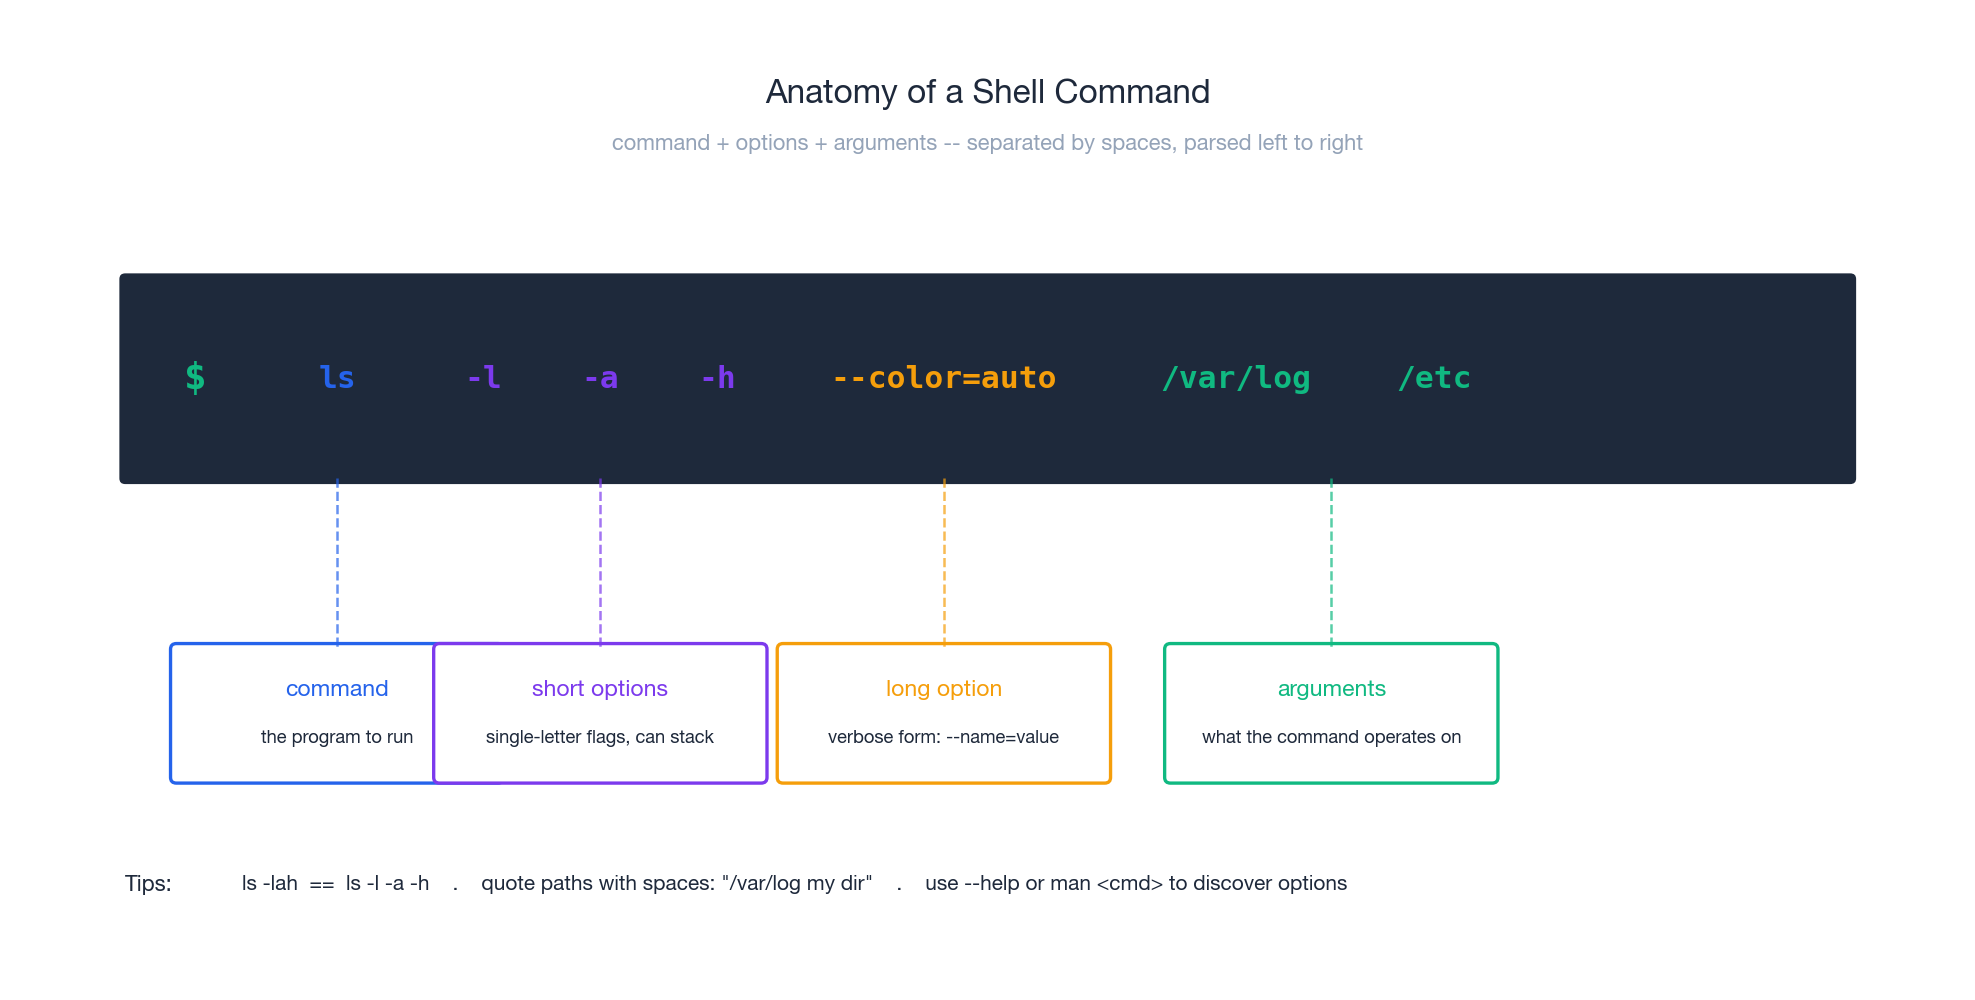
The Anatomy of a Command#
Every Linux command line is parsed by the shell into three types of tokens, separated by spaces.
| |
Three habits will save you time:
-lahmeans the same as-l -a -h. Short flags stack.- Quote anything containing spaces or shell-special characters:
ls "/var/log my dir". - When unsure, ask the command itself:
<cmd> --helpfor a quick summary,man <cmd>for the full manual (use/to search inside,qto quit).
Your First Ten Minutes on a New Server#
You have just SSH’d in. Before anything else, answer five questions.
Who am I, and what can I do?#
The shell prompt tells you. The trailing character is the giveaway:
| |
Don’t log in as root for routine work. Use a regular account and call sudo when you need power. The audit log (/var/log/auth.log or /var/log/secure) records every sudo invocation with a username — if everyone shares root, that trace is gone.
Where am I, and what’s around me?#
| |
pwd (print working directory) and ls -lah (long, all-including-hidden, human-readable sizes) together tell you almost everything you need.
What is the system?#
| |
Are we under pressure?#
| |
Load averages are 1-, 5-, and 15-minute averages of runnable + uninterruptible tasks. On a 4-core box, anything sustained above 4.0 means CPU saturation.
Is the network alive?#
| |
ip replaced the deprecated ifconfig/route/arp trio years ago. If you still see ifconfig in tutorials, it works on most distros via a compatibility package, but ip is what you should learn.
File and Directory Operations: The Daily Vocabulary#
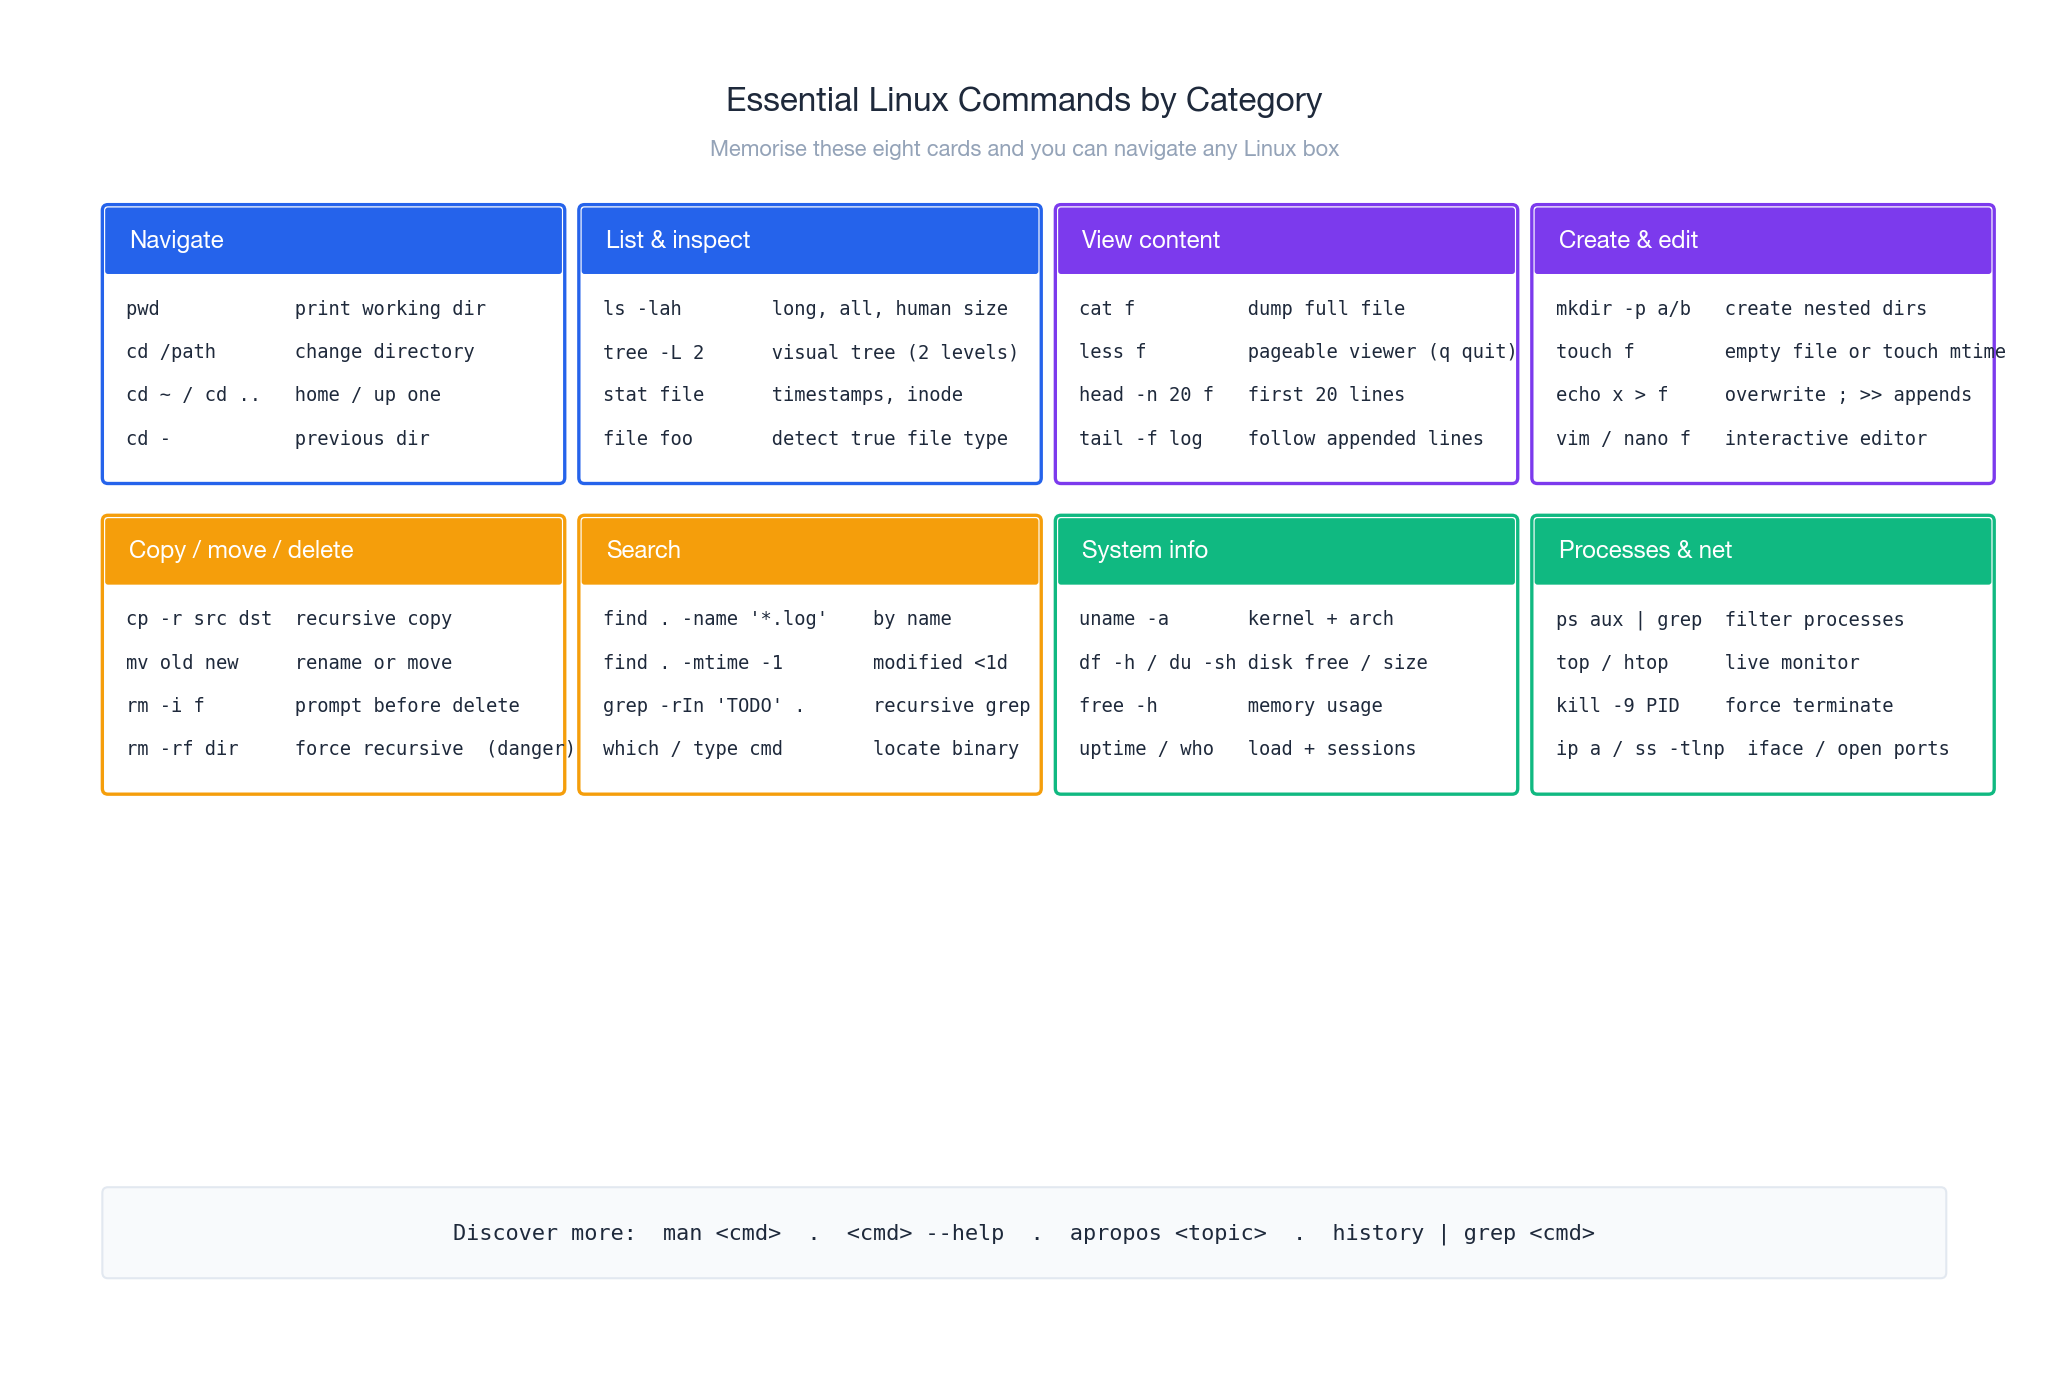
These are the commands your fingers should type without looking. The cheat-sheet below groups them by intent.
Navigation#
| |
A trick worth knowing: pushd / popd / dirs maintain a stack of directories, so you can dive into a deep path and pop back with one keystroke. Tab-completion works on every path.
Listing#
| |
ll is an alias for ls -alF shipped with Bash on Ubuntu/Debian, and many people add their own (alias ll='ls -lah' in ~/.bashrc).
Creating and Deleting#
| |
rm does not have a trash bin. Once a file is unlinked, recovery requires forensic tools and even then is unreliable. Two safety habits:
- Run
ls <pattern>first to see whatrm <pattern>would touch. - Add
alias rm='rm -i'to your shell rc if you’re cautious — it asks before deleting each file. - Never run
rm -rf "$VAR/"unless you’re certain$VARis set; an empty$VARresolves torm -rf /. Modern GNUrmrefuses/by default (--preserve-root), but don’t rely on it.
Copying and Moving#
| |
mv within the same filesystem is just a rename of the directory entry — effectively free, no data is copied. Across filesystems it’s cp followed by rm.
Viewing File Contents#
| |
tail -F is the standard incantation for watching a log while waiting for a request to come in. Pair it with grep --line-buffered ERROR to filter live.
Quick Edits Without an Editor#
| |
The <<'EOF' heredoc with the quoted delimiter prevents shell expansion — write $VAR literally, not its value. Without quotes, variables get substituted.
Finding Files and Text#
Two commands cover ninety percent of needs:
| |
-rIn is the trio you’ll memorise: recursive, skip bInary files (capital I), show line numbers. For very large repositories, ripgrep (rg) is a faster drop-in.
File Information#
| |
stat distinguishes three timestamps that confuse beginners: atime (last read), mtime (last content change), ctime (last metadata change, e.g. chmod). ls -l shows mtime by default.
Pipelines: Composing Commands#
A pipe | connects the stdout of one process to the stdin of the next. No intermediate file is created; data streams in chunks through kernel buffers. This is the single most powerful idea in the Unix toolchain.

A practical example: find the top 10 IPs hitting your web server with errors.
| |
Three companion operators you will reach for constantly:
| |
2>&1 is read as “send file descriptor 2 to wherever fd 1 points right now.” Order matters: cmd 2>&1 > file does not capture stderr to the file; cmd > file 2>&1 does.
Deeper coverage of pipes, process substitution
<(...), named pipes (FIFOs), andxargs-driven parallel execution is in the Linux Advanced File Operations article.
SSH: Logging Into a Remote Box#
SSH (Secure Shell) is the default way to drive any remote Linux machine. It encrypts everything, runs on TCP port 22 by default, and supports both password and public-key authentication.
Basic Usage#
| |
If your network drops mid-session, the terminal hangs. Type ~. (tilde, dot) on a fresh line to force-disconnect from the local end.
Password-Free Login With a Key#
The standard, vastly more secure setup. Generate one keypair per laptop and copy the public half to every server you visit.
| |
Once keys work, lock down sshd by setting PasswordAuthentication no in /etc/ssh/sshd_config and reloading the service. Bots scan the entire IPv4 space looking for password-accepting sshd — close that door.
Hardening Checklist#
- Use Ed25519 keys (faster, smaller, modern) instead of 4096-bit RSA when both ends are recent.
- Disable password auth and root login (
PermitRootLogin no). - Run
fail2banto auto-ban IPs that fail repeatedly. - Limit SSH access at the firewall to known source CIDRs when possible.
- Changing the port from 22 only reduces noise from drive-by scanners; it is not real security.
Service management (reloading
sshd, enabling on boot) is covered in the Linux System Service Management article.
Permissions and Users in Two Pages#
Reading and Changing Permissions#
You already know the rwx-triplet shape. Two ways to write a chmod change:
| |
Common modes worth memorising:
| Mode | Meaning | Typical use |
|---|---|---|
755 | rwxr-xr-x | Executables, public scripts |
644 | rw-r–r– | Normal config / source files |
700 | rwx—— | Private directory |
600 | rw——- | SSH private key, secrets file |
400 | r——– | Read-only secret |
SUID, SGID, sticky bit, ACLs, and
umaskare in the Linux File Permissions article.
Switching User With su and sudo#
| |
sudo is the modern default because it logs who did what and never requires sharing the root password. On a fresh Ubuntu install, the first user is automatically in the sudo group; on RHEL-family systems the equivalent is the wheel group.
User creation, group membership, password policies,
useradd/usermod/userdel, and/etc/passwd//etc/shadowinternals are covered in the Linux User Management article.
Processes, Briefly#
| |
Reach for plain kill first; only escalate to kill -9 if a process is genuinely stuck. -9 cannot be intercepted, so the program never gets to flush buffers, close sockets, or release locks — a frequent cause of corrupted state.
CPU/memory/IO monitoring (
vmstat,iostat,pidstat),nice/renice, control groups, and the OOM killer are in the Linux Process and Resource Management article.
Package Management in 30 Seconds#
Linux installs software via a package manager, not by downloading installers.
| |
Why this pays off: dependencies are resolved automatically, every package is signature-verified by the distro, and one upgrade command covers the whole system.
Building from source, manual
.deb/.rpminstall, alternate ecosystems (snap,flatpak,pip,npm), and managing third-party repositories live in the Linux Package Management article.
Habits That Will Save You#
Back up before you edit anything in
/etc.1sudo cp /etc/ssh/sshd_config /etc/ssh/sshd_config.bak.$(date +%F)When the new config breaks SSH, the old file is one
cpaway.Never modify SSH on a single connection. Open a second SSH session before editing
sshd_config. If the change locks the new session out, the old one is still alive and can revert. This habit has saved entire weekends.Treat these commands as nuclear:
rm -rf /– erase the universe (modernrmrefuses, but don’t test it).dd if=/dev/zero of=/dev/sda– zero an entire disk, no recovery.chmod -R 777 /– world-writable everything; system is gone, security-wise.> /etc/passwd– truncate the user database. The system stays up until reboot.
Always confirm the target before the dangerous flag (
ls,lsblk,cat).The logs are usually telling you the answer. Check them first.
1 2 3 4sudo tail -f /var/log/syslog # general (Debian/Ubuntu) sudo tail -f /var/log/messages # general (RHEL family) sudo grep 'Failed password' /var/log/auth.log # SSH brute-force attempts sudo journalctl -u nginx -n 50 --no-pager # last 50 lines for one service
What’s Next#
This article exists to give you a map. Each topic has its own dedicated piece for when you need depth:
- Linux File Permissions – SUID/SGID/sticky, ACLs,
umask, inheritance. - Linux User Management –
useradd, groups, sudoers syntax, PAM, password policy. - Linux Disk Management – partitioning, filesystems, mounting, LVM, RAID.
- Linux System Service Management – systemd units,
journalctl, timers. - Linux Package Management – repos, GPG, building from source, alternatives.
- Linux Process and Resource Management – monitoring, cgroups, scheduling, OOM.
- Linux Advanced File Operations – pipes, redirection,
xargs,tee, FIFOs.
Linux is not learned in one sitting. Spin up a free-tier VM (or a local VirtualBox / Multipass / WSL2 instance), open a terminal, and break things on purpose — it’s the fastest way for the muscle memory to set in.
References#
- The Linux Documentation Project — canonical, if dated, reference library.
- Arch Linux Wiki — the highest signal-to-noise Linux documentation on the internet, useful well beyond Arch.
- The Linux Command Line, William Shotts — a free book-length introduction to the shell.
- Linux Performance, Brendan Gregg — the canonical resource page on measuring Linux at scale.
- Filesystem Hierarchy Standard 3.0 — the formal spec for the directory layout.
Linux 9 parts
- 01 Linux (1): Basics — Core Concepts and Essential Commands you are here
- 02 Linux (2): File Permissions — rwx, chmod, chown, and Beyond
- 03 Linux (3): Disk Management — Partitions, Filesystems, LVM, and the Mount Stack
- 04 Linux (4): Package Management — apt, dnf, pacman, and Building from Source
- 05 Linux (5): User Management — Users, Groups, sudo, and Security
- 06 Linux (6): Service Management — systemd, systemctl, and journald
- 07 Linux (7): Process and Resource Management: From `top` to cgroups
- 08 Linux (8): Pipelines and File Operations — Composing Tools into Data Flows
- 09 Linux (9): Vim Essentials