
Linux (3): Disk Management — Partitions, Filesystems, LVM, and the Mount Stack
End-to-end disk workflow on Linux: identify block devices with lsblk, partition with GPT, format with ext4 / xfs, mount persistently through /etc/fstab, expand capacity online with LVM, and debug the classic 'disk full but du can't find it' incidents.

Disk problems in production almost never have a one-line fix. You are usually navigating a layered stack: the block device (a physical or virtual disk), the partition table (MBR or GPT), an optional LVM layer that decouples filesystems from disks, the filesystem driver (ext4, xfs, btrfs) that gives meaning to the raw bytes, and finally the mount point in the directory tree that applications actually open files through. Most outages I have seen become tractable the moment you can name which layer is misbehaving.
This post walks the end-to-end workflow — identify a new disk, partition it, format it, mount it persistently, expand it online with LVM, and debug the recurring failure modes — while explaining the underlying mechanism so you can reason about what the kernel is doing rather than memorising commands.
The filesystem hierarchy: where things live#
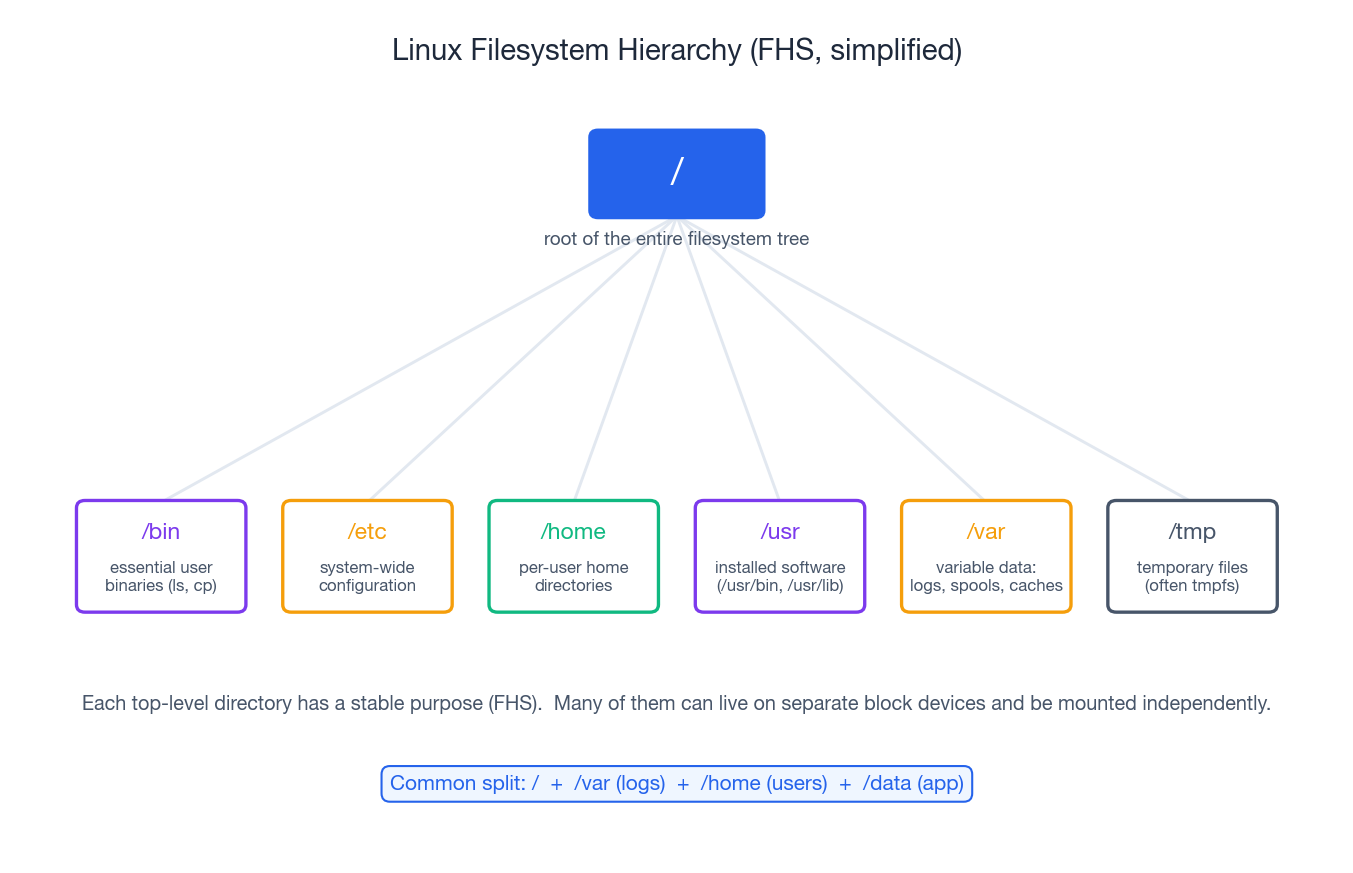
Linux follows the Filesystem Hierarchy Standard (FHS). Every
top-level directory under / has a documented purpose, and once you
internalise that, deciding which directory should sit on its own
volume becomes obvious.
| Directory | What lives here |
|---|---|
/ | Root of the entire tree; the OS itself. |
/bin, /sbin | Essential binaries needed to bring the system up. |
/etc | System-wide configuration (text files). |
/home | Per-user home directories. |
/usr | Installed software and libraries (/usr/bin, /usr/lib). |
/var | Variable data: logs, mail spools, package caches, some DBs. |
/tmp | Temporary files; on most distros this is a tmpfs in RAM. |
/dev | Device nodes (/dev/sda, /dev/null, …). |
/proc, /sys | Kernel-exposed virtual filesystems. |
/mnt, /media | Conventional places to mount removable / extra storage. |
A very common production layout is / + /var + /home + /data
on separate block devices. The reasoning is operational: if a
runaway log fills /var, the root filesystem still has space for
login and recovery; if /data needs to grow, you can extend just that
volume without touching the OS.
How disks show up in Linux: block devices and naming#
Every disk attached to the kernel becomes a block device under
/dev. The naming convention encodes the bus type:
| Device path | What it is |
|---|---|
/dev/sda, /dev/sdb | SATA / SAS / USB disks (SCSI subsystem) |
/dev/nvme0n1 | NVMe SSD, namespace 1 |
/dev/vda | virtio disk (KVM / cloud VMs) |
/dev/xvda | Xen virtual disk (older AWS instances) |
/dev/sr0 | Optical drive |
Partitions append a number; for NVMe an extra p separates them:
/dev/sda1, /dev/nvme0n1p1.
The three commands you run before touching anything destructive:
| |
lsblk -f is the single most useful command in this article — it
prints the block-device tree, the filesystem on each partition, the
mount point if any, and the UUID. If you remember nothing else,
remember this one.
The naming pitfall: why /dev/sdb can change#
Disk names are assigned in the order the kernel enumerates them at
boot. Add or remove a disk, swap the order in which the SCSI HBA
finds them, or live-migrate a VM, and /dev/sdb may suddenly be
/dev/sdc. Never put /dev/sdX in /etc/fstab. Mount by stable
identifier instead:
- UUID — assigned at format time, stable for the life of the
filesystem (
UUID=8f1c-...). /dev/disk/by-id/...— vendor + serial number; useful when you want to know which physical disk you are talking about./dev/disk/by-label/...— human-readable label set at format time.
Partition tables: MBR vs GPT#
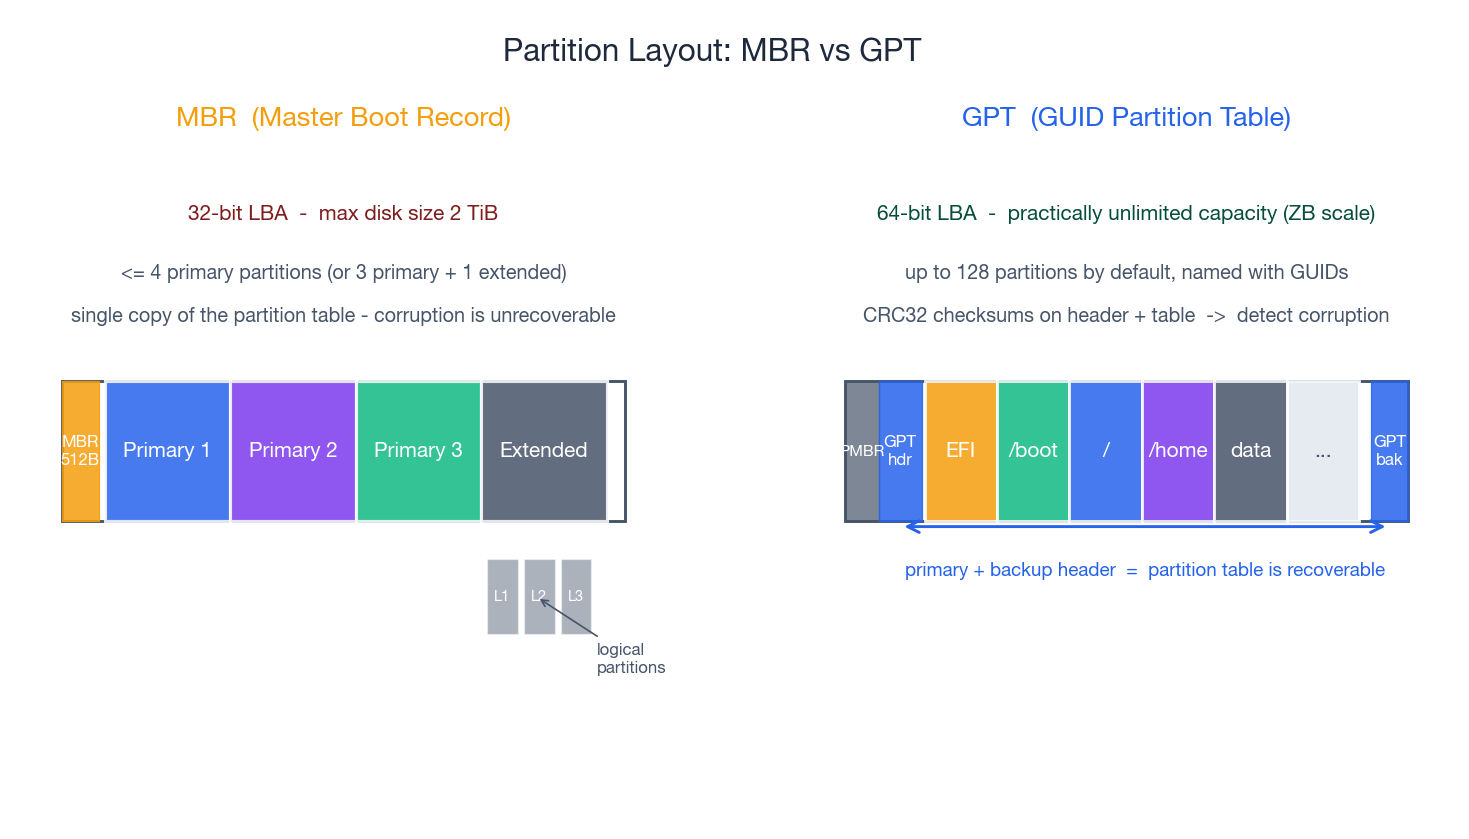
A partition table sits at the start of the disk and tells the OS how the disk is carved up. Linux supports two formats.
MBR (Master Boot Record) is the legacy format, born with the IBM PC. It stores the partition table inside a single 512-byte sector at the very beginning of the disk. The constraints follow directly from that:
- 32-bit LBA addresses, so the maximum addressable size is 2 TiB.
- A maximum of 4 primary partitions. Beyond that you have to carve an “extended” partition that contains “logical” partitions — a workaround that has always felt awkward.
- A single copy of the table. If the first sector is corrupted, the partitioning is gone.
GPT (GUID Partition Table) is the modern replacement, defined by the UEFI spec. It addresses every limitation of MBR:
- 64-bit LBA — practically unlimited capacity (zettabytes).
- Up to 128 partitions by default, each named with a GUID.
- A primary header at the start and a backup at the end of the disk; CRC32 checksums on both, so corruption is detectable and recoverable.
- A “protective MBR” in the first sector so legacy tools that don’t know about GPT see one giant unknown partition rather than free space they might overwrite.
Use GPT unless you have a specific reason not to (very old BIOS that can only boot from MBR, or a dual-boot with a 32-bit Windows install). All modern distributions and clouds default to GPT.
Tools: fdisk, gdisk, parted#
fdisk— historically MBR-only; modern versions handle GPT too.gdisk— GPT-focused, slightly more explicit.parted— supports both, has a non-interactive batch mode that’s handy in scripts.
A typical interactive flow with fdisk:
| |
A non-interactive equivalent with parted:
| |
The 1MiB start is not cosmetic — it ensures the partition is
aligned to a 1 MiB boundary, which matches the 4 KiB physical
sector size of modern disks. Misaligned partitions turn one logical
4 KiB write into two physical reads + writes, which is a silent and
infuriating performance killer. Modern tools do this by default, but
it is worth knowing.
Filesystems: turning a partition into something you can use#
A partition is just a contiguous range of bytes. To store named files in it you need to format it with a filesystem — install on-disk data structures (superblock, inode table, free-space bitmap, journal, …) that the kernel filesystem driver knows how to interpret.
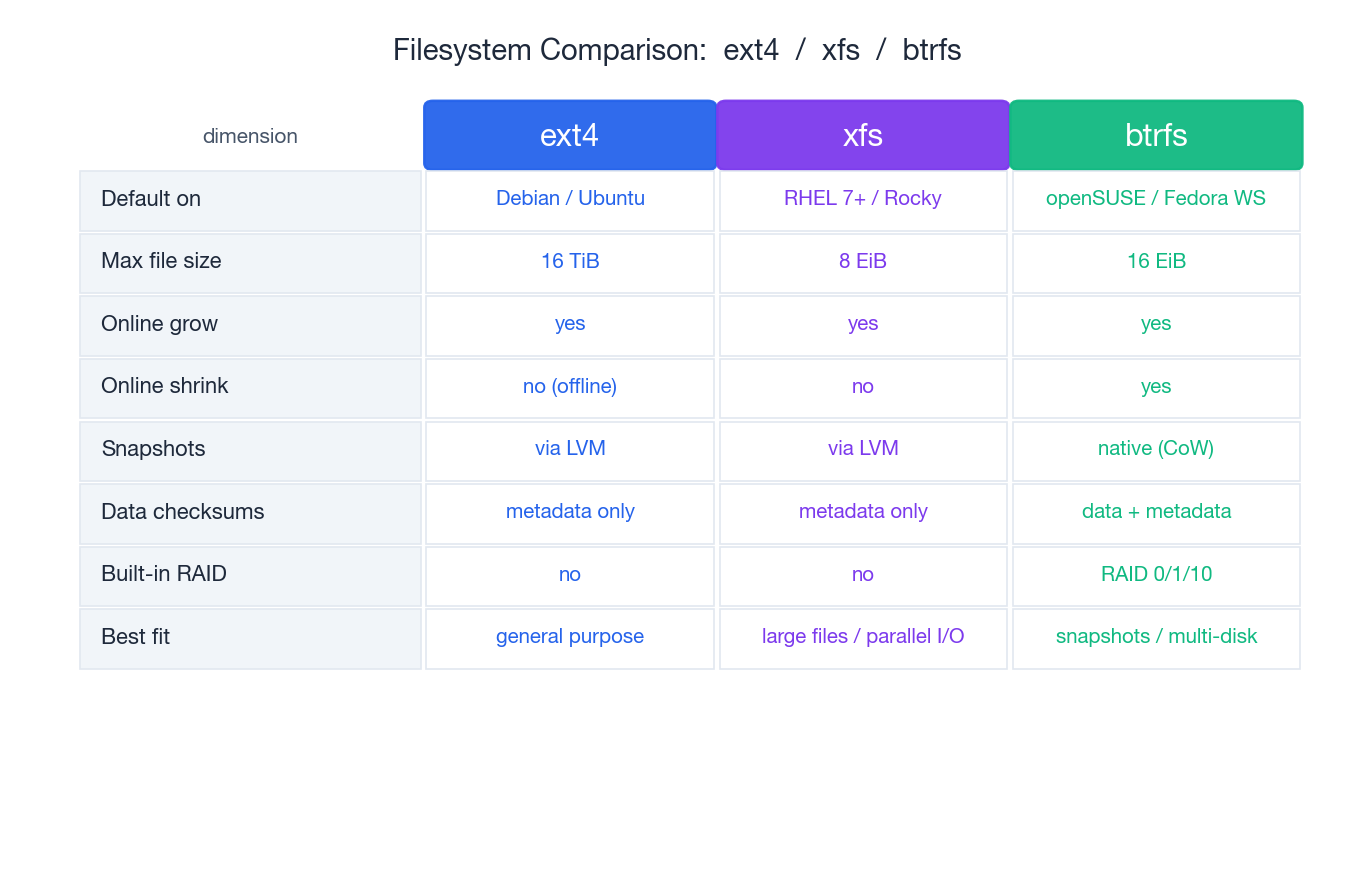
The three filesystems you will actually meet on Linux servers:
- ext4 — the default on Debian / Ubuntu and the safe pick for
general-purpose workloads. Mature tooling (
fsck,tune2fs,e2label), well-understood failure modes, predictable performance. - xfs — the default on RHEL 7+ and derivatives. Designed for large files, high parallelism, and very large filesystems. Cannot be shrunk — you grow or you migrate.
- btrfs — copy-on-write, with native snapshots, checksums on data and metadata, and built-in RAID 0/1/10. Default on openSUSE and Fedora Workstation. The complexity is higher and some configurations have a chequered history; in production it is most often used for the snapshot story.
Format#
| |
After formatting, lsblk -f will show the filesystem type, label and
UUID. Take note of the UUID — you will use it in /etc/fstab.
Mount it once#
| |
Mounting is purely a runtime operation. It does not change anything
on the disk; it just tells the kernel “from now on, paths under
/mnt/data should be served by the filesystem on /dev/sdb1.” When
you reboot, the mount is gone.
Make it persistent: /etc/fstab#
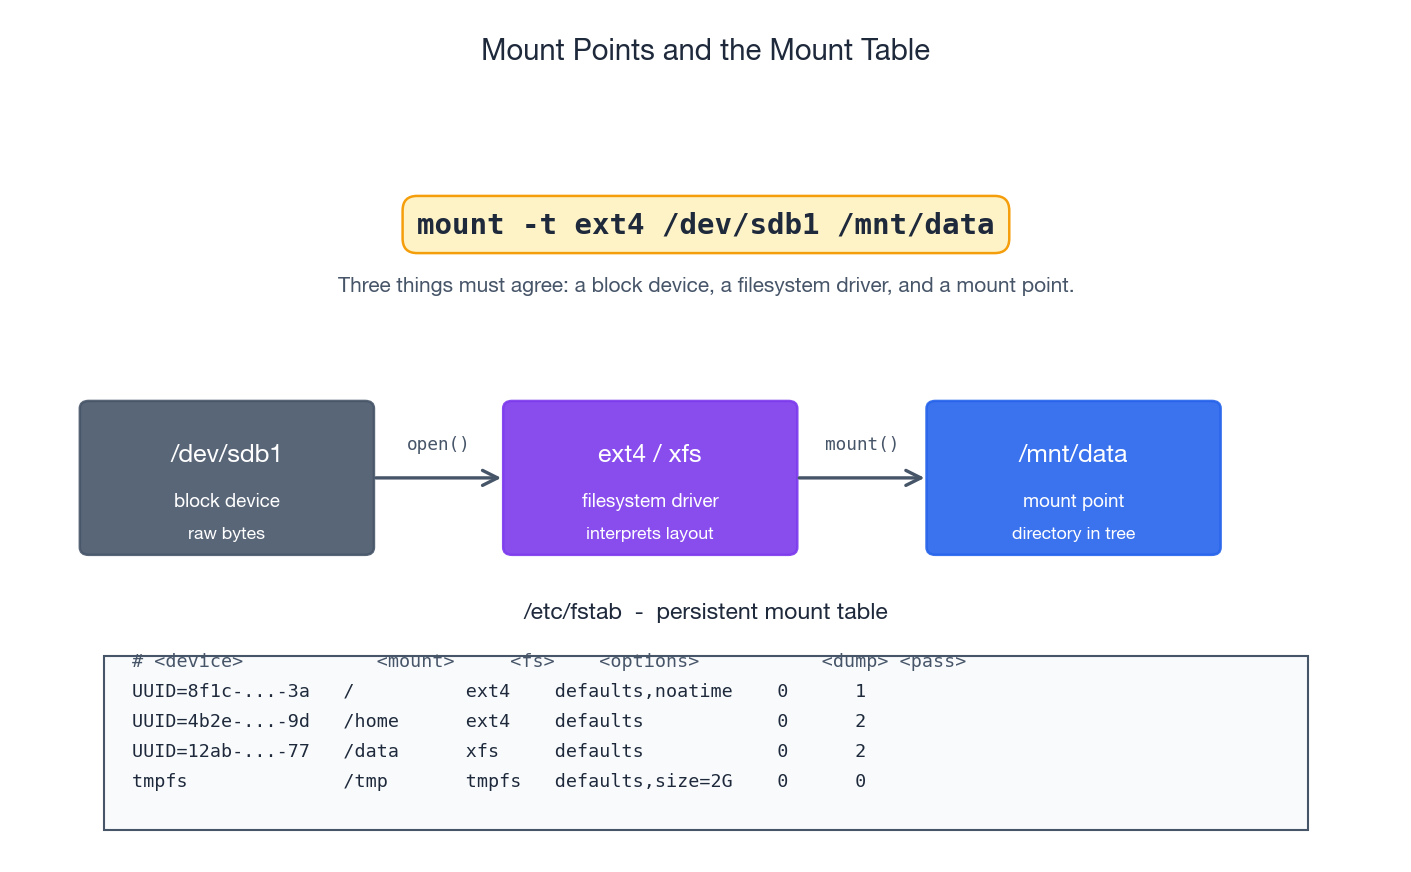
/etc/fstab is the persistent mount table — at boot, systemd (or
mount -a from an init script) reads it and mounts everything
listed.
Always mount by UUID, never by /dev/sdX:
| |
Add a line to /etc/fstab:
| |
The six columns:
- Source — UUID, label, or device path.
- Mount point — must already exist as an empty directory.
- Filesystem type —
ext4,xfs,tmpfs,nfs, … - Mount options —
defaults, plus things likenoatime(skip access-time updates, big win for read-heavy workloads),ro,nosuid,nodev,discard,_netdev. - Dump —
0always (the legacydumpbackup tool is gone). - fsck pass —
1for/,2for other filesystems,0to skip.
Always test before you reboot. If you make fstab unbootable, you
get a system that drops to emergency mode. The safe pattern:
| |
If mount -a errors, fix fstab before rebooting.
Unmounting and “target is busy”#
| |
The most common failure is umount: target is busy. Some process
still holds an open file descriptor under that mount, or has its
working directory there. Find the culprit:
| |
Kill or restart whatever is holding it. As a last resort,
umount -l /mnt/data does a “lazy” unmount — the mount disappears
from the namespace immediately and is fully released when the last
file descriptor is closed. Use sparingly; it can mask real bugs.
LVM: decouple filesystems from physical disks#
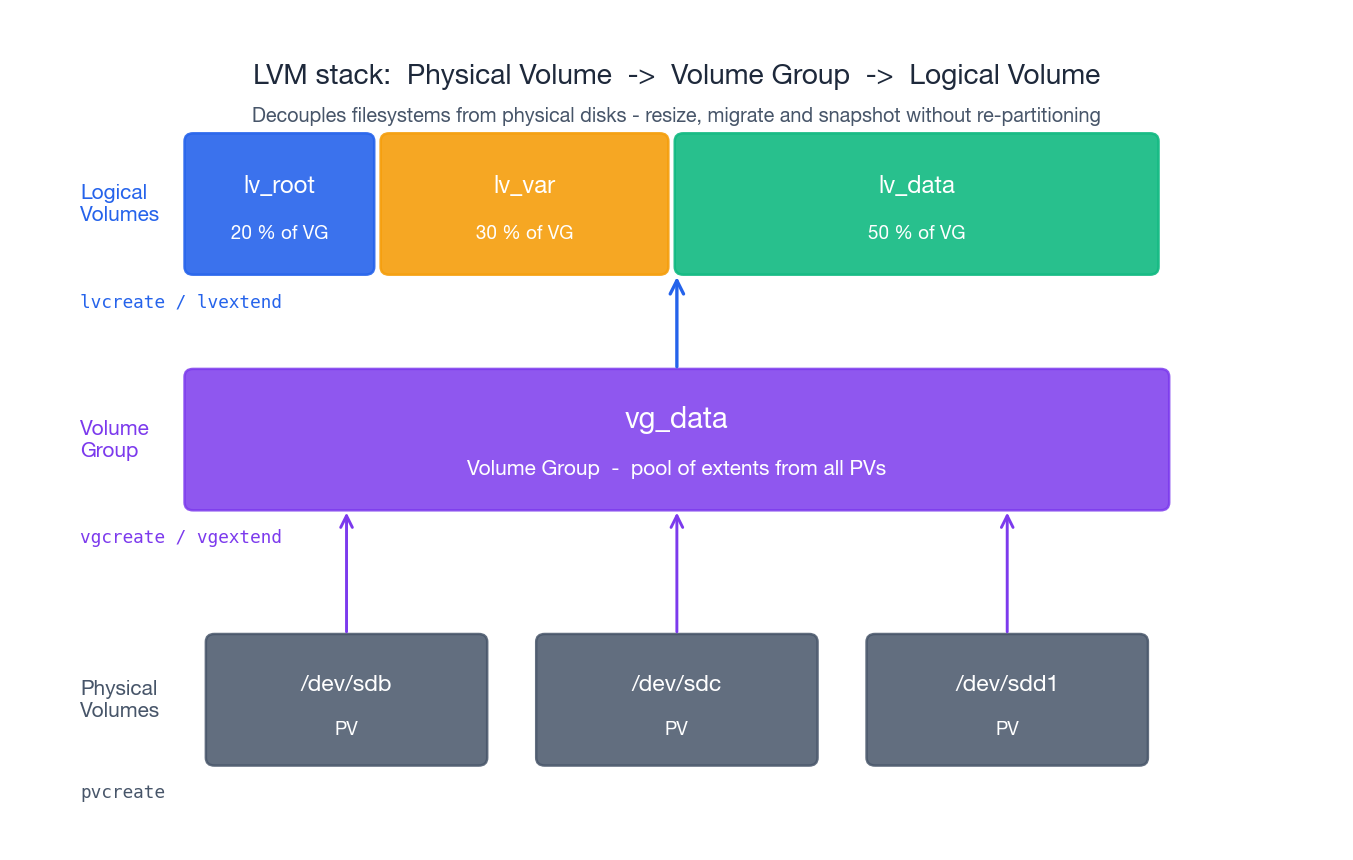
Without LVM, a filesystem lives directly on a partition, so growing the filesystem means growing the partition, which means there must be free space immediately after it on the same disk. In production that is rarely true.
LVM (Logical Volume Manager) inserts a layer of indirection between physical disks and filesystems. It has three concepts:
- PV — Physical Volume. A whole disk or a partition that has
been “claimed” by LVM. (
pvcreate) - VG — Volume Group. A pool of capacity built from one or more
PVs. The VG is divided into fixed-size physical extents
(default 4 MiB). (
vgcreate,vgextend) - LV — Logical Volume. A virtual block device carved out of a
VG. From the kernel’s perspective an LV looks just like a
partition, and you put a filesystem on it. (
lvcreate)
The key insight: an LV does not have to be contiguous on the underlying disks. Extending an LV just allocates more extents from the VG, which can come from any PV. You can grow without re-partitioning.
Create the stack#
| |
Inspect the stack at any time:
| |
Online expansion: the minimal-downtime playbook#
You are at 80% on /data and the alerts are getting noisier. With
LVM the expansion is online and takes seconds:
| |
There is no service restart and no data movement. The filesystem just sees more blocks underneath it.
Shrinking is the hard direction#
- ext4 can be shrunk, but only offline:
umount,e2fsck -f,resize2fs <new-size>,lvreduce. Get the order wrong and you truncate the filesystem. - xfs cannot be shrunk at all. The supported workflow is
“create a smaller LV, copy data with
rsync -aHAX, switch the mount point.”
The pragmatic rule: plan to grow, never to shrink. Start small, extend on demand.
Snapshots#
LVM can create a copy-on-write snapshot of an LV. The snapshot is itself an LV that initially shares all extents with the original; as blocks change in the original, the old contents are copied into the snapshot’s reserved space.
| |
Snapshots are useful for short-lived consistency points (back up from the snapshot while the live filesystem keeps changing) and for quick rollback windows. They are not a backup — if the snapshot’s reserved space fills up, the snapshot becomes invalid; if the underlying VG dies, both copies die together.
Inspecting usage: df vs du, and why they disagree#
Two commands that ought to give the same answer routinely don’t.
df asks the filesystem how full it is:
| |
du walks directories and sums up the size of every file it
sees:
| |
There are three classic reasons df says “100% full” but du can’t
find the missing space.
A process still has a deleted file open#
A process opens /var/log/app.log and writes to it for weeks.
Someone deletes the file. The directory entry is gone — du doesn’t
see it, ls doesn’t see it — but the inode and its data blocks are
not freed until the last file descriptor closes. The process
keeps writing. The disk fills.
| |
The fix is to make the holding process close the file: restart the
service, send SIGHUP if it supports log re-opening, or use
logrotate’s copytruncate mode for processes that don’t.
Mount confusion#
You think you are looking at the data volume, but actually nothing is mounted there and you are filling up the parent filesystem.
| |
If findmnt returns nothing, /data is just a directory on /.
ext4 reserved blocks#
ext4 reserves 5% of the filesystem for root by default. The
intent is that essential daemons can still write even when users
have filled the disk. On large data volumes that 5% is a lot, and
it makes df report “full” before unprivileged users can write.
| |
Only do this on volumes that don’t host the OS itself.
Inode exhaustion#
A filesystem can be empty by bytes and full by inodes if a
workload creates millions of tiny files (caches, mail queues, build
artefacts). df -i will show 100% on IUse% while df -h shows
plenty of free space. The only fix is to delete files or reformat
with a higher inode density (mkfs.ext4 -N <count>); xfs allocates
inodes dynamically and rarely hits this.
Inodes, hard links, symlinks: why filesystems behave the way they do#
The data structure behind every Unix filesystem is the inode. An
inode stores all the metadata for one file: type, owner, permissions,
size, timestamps, link count, and pointers to the data blocks. It
does not store the file’s name. Names live in directories, which
are themselves files containing a list of (name -> inode number)
mappings.
This decoupling explains a lot of behaviour:
- Hard link. A second directory entry pointing to the same inode
(
ln src dst). The two names are equally first-class — neither is the “original”. Deleting one decrements the inode’s link count; the data is freed only when the count reaches zero. Hard links cannot cross filesystems and (by convention) cannot be made to directories. - Symbolic link. A tiny file whose contents are a path
(
ln -s src dst). Has its own inode. Can cross filesystems. Can become “dangling” if the target is removed. - Renaming a file within a filesystem is just rewriting one directory entry — it doesn’t touch the inode or the data blocks, which is why it’s atomic and instant.
- “I deleted the file but the disk didn’t free up” — the link
count went to zero from the directory side, but a process still
holds an open file descriptor (which counts as a reference to the
inode). The data lives until that descriptor closes. This is the
same mechanism as the
df/dudiscrepancy above.
| |
Special files in /dev#
Not every device node corresponds to hardware. A few are pure kernel abstractions you will use constantly:
/dev/null— discards everything written to it; reads return EOF. Use to silence output:command > /dev/null 2>&1./dev/zero— produces an infinite stream of zero bytes. Use to preallocate or wipe:dd if=/dev/zero of=test.bin bs=1M count=1024./dev/random,/dev/urandom— entropy sources.urandomis the one you almost always want; the historical “blocking” behaviour of/dev/randomis a quirk of older kernels and not relevant for modern crypto on Linux.
| |
End-to-end checklist: new disk to mounted filesystem#
The path that turns a freshly attached disk into usable space:
- Identify the new device.
lsblk -fshould show an empty/dev/sdb(or/dev/nvme1n1, …) with no children and no filesystem. - Decide on LVM or not. If you expect to grow this volume, put it under LVM from day one. Retrofitting LVM later requires downtime.
- Partition with GPT (
fdiskorparted). For LVM you can skip partitioning entirely andpvcreatethe whole disk — simpler, and avoids the partition layer. - Format with ext4 (general purpose) or xfs (large files / parallel I/O).
- Mount to verify:
mount /dev/sdb1 /mnt/data && df -h /mnt/data. - Persist by adding a UUID-based entry to
/etc/fstaband testing withsudo mount -a. - Verify after reboot. Do this once, in a maintenance window, before you depend on the volume in production.
If you can run that checklist confidently, most disk incidents become systematic rather than stressful — and the troubleshooting sections below become a reference rather than a panic.
Troubleshooting playbook#
“Disk full” but I just deleted gigabytes of logs#
Almost always a process holding a deleted file open.
| |
Restart the holding process or signal it to reopen its log files.
“Mount fails after reboot”#
Common causes, in order of frequency:
- Wrong UUID in
/etc/fstab. Verify withblkid. - Filesystem driver missing from the initramfs (rare, but happens with btrfs / zfs / xfs on minimal installs).
- Boot ordering: you tried to mount a path that depends on LVM /
RAID / network before that subsystem is ready. Use the
_netdevmount option for network filesystems; LVM and software RAID are usually handled by the initramfs automatically.
sudo mount -a reproduces the boot-time mount sequence, and journalctl -b | grep -i mount shows what failed.
“Performance suddenly got worse”#
Move down the layers, not up:
| |
High await with low %util typically means the storage backend
itself is slow (network-attached disk, congested cloud volume).
High %util with low queue depth often means a single-threaded
fsync workload. High %wa in vmstat with healthy disks usually
means swapping — check free -h and swapon --show.
“Read-only filesystem” suddenly#
The kernel remounts a filesystem read-only when it detects corruption it cannot safely write through. First, look at the kernel log:
| |
If the underlying disk is failing (smartctl -a /dev/sda shows
reallocated sectors or media errors), replace it. If the filesystem
itself is damaged, umount it and run the offline repair tool —
e2fsck -fy /dev/sdb1 for ext4, xfs_repair /dev/sdb1 for xfs.
Take a snapshot or a dd image first if the data matters.
Command appendix#
A compact reference you can keep open during an incident.
Discover and inspect#
| |
Partitioning#
| |
Format and inspect filesystems#
| |
Mount and persist#
| |
LVM#
| |
Diagnose#
| |
Two reminders that will save you at 3 a.m.#
- Re-run
lsblk -fbefore any destructive command. It takes one second and prevents the “I formatted the wrong disk” disaster. - After every change, verify the layer you just touched is visible at the next layer up before you continue. Block -> partition -> LVM -> filesystem -> mount. If a layer disappears, stop and find out why; do not try to power through.
Linux 9 parts
- 01 Linux (1): Basics — Core Concepts and Essential Commands
- 02 Linux (2): File Permissions — rwx, chmod, chown, and Beyond
- 03 Linux (3): Disk Management — Partitions, Filesystems, LVM, and the Mount Stack you are here
- 04 Linux (4): Package Management — apt, dnf, pacman, and Building from Source
- 05 Linux (5): User Management — Users, Groups, sudo, and Security
- 06 Linux (6): Service Management — systemd, systemctl, and journald
- 07 Linux (7): Process and Resource Management: From `top` to cgroups
- 08 Linux (8): Pipelines and File Operations — Composing Tools into Data Flows
- 09 Linux (9): Vim Essentials