
Linux (4): Package Management — apt, dnf, pacman, and Building from Source
Master package management across distributions: dpkg/apt for Debian/Ubuntu, rpm/yum/dnf for RHEL/CentOS, pacman for Arch, dependency troubleshooting, version locking, mirrors, and compiling from source.

Most people learn package management as three commands: install, remove, upgrade. That works until something goes wrong - a dependency conflict, an upgrade that won’t apply, a kernel that doesn’t boot, a mirror that times out from inside China. At that point you need a model of what is actually happening: what a package contains, what the manager is solving for, where it stores state, and how the difference between Debian’s apt/dpkg and Red Hat’s dnf/rpm shows up at 2 a.m. on a production box.
This article is the model plus the cookbook. We start with what is in a .deb or .rpm file and why a manager is needed at all. Then we walk through apt, dnf and pacman side by side - not just “the equivalent commands” but where they share assumptions and where they diverge (dependency resolution, version pinning, downgrade, repo trust). After that we cover the things you only learn the hard way: configuring a domestic mirror that actually works, building Nginx from source when the repo version is too old, dropping in a binary tarball like the JDK without apt, and a small set of habits that keep production boxes upgradable for years.
What a package actually is#
A package is a single file (.deb, .rpm, .pkg.tar.zst) that contains everything one piece of software needs plus metadata describing how it should be installed. The metadata is what makes a package a package - without it you have a tarball.
Concretely, a typical server package contains six kinds of payload:
1. Executables. Compiled binaries that go under /usr/bin (regular user commands) or /usr/sbin (system administration). Examples: /usr/bin/vim, /usr/sbin/nginx, /usr/bin/gcc.
2. Configuration files. The defaults that ship with the software, almost always under /etc. The package manager treats these specially: on upgrade it will not clobber a config file you have edited. Apt prompts you (Y/I/N/O/D/Z) and keeps a .dpkg-dist next to your file; dnf writes the new defaults as .rpmnew and leaves yours alone. This single rule has saved countless production outages.
| |
3. Shared libraries. The .so files that executables link against at runtime - the Linux equivalent of Windows DLLs. They sit under /usr/lib, /lib, or distro-specific paths like /lib/x86_64-linux-gnu/. Sharing them saves disk and memory (one copy serves every consumer) and means a single security upgrade to libssl3 patches every TLS client on the box.
| |
4. Data files. Anything the program needs at runtime that is not code or config: the empty database template under /var/lib/mysql, the default web root under /var/www/html, locale data, sample certificates, etc.
5. Documentation. Manual pages under /usr/share/man/, README and changelog under /usr/share/doc/<pkg>/. Often the first place to look before reaching for a search engine.
6. Service unit files. If the package ships a daemon, it drops a .service file under /usr/lib/systemd/system/ so that systemctl enable nginx works the moment the install finishes. These are owned by the package; admin overrides go under /etc/systemd/system/ to avoid being overwritten on upgrade.
On top of those payloads, the package metadata records: the package name and version, dependencies (Depends: in .deb, Requires: in .rpm), conflicts, post-install scripts (e.g. useradd nginx), and a SHA256 of every file. That last bit is what lets dpkg -V or rpm -V later tell you which files have been tampered with.
Why we need a package manager#
Without one you would, for every piece of software:
- Find a download link (and trust whoever runs the site).
- Manually resolve dependencies - A needs B 1.1+, B needs C, C conflicts with D you already installed.
- Decide where each file goes.
- Remember every file you copied so you can uninstall it later.
- Poll upstream by hand for security updates.
A package manager replaces all of that with a database (/var/lib/dpkg/ or the rpmdb) plus a solver. The database knows every file every installed package owns; the solver knows every package available in the configured repositories and can plan an install, upgrade or removal that is consistent. That is the entire value proposition - and it is enormous.
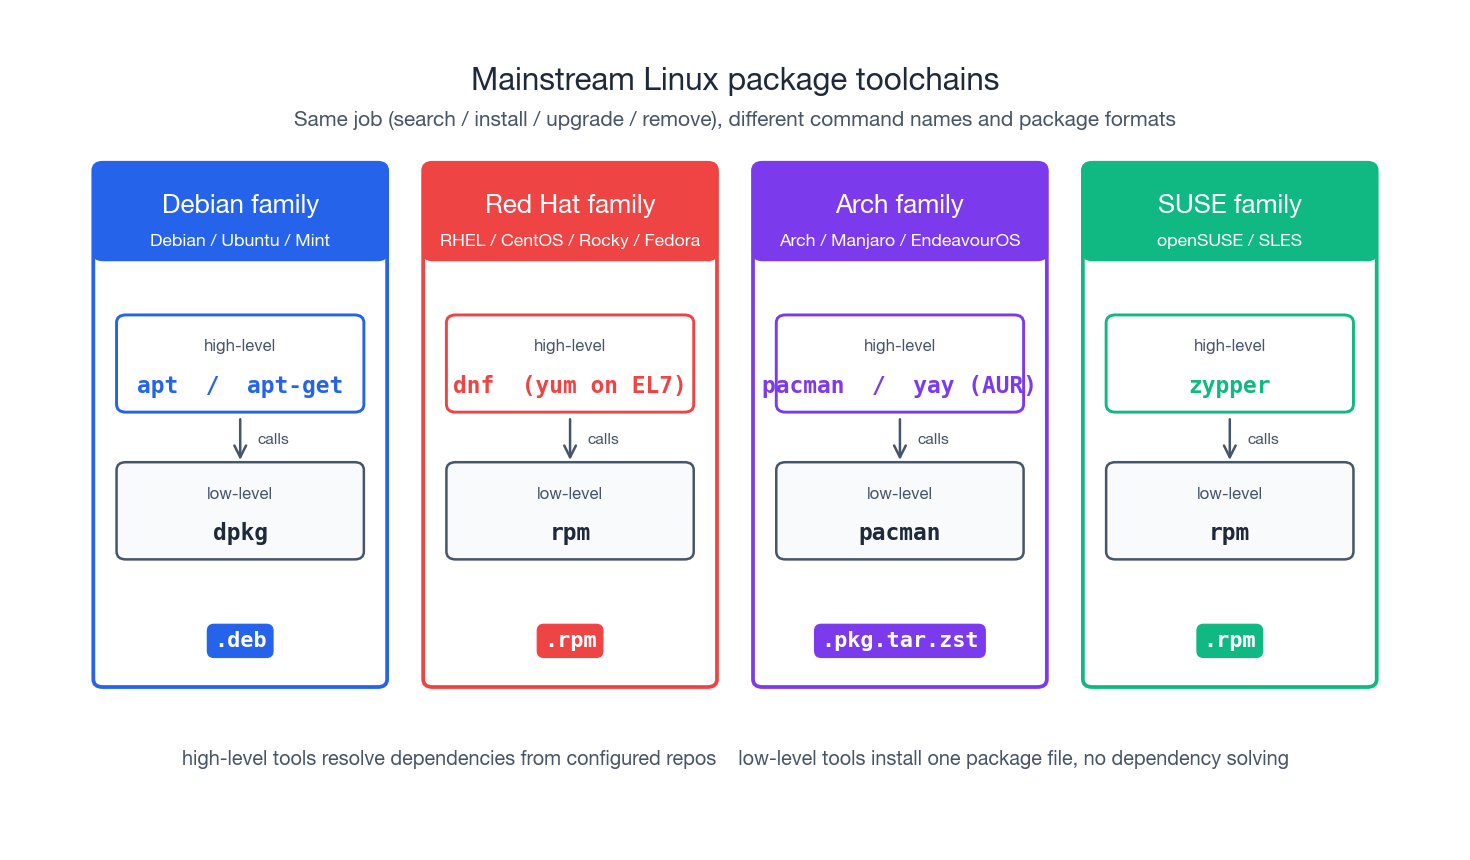
The major package toolchains#
The Linux ecosystem split into a few package families decades ago and has remained remarkably stable since. Here are the names you need to know:
| Family | Distros | Format | Low-level | High-level |
|---|---|---|---|---|
| Debian | Debian / Ubuntu / Mint | .deb | dpkg | apt, apt-get |
| Red Hat | RHEL / CentOS / Rocky / Alma / Fedora | .rpm | rpm | dnf (yum on EL7) |
| Arch | Arch / Manjaro / EndeavourOS | .pkg.tar.zst | pacman | pacman, yay |
| SUSE | openSUSE / SLES | .rpm | rpm | zypper |
| Gentoo | Gentoo | source ebuild | - | portage (emerge) |
The split that matters in practice is low-level vs high-level. Low-level tools (dpkg, rpm, plain pacman -U) operate on a single file: they unpack, run scripts and update the local database, but they will not fetch missing dependencies. High-level tools (apt, dnf, pacman -S, zypper) wrap the same actions but talk to remote repositories and run a dependency solver. Most of the time you want the high-level tool. The low-level tool is what you reach for when something the high-level tool would not let you do is exactly what you need - like force-installing a package that conflicts on paper, or extracting a .deb to inspect its contents.
The rest of the article focuses on apt (Debian/Ubuntu), dnf (RHEL/Rocky/Fedora) and pacman (Arch), with notes on the underlying dpkg / rpm tools where they matter.
Dependency resolution: the actual hard part#
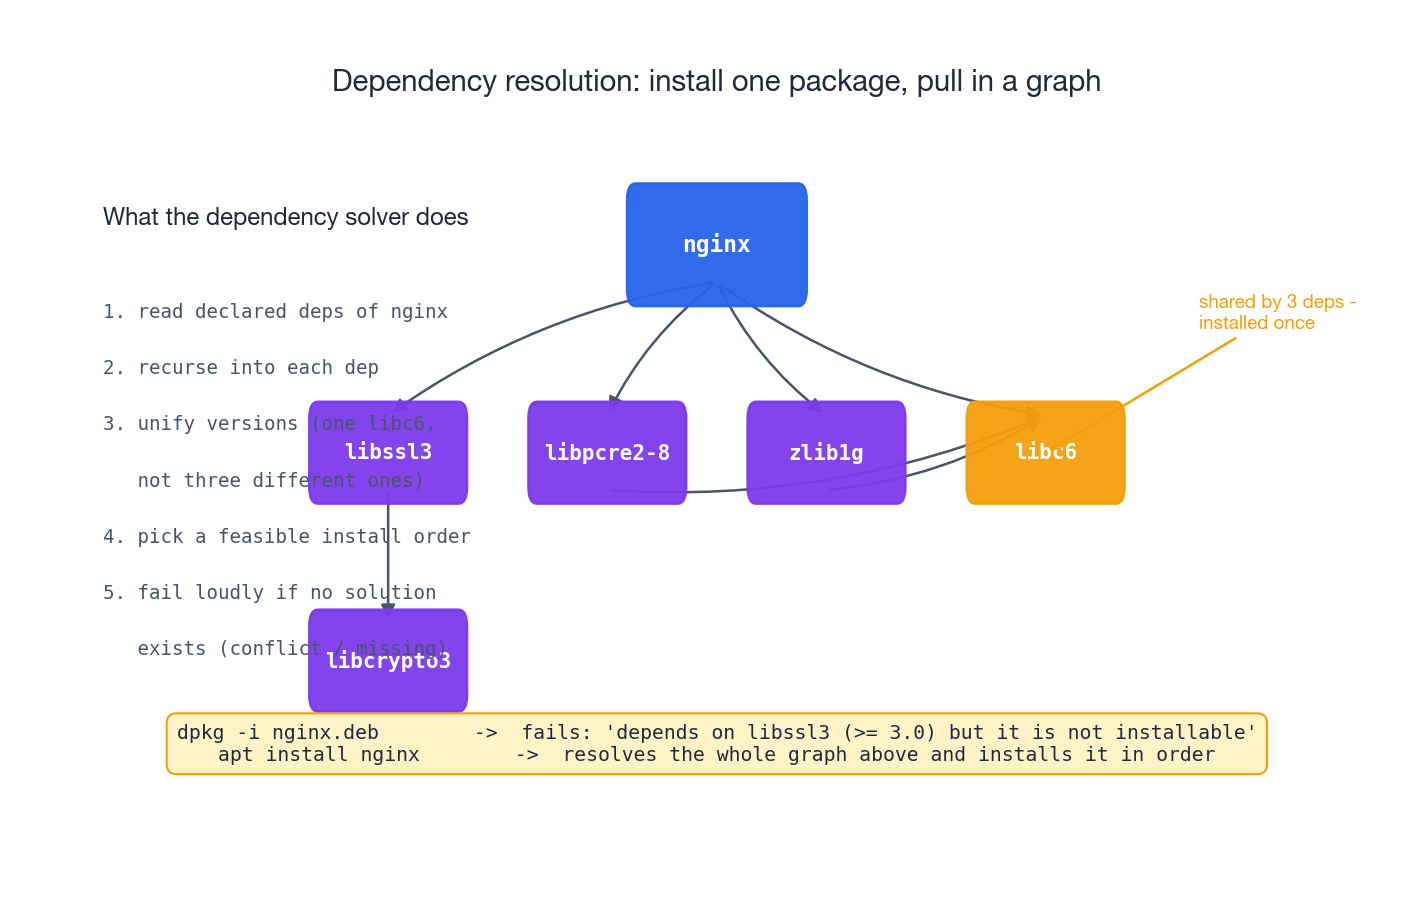
The most surprising thing about package managers is that the bulk of their code is not the install logic - it is the solver. Here is what apt install nginx actually has to do:
- Read the metadata for
nginxfrom the cachedPackagesindex. - Walk the dependency graph -
nginxdepends onlibssl3,libpcre2-8,zlib1g,libc6, …; each of those depends on more things; you stop when you hit something already installed at an acceptable version. - Unify versions. If two paths through the graph want different versions of
libc6, the solver has to either find a single version that satisfies both, or report a conflict. There is no “install both” option for shared libraries - the dynamic loader resolves names, not paths, and you get one binding. - Choose an install order that respects “this must be installed before that” so post-install scripts don’t run with their dependencies missing.
- Fail loudly if no consistent solution exists, rather than half-installing and leaving the system in a bent state.
When you skip the high-level tool, you lose all of this:
| |
The apt install -f step is the dependency solver running after the fact to repair a partial state. You can avoid the whole dance by letting the high-level tool handle the local file in the first place:
| |
The same logic applies to removal. If you have nginx and libcache-extra installed, removing only libcache-extra is fine - but uninstalling nginx should also remove the now-orphaned libpcre2-8 if nothing else needs it. That is what apt autoremove and dnf autoremove do.
Debian / Ubuntu: apt and dpkg#
When to use which#
| Tool | What it is | When to use |
|---|---|---|
apt | Modern user-facing front-end. Colour, progress bars, sane defaults. | Interactive shells, day to day. |
apt-get | Older front-end with the same engine. Stable, parseable output. | Shell scripts, Ansible, Dockerfiles. |
dpkg | The low-level tool. Operates on one .deb at a time. No dependency solver. | Inspect a package, force a state, rescue. |
A useful mental model: apt is apt-get plus interactive niceties; apt-get is the dependency solver wrapping dpkg; dpkg is what actually unpacks files and runs maintainer scripts.
Daily commands#
| |
Two commands new admins reliably get wrong:
apt updatedoes not install anything. It downloads the latestPackagesindexes from your mirrors so the nextapt installknows what is available. Forgetting to run it is the reason “the package exists, but I can’t install it.”apt removekeeps/etc. That is usually what you want (reinstalling later restores your config), but if you are decommissioning the service for good,apt purgeis the right call.
Searching, inspecting, locating#
| |
The last two are operational lifesavers. “What did this package put on my disk?” and “Which package does this random binary belong to?” come up constantly during incident response, and there is no Linux equivalent of running dpkg -S against an unknown file in the path.
Pinning, downgrading, locking#
| |
Holds are how you survive a known-bad upstream release: pin the previous version, schedule the proper upgrade for a maintenance window, move on.
Cleaning up#
| |
A single combined cleanup that I keep in muscle memory:
| |
Run it once a week on every box you own and your /var partition will thank you.
RHEL / Rocky / Fedora: dnf (and yum, and rpm)#
dnf replaced yum in CentOS 8 / RHEL 8 and Fedora 22. The command surface is almost identical (a deliberate design goal), but the engine underneath is rewritten in Python with a proper SAT solver (libsolv), which is why dnf operations feel noticeably faster on large transactions. CentOS 7 still ships yum; everywhere else assume dnf.
Daily commands#
| |
dnf downgrade is one of the things dnf does better than apt - in the apt world a downgrade is “install the older version and hope it doesn’t conflict”; in the dnf world it is a first-class operation.
Searching, inspecting, locating#
| |
rpm -V is the underrated one. Output like S.5....T. c /etc/nginx/nginx.conf decodes as: size differs (S), MD5 differs (5), mtime differs (T), and it is a config file (c). Config files are expected to differ from the original; binaries differing under /usr/sbin/ are how you find that something tampered with the system.
Pinning and history#
| |
dnf history has no real apt equivalent. It records every transaction with timestamps, command line, and full diff, and it can roll any of them back. On servers that have lived through several admins this is how you reconstruct what happened.
Arch: pacman#
Arch Linux uses pacman for both low-level and high-level work. It is rolling-release - there is no “Arch 22.04,” just “what the repos look like right now” - so the workflow is biased toward “always upgrade everything together”:
| |
Arch’s golden rule: do not partial-upgrade. pacman -S nginx after weeks of not running pacman -Syu can pull in a nginx built against newer libraries than you have, and you end up with a broken nginx. Always sync the system before installing anything new, or just use pacman -Syu nginx to do both atomically.
The Arch User Repository (AUR) - community-maintained build recipes - is fronted by tools like yay or paru, which wrap pacman plus makepkg to fetch source, build, and install in one step. Useful, but treat anything from the AUR as “I will read this PKGBUILD before installing it.”
The lifecycle on one box#
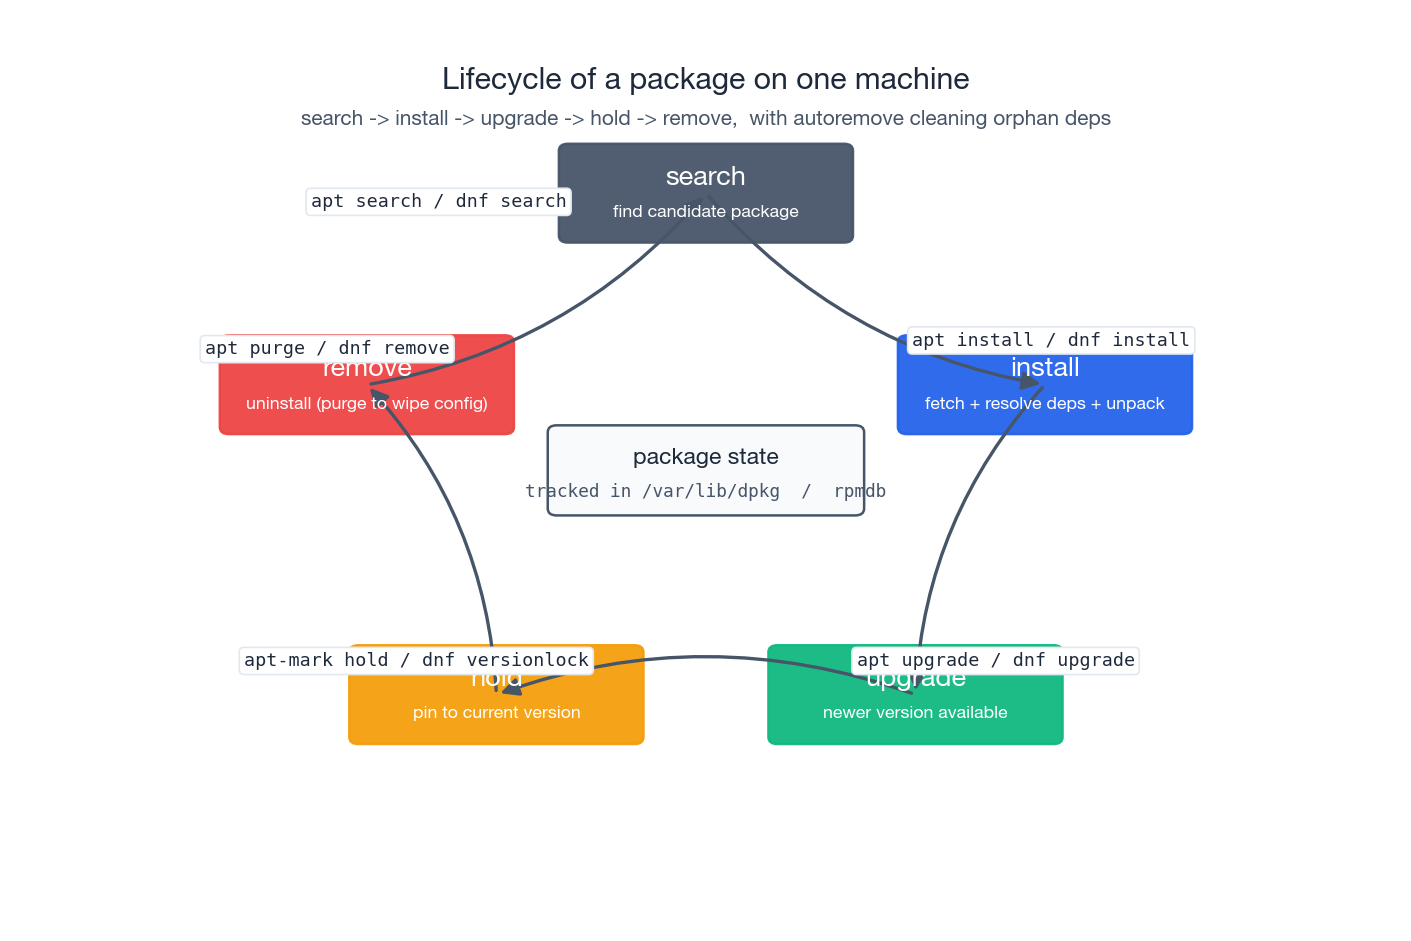
Stepping back from the individual tools, every package on your system moves through the same lifecycle: search -> install -> upgrade (or hold) -> remove. The package manager records the current state of every package in its database (/var/lib/dpkg/status for Debian, the rpmdb under /var/lib/rpm/ for Red Hat). Every command you run is, mechanically, a transaction against that database plus actions on disk to make reality match.
This is why “I deleted the binary by hand” is always wrong. The database still says the package is installed; the next upgrade of that package will silently put the file back; dpkg -V / rpm -V will report the file as “missing.” Either remove the package properly (apt purge, dnf remove) or, if you really need to keep the package metadata but blank the binary, divert it (dpkg-divert).
How a repository is laid out#
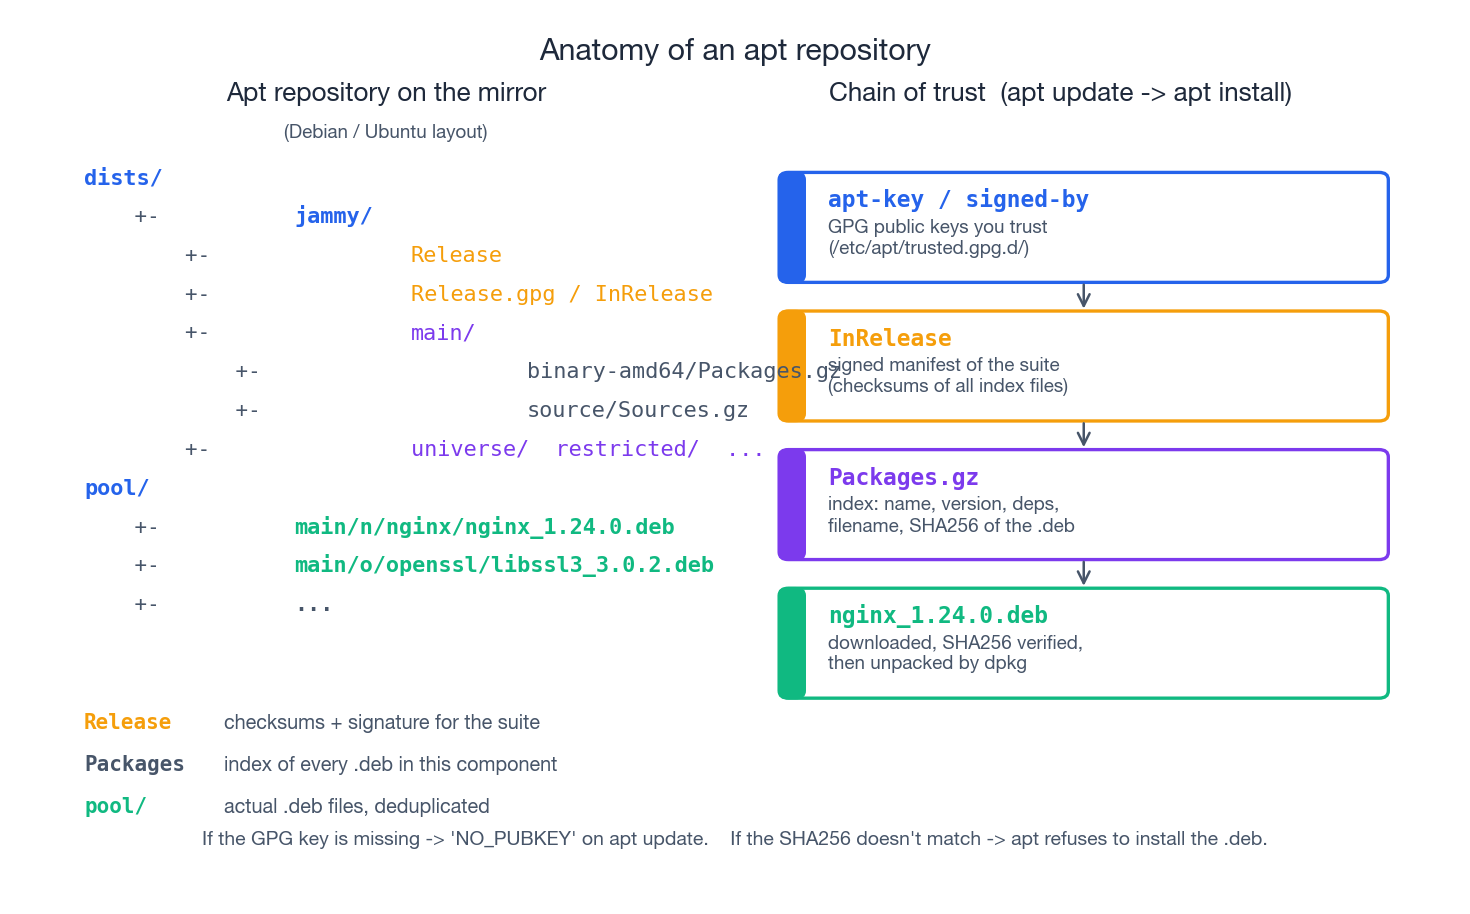
When you run apt update, your machine talks HTTPS to a mirror and downloads index files in a very specific layout. Understanding that layout makes broken-mirror diagnostics a matter of curl-ing the right URL.
A Debian-style apt repo serves two trees:
dists/<suite>/- per-suite metadata. The top file isRelease(or its inline-signed cousinInRelease), which lists every component (main,universe, …) and architecture, with SHA256 sums of the correspondingPackages.gzindex files.Release.gpgis a detached GPG signature. This is the root of trust.pool/- the actual.debfiles, organised by source-package name (pool/main/n/nginx/nginx_1.24.0-1_amd64.deb).
The chain of trust on apt install nginx is:
- Your machine has GPG public keys it trusts under
/etc/apt/trusted.gpg.d/(placed there bysigned-by=in the source list, or historically byapt-key). apt updatefetchesInRelease, verifies the signature against those keys, and refuses to use the suite if verification fails (NO_PUBKEYerrors come from this step).- From
InReleaseit knows the SHA256 ofPackages.gzfor each component; it fetches them and verifies. - From
Packages.gzit knows the SHA256 ofnginx_1.24.0-1_amd64.deb; it fetches it frompool/, verifies, and only then hands it todpkg.
If anything in this chain breaks - missing key, modified Release, mismatched checksum on the .deb - apt aborts. That is the security guarantee: a malicious mirror can serve you whatever bytes it wants, but it cannot get them past the chain unless it also has the upstream signing key.
The Red Hat side is structurally similar: repodata/repomd.xml is the signed manifest, with checksums of the primary.xml.gz index and the .rpm files under the repo. dnf enforces the same chain unless you explicitly disable gpgcheck (you should not).
Configuring a domestic mirror (China)#
The default Ubuntu and CentOS mirrors are slow from inside China. The fix is to point the source list at a domestic mirror. The two big ones are Aliyun (mirrors.aliyun.com) and Tsinghua (mirrors.tuna.tsinghua.edu.cn). Both serve every popular distro.
Ubuntu (apt):
| |
Codenames for the common Ubuntu LTS releases: bionic (18.04), focal (20.04), jammy (22.04), noble (24.04). Use the right one in the sources file.
Ubuntu 24.04 moved from /etc/apt/sources.list to /etc/apt/sources.list.d/ubuntu.sources in the deb822 format. The same find-and-replace works, just on the new file.
CentOS / Rocky (dnf):
| |
The Tsinghua mirror exposes the same paths with mirrors.tuna.tsinghua.edu.cn substituted; pick whichever is faster from your network. After switching, run a real upgrade (apt upgrade -y / dnf upgrade -y) - if the mirror is misconfigured you find out immediately, not the day you actually need to install something.
Building from source: configure / make / make install#
Sometimes the repo version is too old, or you need a build option that the distro package omits (an Nginx module, an OpenSSL version, a tuning flag). Source builds are the fallback. The canonical recipe is the autotools three-step:
./configureprobes your system - which compiler, which libraries, which headers - and writes aMakefilethat reflects the answers and the options you asked for.makeruns the compiler against the source according to thatMakefile.sudo make installcopies the built artifacts into the directories theMakefilerecorded, typically under whatever--prefixyou gave toconfigure.
Cmake and Meson projects use different verbs (cmake -B build, cmake --build build, cmake --install build) but follow the same shape: configure, build, install.
Worked example: Tengine (Nginx fork) on Ubuntu#
Tengine is Taobao’s Nginx fork with extra modules. The build is identical to upstream Nginx - if you can build Tengine you can build Nginx.
| |
What each step actually did:
./configurechecked that you have a C compiler and the OpenSSL/PCRE/zlib development headers. If anything was missing you got a clear error - install the missing-devpackage and re-run. It then wrote aMakefilethat bakes in/usr/local/nginxas the install path and enables the four HTTP modules you asked for.makewalked theMakefileand producedobjs/nginxplus a few helpers.sudo make installcreated/usr/local/nginx/{sbin,conf,logs,html}and copied the binary, default config and sample HTML into them. It did not create a systemd unit, register a user, or open a firewall port - that is on you.
Run it:
| |
To get it under systemd, drop /etc/systemd/system/nginx.service:
| |
then:
| |
The catch you sign up for the moment you build from source: there is no apt upgrade for it. You own the upgrade path, the security tracking, and the rebuild-when-OpenSSL-changes work. For most production workloads the right answer is “use the distro package unless I have a concrete reason not to.” Source builds are for when you have that reason.
Binary tarballs: the JDK example#
Some software ships as “extract and run” binary archives - JDKs, Go, Node.js, most database engines. There is no installer to argue with; the filesystem layout and the environment variables are entirely your call.
| |
/etc/profile.d/*.sh is sourced by login shells for every user, which is the right scope for a JDK. For per-user installs use ~/.bashrc or ~/.zshrc instead. To run multiple JDK versions side by side, drop them all under /opt/jdk-XX and switch via JAVA_HOME (or use a tool like sdkman / jenv).
The same pattern works for Go (/opt/go), Node.js (/opt/node-vXX), and so on. They are popular precisely because they sidestep the distro release cycle - useful when you need a specific upstream version and the distro is six months behind.
Modern alternatives: Snap, Flatpak, AppImage#
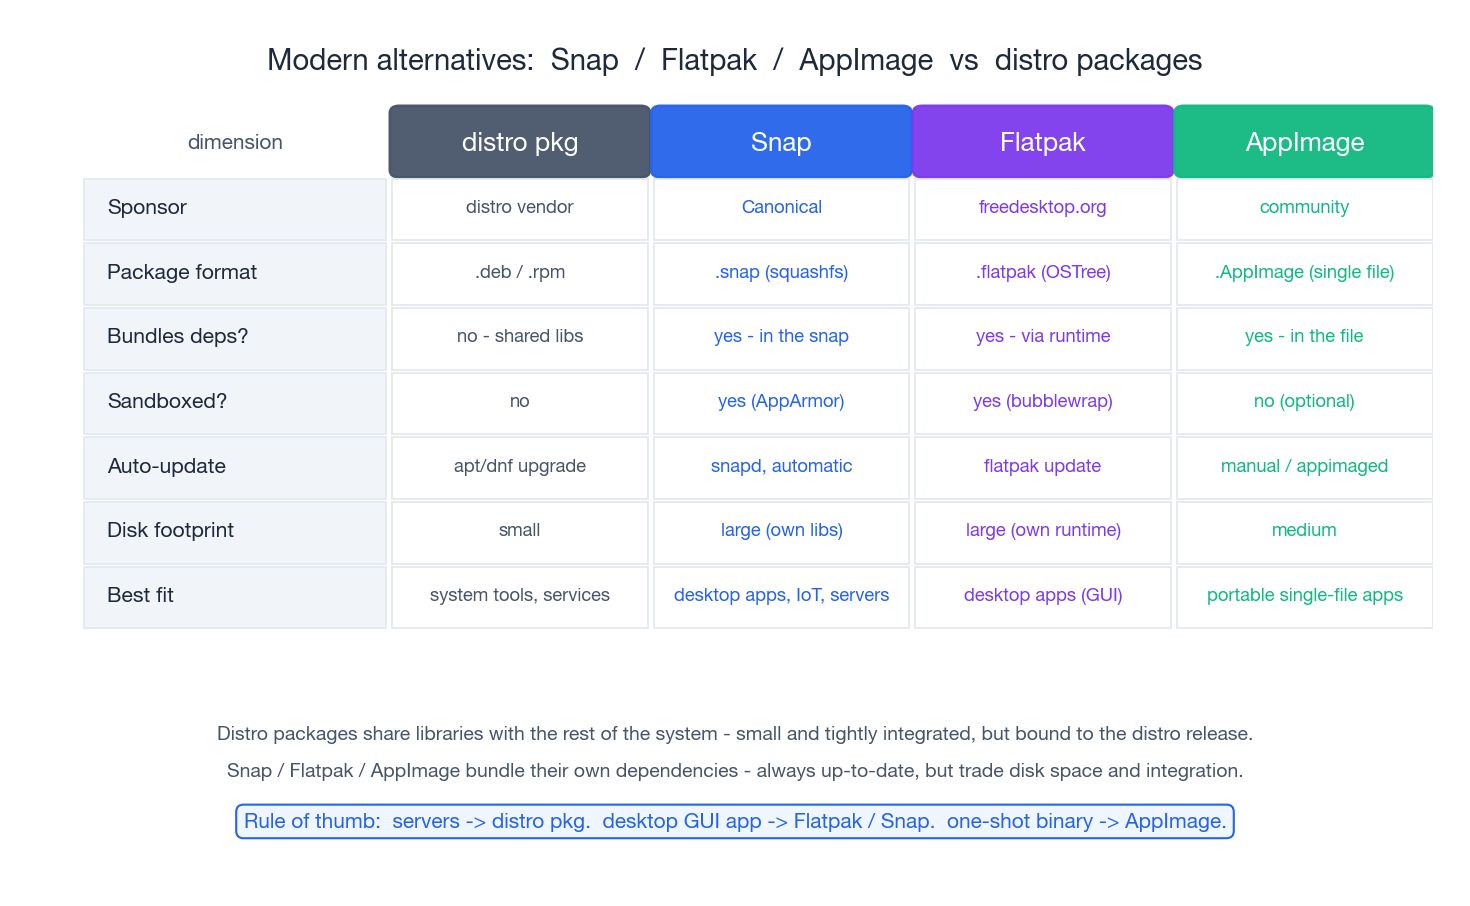
The distro package model has one persistent weakness: it ties a piece of software to the rest of the system. A Firefox built against Ubuntu 22.04’s glibc and gtk cannot easily be shipped to RHEL 8. Three projects address this differently:
- Snap (Canonical) - bundles dependencies inside a
.snaparchive (a SquashFS image), runs apps under AppArmor confinement, and updates automatically viasnapd. Default for some Ubuntu apps (Firefox, the Chromium snap). Ubiquitous on Ubuntu, less so elsewhere. - Flatpak (freedesktop.org / RHEL community) - bundles apps against shared runtimes (e.g.
org.freedesktop.Platform//22.08), sandboxed viabubblewrap, distributed mostly via Flathub. The de-facto standard for Linux desktop GUI apps. - AppImage - one self-contained executable file, no install step, no daemon, no sandbox by default. Double-click to run. Great for “I just want to try this app” or for distributing internal tools.
| |
When to reach for which:
- Server-side stuff (
nginx,mysql,python,redis) - distro packages, every time. They are smaller, integrate with systemd, and security updates land via the distro security team. - Desktop GUI apps that ship faster than the distro - Flatpak (Flathub has the widest selection) or Snap.
- One-off binaries you want to evaluate without polluting the system - AppImage.
You can mix all four on the same machine. They install into separate roots, use separate update mechanisms, and do not collide.
Habits that keep production boxes upgradable#
These are the rules I have ended up with after years of fixing other people’s boxes:
1. Update on a schedule. Not “when something breaks.” Weekly apt upgrade -y / dnf upgrade -y on every server, gated through whatever change-management you have. The longer a box goes without updates, the harder the eventual upgrade gets.
2. Clean as you go.
| |
When /var fills up unexpectedly, the package cache is the first thing to check:
| |
3. Pin what you cannot afford to upgrade silently. Database engines, kernels on workloads with custom modules, anything you have benchmarked at a specific version. Hold it (apt-mark hold / dnf versionlock add) and upgrade it deliberately.
4. Do not mix package manager and source builds for the same software. If apt install nginx and make install both put an nginx on your PATH, you will eventually start the wrong one, edit the wrong config and waste an hour figuring it out. Pick one.
5. Source-built software lives under /opt or /usr/local. The package manager owns /usr (except /usr/local). Stay out of its way.
6. Back up /etc before touching it.
| |
The package manager won’t help you if you broke a config file at 3 a.m. - your backup will.
7. Use language-level isolation for language packages. Python: python3 -m venv or uv. Node.js: nvm for versions, npm/pnpm for project deps. Don’t let pip install --user pollute the system Python that other distro packages depend on.
8. Read what you are about to do. apt/dnf print the full plan before they execute. If the list of packages it wants to remove is larger than expected, stop and figure out why before saying yes. The vast majority of “I broke my system with apt” stories begin with someone hitting y on a prompt that mentioned removing 200 packages.
Summary#
The map of package management you should leave with:
- A package is files plus metadata; the manager exists to keep that mapping consistent in a database that survives reboots.
- High-level tools (
apt,dnf,pacman) run the dependency solver and talk to repositories. Low-level tools (dpkg,rpm) operate on one file at a time. - The hard part of a package manager is dependency resolution, and you avoid most pain by always going through the high-level tool.
- Repositories are signed file trees, and the trust chain goes from the GPG keys you ship with the system through
Release/repomd.xmldown to each individual.deb/.rpm. - Source builds are the fallback for when the repo version is wrong; pay the upgrade tax knowingly.
- Snap / Flatpak / AppImage solve the “ship to many distros” problem at the cost of disk and integration; great for desktop apps, niche for servers.
Further reading:
- Debian package management reference - https://www.debian.org/doc/manuals/debian-reference/ch02
- DNF documentation - https://dnf.readthedocs.io/
- Arch Pacman/Rosetta - https://wiki.archlinux.org/title/Pacman/Rosetta (cross-distro command translator)
- RPM packaging guide - https://rpm-packaging-guide.github.io/
Next in the series:
- Linux process and resource management - cgroups,
ps,top,nice, OOM killer. - Linux user management - users, groups, sudoers, PAM.
Once you can configure a mirror, lock a version, debug a dependency conflict, and decide between distro packages, source builds and Flatpak on the merits, you have stopped fighting the package manager and started using it.
Linux 9 parts
- 01 Linux (1): Basics — Core Concepts and Essential Commands
- 02 Linux (2): File Permissions — rwx, chmod, chown, and Beyond
- 03 Linux (3): Disk Management — Partitions, Filesystems, LVM, and the Mount Stack
- 04 Linux (4): Package Management — apt, dnf, pacman, and Building from Source you are here
- 05 Linux (5): User Management — Users, Groups, sudo, and Security
- 06 Linux (6): Service Management — systemd, systemctl, and journald
- 07 Linux (7): Process and Resource Management: From `top` to cgroups
- 08 Linux (8): Pipelines and File Operations — Composing Tools into Data Flows
- 09 Linux (9): Vim Essentials