Vim Essentials: Modal Editing, Motions, and a Repeatable Workflow
Learn Vim by understanding its grammar -- modes, operators + motions, text objects -- not by memorizing shortcuts. A practical, beginner-friendly guide with a one-week practice plan.
Most people quit Vim because they try to memorize shortcuts. That is the wrong frame. Vim is a small language: learn the grammar – operator + motion – and you can express any edit without ever opening a cheat sheet again. This guide walks you through the 80% of Vim you will use daily, then shows how the remaining 20% composes naturally from the same handful of rules.
What you will learn
- The single core idea: modes plus composable operations (operator + motion)
- The handful of motions, text objects, and operators that cover almost everything
- File operations, search & replace, macros, marks, registers
- Buffers vs windows vs tabs – the mental model people most often get wrong
- A minimal
.vimrcand a one-week deliberate-practice plan to build muscle memory
Prerequisites
- Any terminal (Vim ships with virtually every Unix-like system)
- A willingness to feel slow for about a week
1. The core idea – modes plus a tiny grammar
Vim revolves around one loop:
- Move to what you want to change (a motion).
- Select the scope (implicitly via the motion, or explicitly in Visual mode).
- Apply an operator – delete, change, yank.
Once that loop becomes reflex, you stop “remembering keys” and start “speaking Vim.”
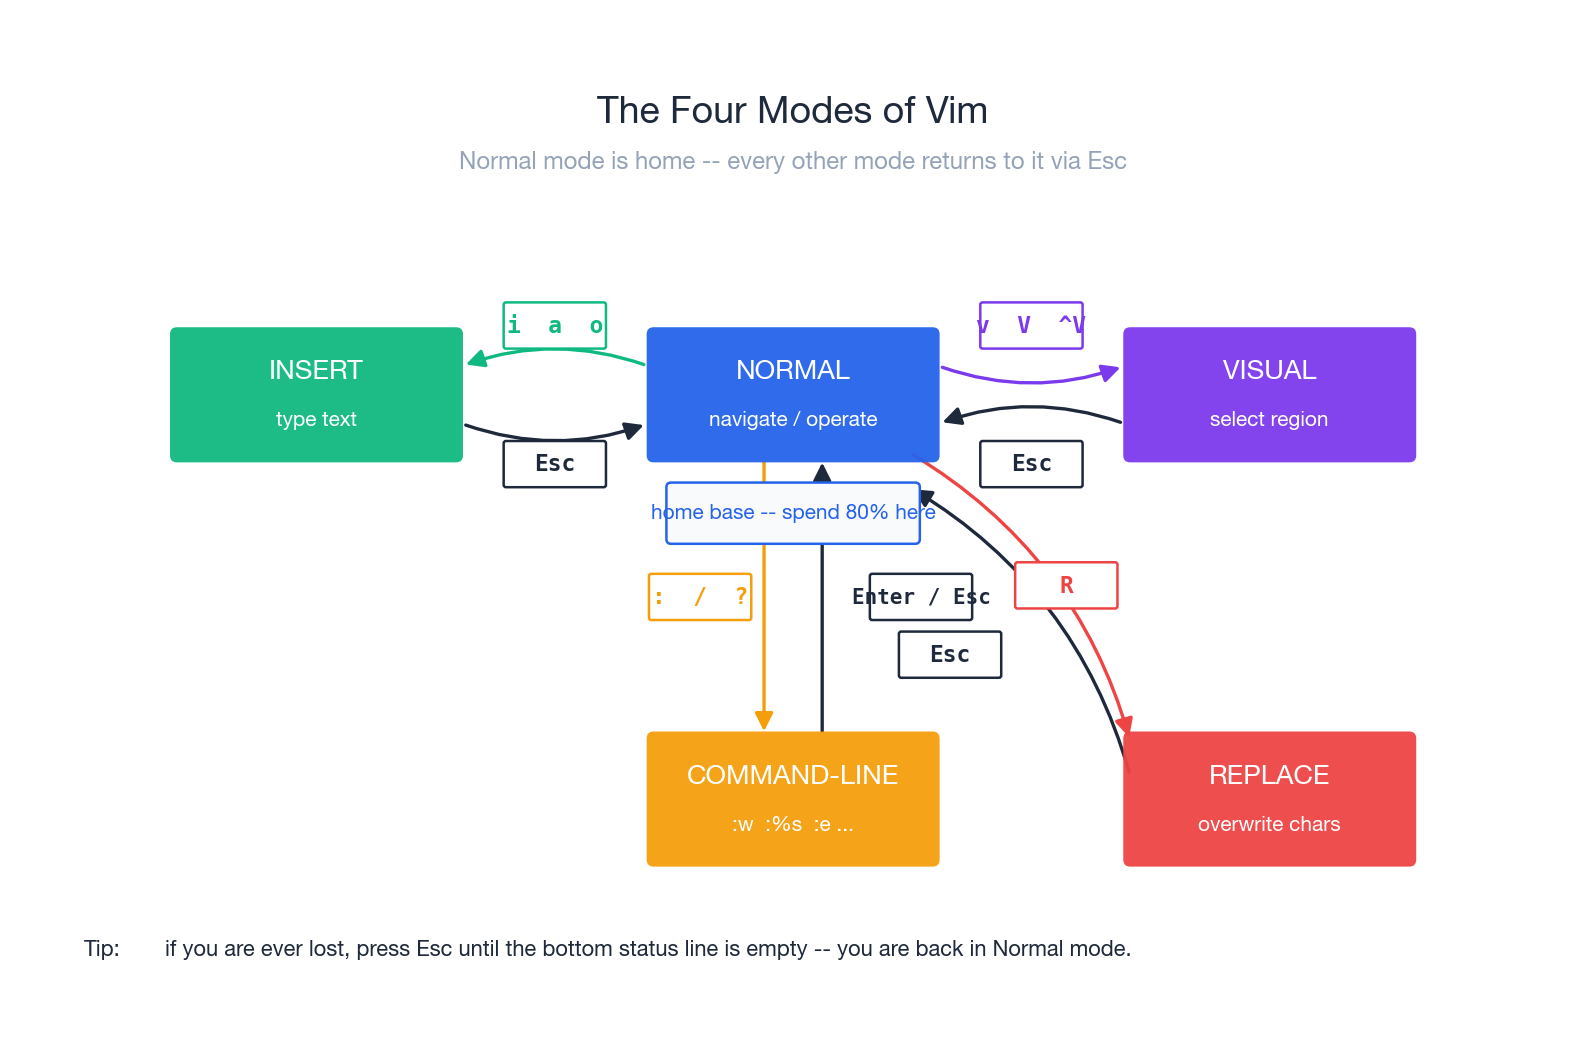
The four modes you actually use
- Normal mode – navigation and commands. Vim starts here. Spend ~80% of your time here.
- Insert mode – type text. Treat it as a temporary detour: enter, type a small chunk, leave.
- Visual mode – select text (character / line / block).
- Command-line mode – everything that starts with
:(save, search & replace, settings) or/and?(search).
Replace mode (R) exists too, but most people only enter it by accident. If your typing is suddenly overwriting characters, press Esc – you slipped into Replace.
The single most important habit: the moment you finish typing, press
Esc. Idle time should be spent in Normal mode, where every key is a command.
Operators and motions – the grammar
A Vim command reads like a tiny English sentence:
[count] operator motion
Operators – what to do:
| Op | Meaning |
|---|---|
d | delete |
c | change (delete + Insert) |
y | yank (copy) |
> | indent right |
< | indent left |
= | auto-indent |
Motions / text objects – how much:
w/b– next / previous word0/^/$– line start / first non-blank / line endgg/G/{n}G– file top / file end / lineniw/ip/i"– inner word / paragraph / quoted string
Now compose:
dw– delete a wordd$– delete to end of lineciw– change inner wordyip– yank a paragraph3dw– delete the next three words
That’s the whole game. Memorize the operators (there are five), memorize a dozen motions, and you can already edit faster than you can in most GUI editors.
2. Movement – jump, do not crawl
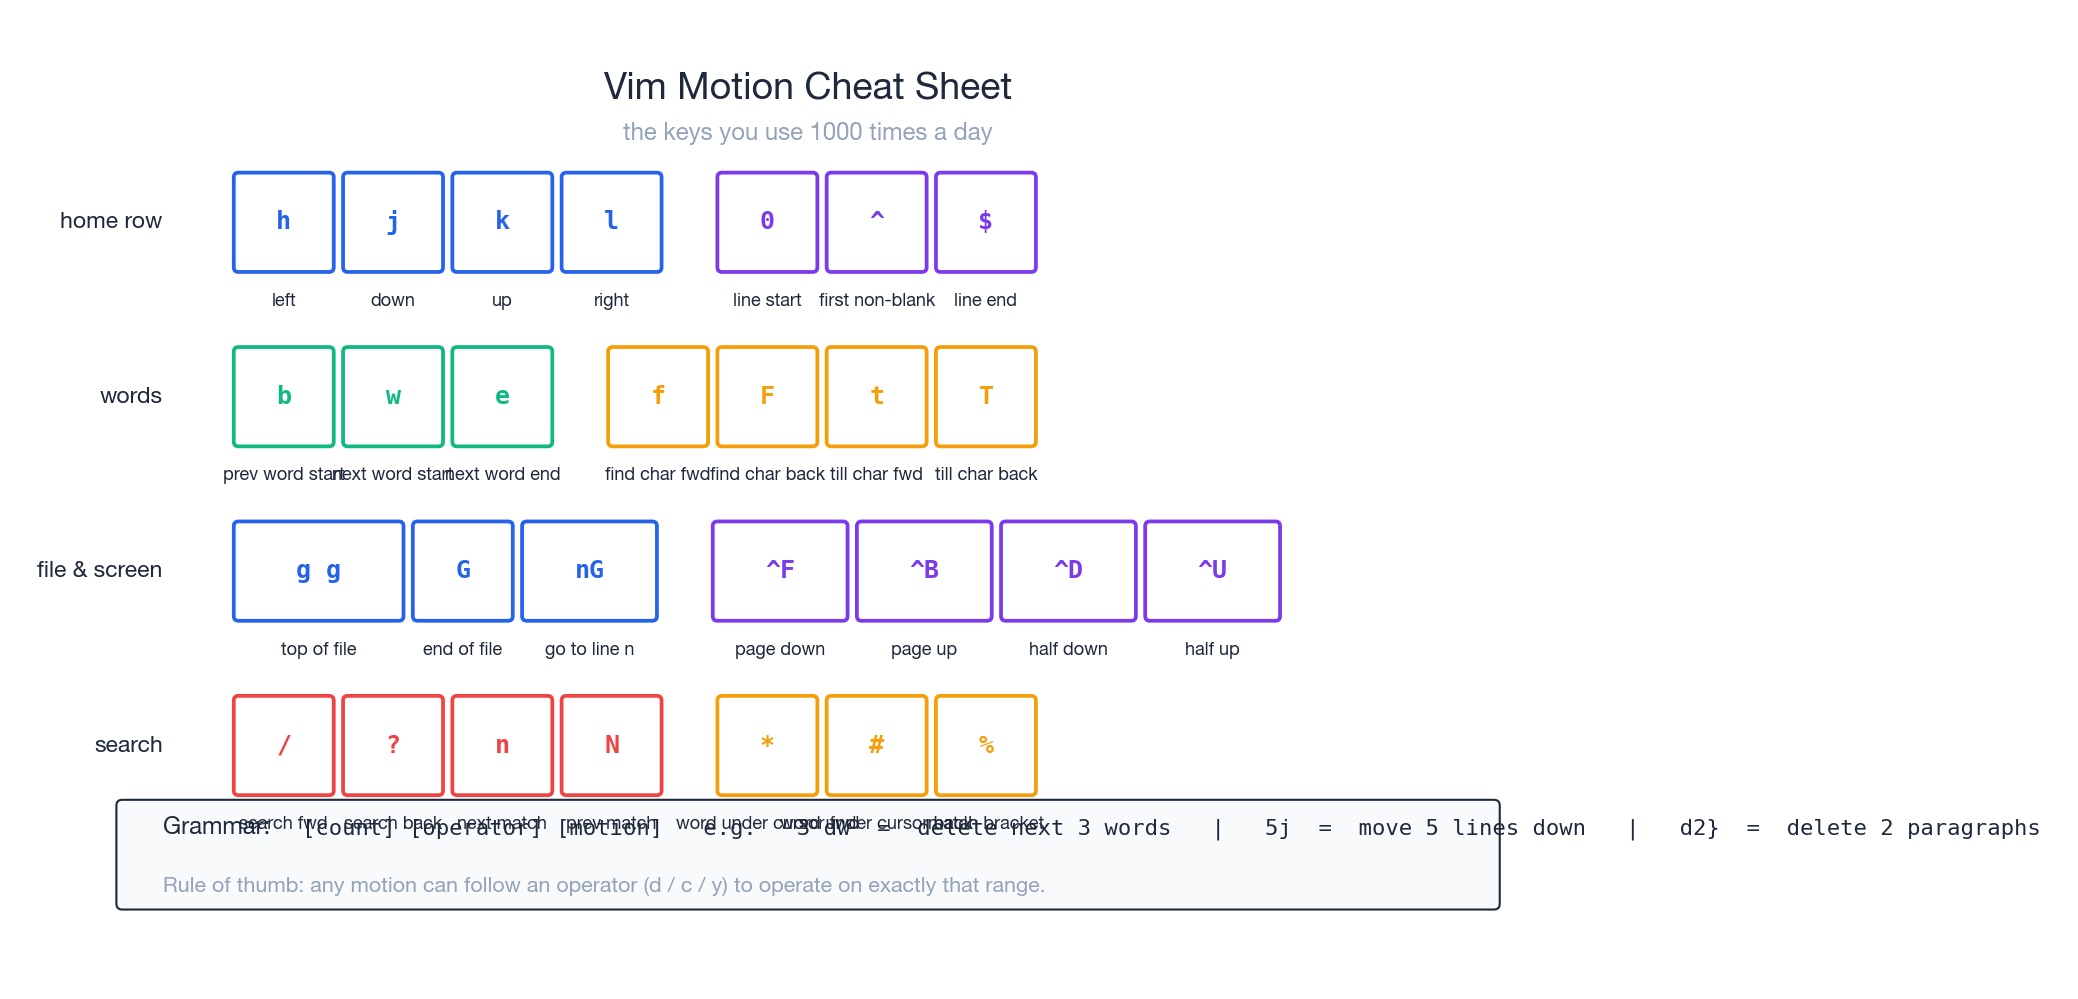
The cheat sheet above is worth printing once and then never looking at again. The categories matter more than the keys:
- Char-level (
h j k l): only when you have nothing better. If you find yourself pressingjmore than three times, you should have used a different motion. - Word-level (
w b e): jump by tokens. - Line-level (
0 ^ $): start, first non-blank, end. - File-level (
gg G {n}G): top, bottom, specific line. - Screen-level (
Ctrl-f,Ctrl-b,Ctrl-d,Ctrl-u): page or half-page. - Search-level (
/pattern,?pattern,n,N,*,#): the fastest way to navigate code is to search for a token, not to scroll.
Two motions deserve special mention because they pair perfectly with operators:
f{char}jumps to the next occurrence of{char}on the line;t{char}jumps to just before it. Sodf,deletes everything up to and including the next comma – a very common need when editing argument lists.%jumps between matching brackets.d%from an opening(deletes the entire parenthesised expression.
3. Edits – delete, change, yank, paste
Delete
| Key | Effect |
|---|---|
x | delete the character under the cursor |
dd | delete the current line |
d{motion} | delete the range a motion would cover |
D | delete from cursor to end of line (d$) |
Change (delete + enter Insert)
| Key | Effect |
|---|---|
cc | replace the line |
c{motion} | replace the range and start typing |
C | change to end of line (c$) |
Yank (copy)
| Key | Effect |
|---|---|
yy | yank the line |
y{motion} | yank the range |
Y | yank to end of line |
Paste
p– paste after the cursor (or below the line for line-wise yanks).P– paste before.
Undo and redo
u– undo.Ctrl-r– redo.:earlier 5m/:later 30s– time-travel through the undo tree (yes, Vim’s undo is a tree, not a stack).
“Cut” is just delete
There’s no separate cut command. Delete already puts the text in a register, so to move a line: dd -> navigate -> p.
The repeat dot
. repeats your last change. After ciw + typing host + Esc, you can move to another word and press . to change it to host as well. The dot command turns the operator-motion grammar into a one-key macro; learn to make every edit “dottable”.
4. Text objects – edit by meaning, not by position
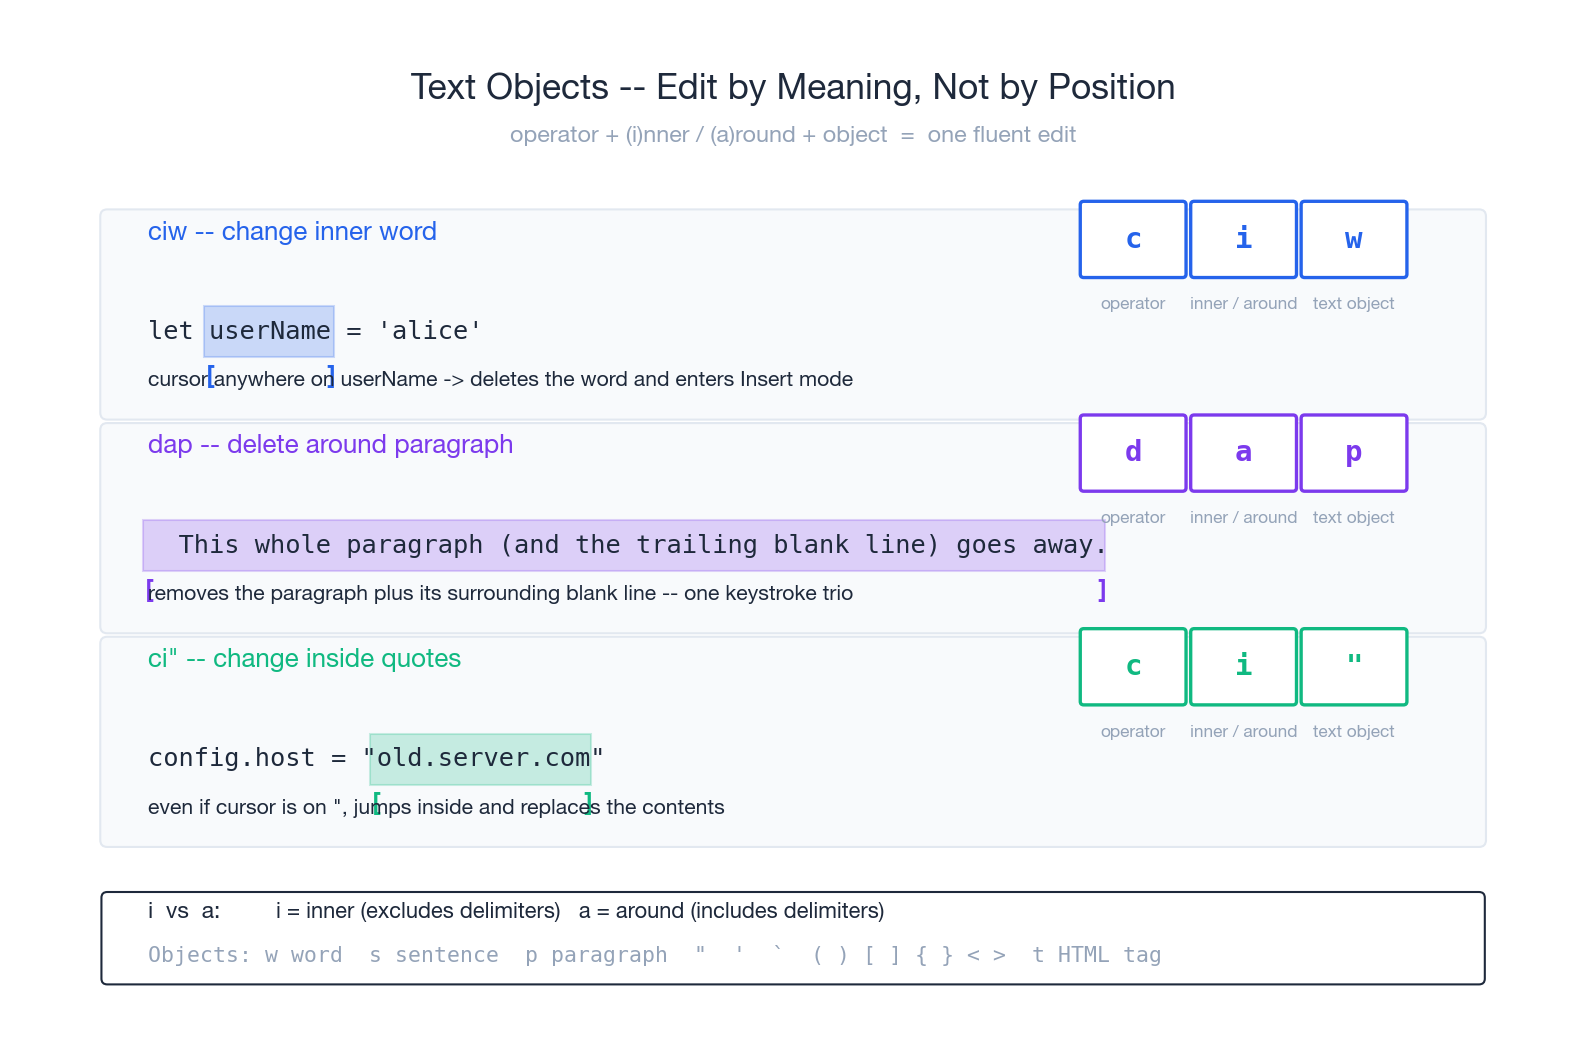
Text objects are the feature most beginners skip and most experts use constantly. Instead of selecting boundaries by hand, you name a semantic unit:
i(inner) excludes the delimiters.a(around) includes them.
| Object | Meaning | Example |
|---|---|---|
iw / aw | inner / around word | ciw change a word |
is / as | inner / around sentence | dis delete a sentence |
ip / ap | inner / around paragraph | yip yank a paragraph |
i" / a" | inside / around "..." | ci" rewrite a string literal |
i' / a' | inside / around '...' | di' delete a single-quoted str |
i( / a( | inside / around (...) | da( delete with the parens |
i{ / a{ | inside / around {...} | ci{ rewrite a block |
i[ / a[ | inside / around [...] | di[ delete an array literal |
it / at | inside / around HTML tag | cit rewrite tag content |
The cursor does not need to be on the boundary – ci" works from anywhere inside or even on the quotes. That is the whole point: you stop thinking “select then act” and start thinking “act on this thing”.
5. Search and replace – with safety
/pattern searches forward, ?pattern searches backward; n and N step through matches.
Replace follows the classic ed/sed syntax:
:s/old/new/        " first match on this line
:s/old/new/g       " all matches on this line
:%s/old/new/g      " all matches in the buffer
:10,40s/old/new/g  " only lines 10 to 40
:%s/old/new/gc     " global, with confirmation prompt
A safer workflow than just running :%s/old/new/g:
- Run
/oldfirst and step through withnto confirm the pattern is what you think it is. - Then run
:%s//new/gc– the empty pattern reuses your last search, andcmakes Vim asky / n / a / qfor each match. - Run
:nohto clear the highlight when you are done.
Useful flags inside the search pattern itself:
\ccase-insensitive,\Ccase-sensitive\<word\>whole-word match\v“very magic” mode – treats more characters as regex meta (much closer to Perl/PCRE)
6. Macros – automate without leaving Vim
Macros are the highest-ROI “advanced” feature in Vim because they turn any repetitive edit into a one-time recording.
qa            " start recording into register a
... edits ... " do the edit you want to repeat (move + operate)
q             " stop recording
@a            " replay the macro
@@            " replay the previous macro
20@a          " replay it 20 times
The trick to writing a robust macro is to make every motion repeatable from a known starting point. A common pattern: start each iteration by pressing 0 (line start) and end it with j (move to next line). That way replaying the macro on consecutive lines stays in sync.
7. Registers – a clipboard with thirty slots
Every yank and delete goes into a register. There is more than one:
""– the unnamed register (the default; last delete or yank)."a…"z– named registers, you fill these on purpose."0…"9– a yank/delete history."+and"*– the system clipboard (requires Vim built with+clipboard; check withvim --version | grep clipboard)."_– the black hole. Anything sent here vanishes; useful when you want to delete without overwriting the unnamed register.
Use them like this:
"ayy   " yank this line into register a
"ap    " paste from register a
"+yy   " yank to system clipboard
"+p    " paste from system clipboard
:reg   " inspect every register
Pro habit: when you are about to paste then immediately delete something else (which would clobber the clipboard), prefix the delete with "_ – e.g. "_dd deletes the line without touching your yanked text.
8. Marks – bookmarks across a file or project
ma     " set mark a at the cursor
'a     " jump to the line of mark a
`a     " jump to the exact position of mark a
Lowercase marks (a-z) are local to the buffer; uppercase marks (A-Z) are global and survive across files – very handy for “I’ll come back to this”.
A few special marks Vim sets for you:
` `– where you were before the last jump.`.– the last position you edited.`^– the last position you were in Insert mode.`"– where you were when you last closed this file.
9. Visual mode – and especially Visual Block
Three flavours:
v– character-wise selection.V– line-wise selection.Ctrl-v– block-wise (rectangular) selection. This is the killer feature.
Visual Block solves the “edit the same column on twenty lines” problem that requires regex or macros in most other editors:
Comment out 5 lines:    Ctrl-v  jjjj  I  #  Esc
Append ; to 10 lines:   Ctrl-v  9j    A  ;  Esc
Delete a column of 4:   Ctrl-v  jjj   d
The pattern is: enter block mode, extend the selection vertically, then press I (insert before block) or A (append after block), type once, press Esc, and Vim applies the change to every selected line.
10. Files, windows, splits, tabs
File operations (command-line mode)
| Command | Effect |
|---|---|
:w | write (save) |
:q | quit |
:wq / :x / ZZ | save and quit |
:q! | quit, discarding changes |
:e {file} | open a file |
:saveas {file} | save as |
:!cmd | shell out (e.g. :!ls, :!git status) |
Splits
| Command | Effect |
|---|---|
:sp {file} | horizontal split |
:vsp {file} | vertical split |
Ctrl-w h/j/k/l | move between splits |
Ctrl-w = | equalise sizes |
:close / :only | close current / close all but current |
Buffers vs windows vs tabs
This is the model people get wrong most often. Read it once, slowly:
| Concept | What it is | Commands |
|---|---|---|
| Buffer | a file loaded into memory | :ls, :b {name}, :bnext, :bprev |
| Window | a viewport showing one buffer | :split, :vsplit, Ctrl-w motions |
| Tab | a layout of windows | :tabnew, gt, gT |
A file is always a buffer the moment you open it, even if no window is currently showing it. Two windows can show the same buffer (great for looking at the top and bottom of a long file at once). Tabs are not “open files” like in a browser – they are saved layouts.
The swap file
If you open a file Vim is already editing somewhere else, or if Vim crashed, you’ll see a .swp warning. Vim is asking whether you want to recover the unsaved changes from the crash, or carry on regardless. If you don’t need the recovery, deleting the orphaned .swp file silences the warning:
find . -name ".*.swp" -delete
11. A minimal, safe .vimrc

Vim becomes comfortable once you set a handful of defaults. Don’t pile on plugins yet – start with this:
| |
Save it as ~/.vimrc and restart Vim. There is no daemon to reload – the file is read at startup.
If you use Neovim, the equivalent config lives at ~/.config/nvim/init.vim (or init.lua for the Lua version).
12. Common workflows – search/replace and multi-file editing
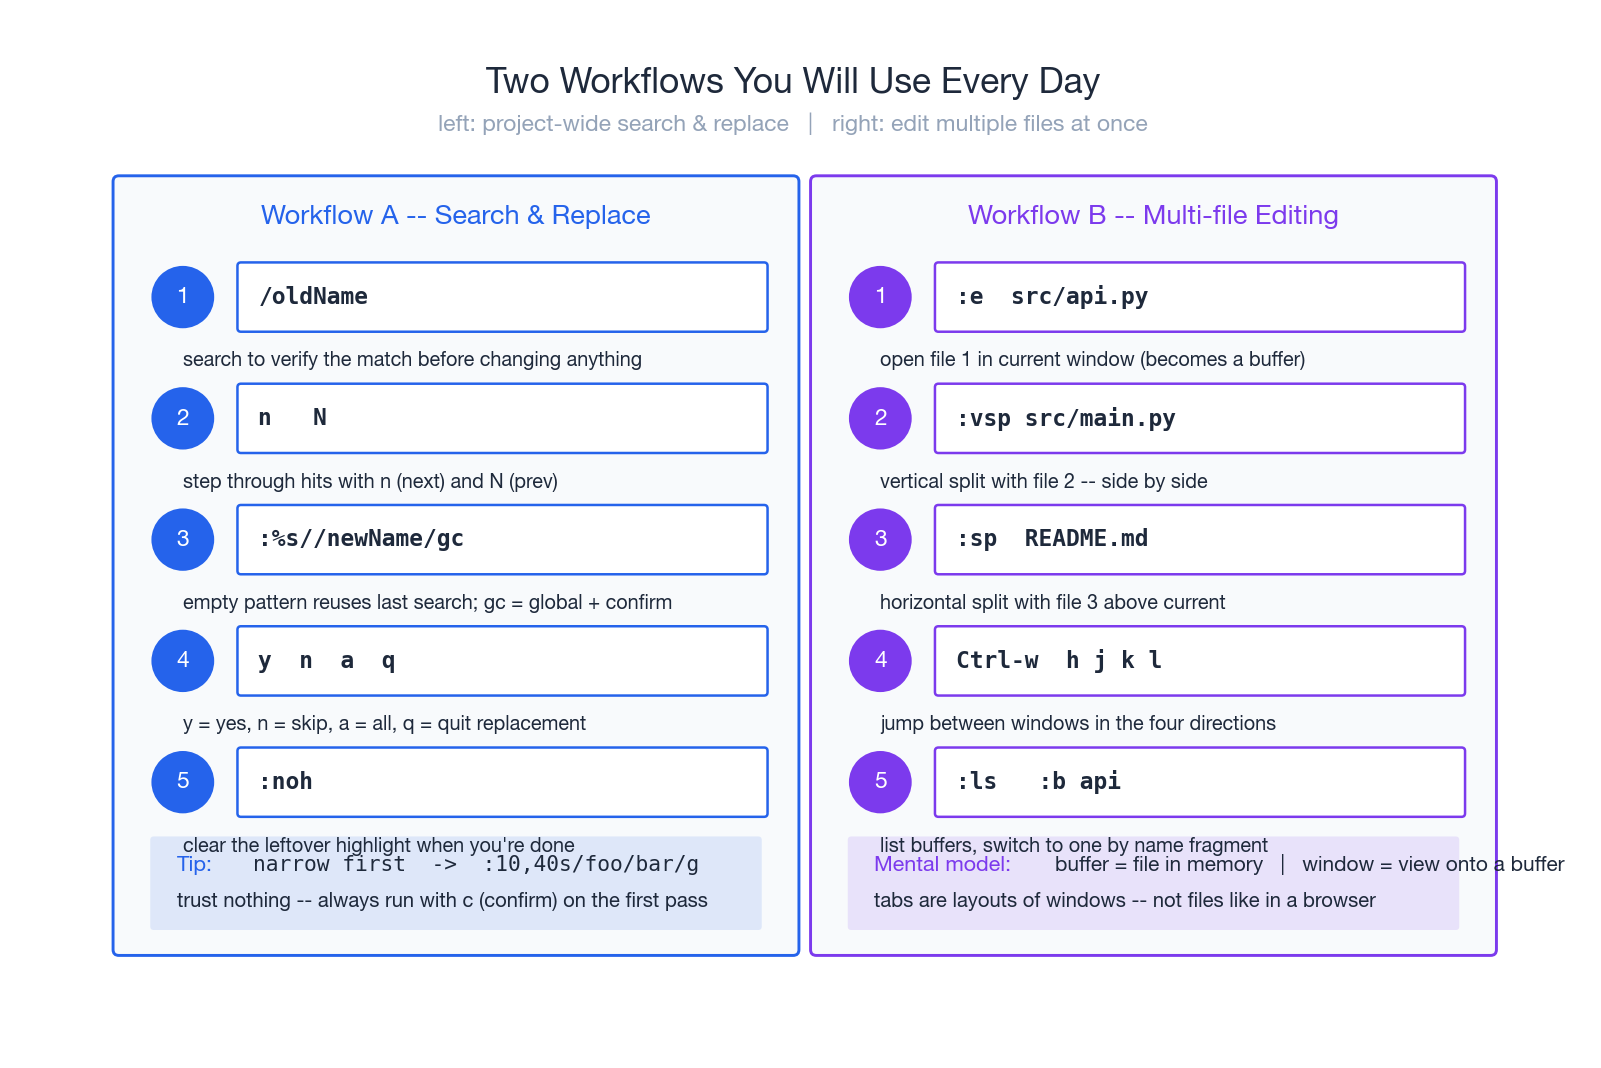
These two flows account for most of the time you’ll spend in Vim once you’ve got the basics. The figure walks you through both step by step; the recipes below are the same flows in plain text so you can copy and paste them while practicing.
Project-wide search and replace
/oldName             " step through hits to confirm
:%s//newName/gc      " '' reuses last search, c = confirm each
:noh                 " clear leftover highlight
Multi-file editing
:e src/api.py        " open file 1
:vsp src/main.py     " vertical split with file 2
:sp README.md        " horizontal split with file 3
Ctrl-w h/j/k/l       " jump between windows
:ls   :b api         " list buffers, switch by name fragment
13. Pitfalls and how to escape them
1. Pasted code is over-indented. Vim’s auto-indent re-indents each pasted line. Fix:
:set paste       " disable auto-indent
" ... paste ...
:set nopaste
Even better: "+p pastes from the system clipboard, which Vim treats as a single block.
2. Typing suddenly overwrites characters. You hit R (or your terminal’s Insert key) and entered Replace mode. Press Esc.
3. Swap file warning on every open. A previous Vim session didn’t exit cleanly. Delete the orphaned swap file (see section 10) or, in Neovim, run :checkhealth.
4. u doesn’t undo what you expect. Vim’s undo is a tree, not a stack. Use :earlier 5m / :later 30s to walk through edit history by time.
5. You can’t quit Vim. The famous problem. From any mode, press Esc to be safe in Normal mode, then type :q! and Enter to quit without saving, or :wq to save and quit.
14. Vim or Neovim?
Both are excellent. Decide on practical grounds:
- Stick with Vim if you mostly edit on remote servers and containers (Vim is preinstalled almost everywhere), or you don’t need LSP / modern plugin ecosystems.
- Switch to Neovim if you want built-in LSP (autocompletion, go-to-definition, diagnostics), a Lua config, async plugins, and a faster-moving community.
You can move between the two without re-learning – the editor commands are identical. Only the configuration and plugin layer differ.
15. A one-week deliberate-practice plan
You become fluent in Vim the same way you become fluent in any language: by forcing yourself to use it for a fixed period, even when you’re slower than usual.
Day 1-2 – only these keys. hjkl, w, b, 0, ^, $, dd, dw, ciw, /, :%s. Do all editing this way. You will be slow. That is the point.
Day 3-4 – add text objects. Force yourself to use ciw, ci", ci(, dap instead of selecting things by hand. This is where Vim starts feeling fast.
Day 5 – add macros. When you spot any repetition (more than three times), record a macro: qa … q … @a.
Day 6 – add splits and buffers. Stop opening multiple terminal tabs. Use :vsp, :sp, :b, Ctrl-w to navigate.
Day 7 – customise. Now edit .vimrc. Add the settings from section 11, then one or two personal mappings. Avoid plugins for at least another week.
After this week, the grammar will be in your fingers. From then on, every new “trick” you learn (a new motion, a new text object) just plugs into the grammar you already know.
Summary – ten principles
- Modes are your friend. Normal is home; Insert is a temporary detour.
- Think operator + motion.
d+w= delete word. Everything is a sentence. - Use text objects.
ciw,di",yipbeat manual selection every time. - Search first, then edit.
/foothencwis faster than scrolling. - Repeat with
.. For simple edits,.is the fastest one-key macro. - Record macros for complex repetition.
qa…q…20@a. - Master a few motions deeply.
w/b,0/$,gg/G,f{char},/,%cover most navigation. - Don’t over-customise early. Learn defaults first; add mappings later; add plugins last.
- Use buffers and splits instead of opening new terminal windows.
- Practice deliberately for one week. After that, Vim stops feeling hard and starts feeling fast.
Once the grammar lives in your fingers, Vim stops being a tool you “operate” and becomes a text-editing language you speak fluently.
Where to go next
vimtutor– run it in your terminal. Thirty minutes, built into Vim.- Practical Vim by Drew Neil – the best book for going from beginner to fluent.
- Vim Adventures – a browser game that teaches motions.
- Vim Golf – competitive minimum-keystroke puzzles; great for advanced tricks.